Showing posts with label vegetarian. Show all posts

Sunday, May 20, 2012

Comfort Ravioli Soup


Kris' band played in Corpus this weekend. It was super fun except for the fact that he was fighting allergies the whole time. He managed to shine it on though until this morning when it seemed to go into something else.

As I write this, I can tell I'm getting whatever he has. No wonder I was craving soup.

This soup is both comforting and out of the ordinary at the same time. The lime juice adds an unexpected brightness and the variety of vegetables keep things interesting. Of course you can use whatever you have on hand as far as the greens go, but this particular combination is my favorite.

Comfort Ravioli Soup
* Can be made vegetarian - just switch stock to vegetable stock.

Ingredients:
2-3 tablespoons canola or vegetable oil
1/2 cup chopped shallots or onion
4 cloves of garlic, chopped fine
plenty of kosher salt, for seasoning
2 carrots, sliced fairly thin
1 bay leaf
3 plum tomatoes
2 bunches Swiss Chard, rinsed well, pulled from the thick stems (discard them) and torn into pieces (not too small - about the size of a lady's palm as they will shrink when they cook)

5 1/2 cups low sodium chicken stock
juice of 1 healthy lime
lots of fresh grated nutmeg
good pinch red pepper flakes

1/2 cup drained cannellini beans
1 cup frozen lima beans
rind of parmesan (or sub 1/2 cup shredded parm)
1 package (9 oz) three cheese whole wheat pasta, such as Buitoni

Directions:
Heat the oil in a medium, heavy weight lidded dutch oven over medium heat. Add the shallots, season with a pinch of salt and cook until softened, about 4 minutes. Add in the garlic and cook, stirring often to keep it from burning - about 2 minutes. Add in the carrots (season with a pinch more salt) and bay leaf sauté for 4 minutes. Meanwhile, cut the tops off the tomatoes on the stem side. Hold each tomato over the sink, cut side down, and squeeze the seeds out. Then dice the tomatoes and add them to the carrots.

Cook the tomatoes just long enough to knock the newness off of them, about 3 minutes. Add in the Swiss Chard then pour in the chicken stock and lime juice giving a good stir. Place the lid on and turn the heat to high. Once it's boiling, remove the lid and stir in the nutmeg and red pepper flakes and another pinch of salt.

Let boil for another 2 minutes, then turn the heat to low and add in the cannellini and lima beans and the parmesan rind. Cover and let simmer on low for at least 30 minutes but preferably an hour. Stir every so often to make sure nothing's sticking to the bottom.

Remove the lid and stir in the pasta. Cover again and let simmer for 10 minutes until the pasta has cooked (and puffed.) Taste for seasoning, adding any salt and/or pepper or pepper flakes as needed.

Serve in big bowls with crusty bread alongside. Just make sure you don't eat the bay leaf. Discard if you can find it.

Friday, February 10, 2012

Roasted Veg Sammy


This is one of my favorite things to eat on earth. I basically grill up whatever vegetables I have in my fridge and throw 'em together in a big ole French bread bear hug. On a good day I have zuchinni, red bell pepper, eggplant and/or Portabella in my fridge. I slice them up, season with olive oil, salt and pepper and grill until tender and slightly charred. I then pile 'em all together onto toasted french bread slathered with goat cheese and add a final hit of salt, pepper and olive oil. Top it off with flat leaf parsley and/or basil and close the lid. Boomtown!

Sunday, January 1, 2012

Happy New Year Black Eyed Peas


Either I'm officially getting old or cream cheese can make me like just about anything. Happy New Year to you and yours!

Happy New Year Black Eyed Peas

Ingredients:
11 oz fresh black eyed peas
1-2 tablespoons olive oil, just enough to sauté onion in
1 medium sweet onion, chopped
2 cups fresh spinach, preferably not baby
2 tablespoons diced green chiles, from a can
3 oz cream cheese
2 tablespoons shredded parmesan cheese
salt and pepper to taste

How To:
Fill a medium pot with water and bring to a boil. Once boiling, add in black eyed peas. Return to a boil and boil until tender but not mushy, about 7 minutes. When ready, drain and set aside.

Meanwhile, add oil to a large rimmed sauté pan and put over medium heat. Once hot, add the onions and sauté until tender and translucent. Add the spinach, cooking for another minute or two until the spinach begins to wilt a bit. Next stir in the cream cheese and chiles, lowering the heat slightly and stirring until the cream cheese has melted into the onions. Add in the parmesan and black eyed peas, stirring well. Season with salt and pepper to taste and serve right away or at room temp.

Wednesday, November 9, 2011

Hummus Pizza with Kalamata, Feta and Basil


I made this a few weeks ago when Kris was out of town. That's about the only time I can get away with making a pizza covered in hummus. But that doesn't stop me from fantasizing about it. Night after night.

After night.

Hummus Pizza with Kalamata, Feta and Basil

Ingredients:
1 fresh pizza dough crust, rolled thin to about a 12x14 inch diameter
Small handful cornmeal or grits, optional
10 oz store bought hummus (I prefer Sonny & Joe's, found at Whole Foods) mixed with zest of 1 lemon
3 zuchinni cut into 1/4 inch dice (don't leave this out! The sweetness against the salty feta and kalamata MAKES it!)
1/2 teaspoon dried oregano
1/4 cup feta cheese
3 tablespoons roughly chopped kalamata olives (seeds removed)
Couple handfuls fresh basil

Directions:
Heat the oven to 350 then grease a large rimmed cookie sheet with nonstick spray. Add the diced zuchinni, drizzle with just enough oil to coat, season with salt and pepper and and roast at 375 for 35 min. Set aside while you prepare the rest.

Kick up the heat to 450 or 500, depending on what your instructions are for your particular pizza dough. Transfer the dough to a greased cookie sheet (I like to sprinkle some grits or cornmeal on the sheet before adding the dough onto it for texture and easier removal) and bake until the crust is just golden and beginning to brown at the edges. Remove from the oven and spread with the hummus/lemon zest mixture. Sprinkle the roasted zuchinni evenly over the top, then the oregano, feta and kalamata. Finish with fresh basil, cut and serve (add salt/pepper if desired.) Slice and serve.

Sunday, May 22, 2011

Individual Spinach and Basil Gratins


The one thing I will never understand about entertaining is having to cook while talking to people. I can't do it. I have terribly vivid nightmares (real, honest to God memories, actually) asking people to please leave me be in the kitchen for 5 minutes so I can 'get it together.' Martha Stewart I am not.

But recipes like this make me look like I have it together...simply because I make them ahead of time, refrigerate them (even a day before!) then just pop them in the oven when company arrives. This I can emanage while talking and enjoying a cocktail...

Spinach and Basil Gratin
* Serves 2 (recipe is easily doubled, if need be.)
* Corn makes an amazing addition to this if desired. Just stir in 1/2 a cup of thawed frozen corn or fresh corn cut off the cob before you stir in the cheese.

Ingredients:
1 tablespoon butter
1 cup thinly sliced shallots (about 4 golf ball sized shallots, peeled and halved lengthwise then cut along the diagonal into 1/8 inch thick slices)
pinch salt and pepper
1 garlic clove, finely minced (or can sub a few shakes dried garlic powder)
hefty grating of fresh nutmeg
1/4 cup brandy
4 cups packed fresh basil leaves
2-3 sprigs fresh thyme leaves, leaves removed
1/4 cup half and half
1/2 cup shredded parmesan, plus extra for topping
1/2 cup corn, optional
pinch red pepper flakes
1/8 teaspoon kosher salt (or 1/4 teaspoon, if you like things on the salty side)
2 tablespoons seasoned Italian bread crumbs

Directions:
Preheat oven to 350, if making right away.

Heat the butter in a medium nonstick lidded skillet over medium heat. Add the shallots along with a pinch of salt and pepper and saute until softened, about 4 minutes. Add the garlic and cook until softened, about 2 minutes more. Add the nutmeg and stir in, then add the brandy. Bring the mixture up to a boil over high heat and boil until the brandy has evaporated. Lower the heat to medium low and stir in the spinach leaves. Put the top on and cover for 1 minute so that the spinach wilts. Once wilted, stir in the basil and thyme, half and half, parmesan, corn if adding, red pepper flakes, and additional salt. Reduce heat to low and stir until cheese has melted and all is well blended. Set aside.

Meanwhile, grease 2 4"x4" ramekins with nonstick spray. Evenly distribute the spinach/basil gratin between them, then put the bread crumbs over the top along with the desired amount of additional parmesan. At this point you can either let them cool for 30 minutes before covering and refrigerating overnight or bake off right away.

To bake, put in a 350 oven for 20/25 minutes until bubbling. Kick heat up to broil and cook for 2-3 minutes, just until cheese/breadcrumb topping begins to turn golden brown. Cool for 5 minutes before serving.

Monday, May 9, 2011

Farrotto. Purely simply fabulous.


Happy Meatless Monday y'all! I have to admit, I haven't posted a Meatless Monday recipe before because we eat a LOT of meatless meals and not just on Mondays (I like to see how many in a row I can get away with before Kris complains.)

Farrotto is simply farro (whole grains of wheat) cooked risotto style. What I love about it is it's healthier than traditional risotto yet heartier at the same time. You can eat it as a meal without the guilt of ducking into a bowl of creamy rice (or at least I believe you can.) And as an extra bonus, you don't need to heat the chicken stock before adding it throughout the cooking process. You can pour it straight from your measuring cup or from the box, as I do;)

Feel free to sub roasted butternut squash for the acorn squash. I'm telling you - there's something bizarrely amazing about the natural sweetness of roasted squash with the subtle roundness of maple syrup a with the salty kick of gorgonzola. I know it sounds weird if you've never tried it in a savory context but I promise you it's not.

PS animal lovers - you can make this completely vegetarian if you sub veggie stock for the chicken stock.

Farrotto with Lovely, Lovely Things
Serves 6.

Ingredients:
2 teaspoons olive oil
1/2 sweet onion, chopped
2 cloves garlic, minced
salt and pepper
1/4 cup dry white wine
1 cup Farro
2 1/2-3 cups low sodium chicken stock
olive oil
1 acorn squash, peeled, cut in half and seeds removed
3/4 cup cherry tomatoes
1 cup thawed frozen corn
1/4 cup black beans, rinsed and drained
1/3 cup gorgonzola plus extra for garnish
2 tablespoons maple syrup
fresh cracked pepper and salt to taste
1/3 cup chopped fresh basil, plus more for garnish

Directions:
Preheat the oven to 400.

In a medium/large dutch oven, heat the olive oil over medium heat for 2 minutes. Add the onions and saute for 4 minutes stirring occasionally. Add the garlic and saute 2 more minutes until onions are completely translucent. Season with a bit of salt and pepper, then bring the heat to high and add the white wine. Stir constantly as the wine evaporates and bubbles - 2 or so minutes. Once mostly evaporated, stir in the farro and reduce heat back to medium. Stir constantly for 2 minutes, then add in a half a cup of chicken stock, stirring in. Let softly simmer, stirring occasionally, until mostly evaporated (soaked up by the farro) before adding another half cup. Continue this process until the farro is to the risotto-style consistency you like (start checking the consistency after you've added a little over 2 cups.) If you happen to run out of stock and need more, you can add water. Like the mom says in Friday - 'It won't hurt.'

Meanwhile, cut the halved squash into quarters, then into eights. Turn the sections sideways and cut them crosswise into thin, 1/8 inch thick pieces. Grease an aluminum-lined large baking sheet with nonstick spray and add the squash pieces, evenly distributing them. Drizzle with olive oil just to coat, add in the cherry tomatoes and toss all to lightly coat with oil before patting back down to get them all spread out again. Season with salt and pepper and roast for 16 minutes. Turn over with a spatula and roast another 8 minutes or so until nice and caramelized, but not blackened. Remove and add into the farrotto (once it's to the consistency that you like.)

Gently stir in the corn, black beans, maple syrup, pinch salt and pepper, gorgonzola and basil. Taste for salt and pepper and make any adjustments necessary (I actually like a lot of pepper with this and I'm not a pepper person.) Serve in deep bowls, garnished with additional gorgonzola and basil.

Monday, March 21, 2011

Creamy Roasted Tomato Soup (without a drop of cream!)


Can I tell you about the time I fell in love with tomato soup? I was in college having lunch with my sister at La Madeleine (fancy!) and I ordered a mug of their tomato soup and Caesar salad thinking I was being virtuous. I can't remember what we talked about. All I can remember is the damn soup. It literally drowned out everything around me. I was in a bubble and it was peaceful and warm and I never wanted to leave it.

But eventually, we had to leave and as we approached the exit I spotted some of the delicious soup for sale. In jars. With the calorie count on them. Turns out, there were about three gallons of heavy cream in each 1/2 cup serving. Don't ask me to do the math - I'm an advertising dork not a scientist - but trust me it was something crazy like that. I have it in my head that it was 60 grams of fat per serving. In other words I could've eaten an entire deep fried chicken or grazed my way through the Texas State Fair for less calories. And it had been soup.

Tomato soup was an evil dirty whore. She'd lied to me with her fresh pink color and visions of spending entire summers in a bikini. From then on I avoided it like the plague. Okay I lied. I got over my phobia eventually. When I was sick I ate Campbell's Tomato with my grilled cheese (not bad) and occasionally whipped up some various chef recipes (Giada's Tomato, Rosemary, and White Bean...divine.) But none were of the creamy variety. I had been scarred.

Until now. My dears - let me introduce you to a creamy, luscious tomato soup without a drop of cream in it. Again I'm not a scientist. I can't tell you why it tastes so naughty and rich and cream-laden. Maybe it's from roasting the tomatoes or the addition of fennel which incredibly doesn't make it licorice-y. But I'll be honest. I don't want to know.

I just want to eat it.

Creamy Roasted Tomato Soup (without a drop of cream!)

Ingredients:
3 pounds vine-ripened tomatoes, cut in half crosswise and scooped free of seeds and watery pulp
2-3 tablespoons olive oil
salt and pepper
1 medium head fennel
3 tablespoons butter
1/2 cup chopped shallots
1 carrot, chopped
1 peeled, whole garlic clove, lightly smashed
4 cups low sodium chicken broth, divided
1 sachet of fresh herbs (a handful each of flat leaf parsley, cilantro, and basil tied together in cheese cloth)

Instructions:
Preheat the oven to 400 degrees. Spray a large, rimmed baking sheet with nonstick spray and set your tomato halves on it, cut side up. Drizzle over enough olive oil to coat them, using your fingers or a pastry brush to spread the oil over each one. Flip them to cut side down, smear any leftover oil over the tops and sprinkle lightly with salt and pepper.

Bake the tomatoes for about 40-45 minutes until the tops are just beginning to blacken a little and the tomatoes have shrunk. Set aside.

While the tomatoes roast, trim the stalks off your fennel bulb, peel away the outer layer and remove the bulb base then chop. Add the 3 tablespoons of butter to a large dutch oven and bring over medium heat. Once just melted, add the shallots, carrot, garlic, and fennel. Season lightly with pepper (hold off on the salt for now) and saute until softened, about 12-15 minutes. Be careful not to let the vegetables burn or the butter brown. Once softened, add 2 cups of the chicken broth and the herb sachet.

Reduce heat to a low simmer and let gently bubble away, partially covered, for 30 minutes. Remove from the heat and retrieve the sachet, squeezing once cool enough to handle to get all the juice and herby flavor out. Discard the sachet then add your tomato halves and any juice collected in the pan to the pot. Let cool slightly before blending.

To blend, add in batches to a blender or all at once to a food processor and process until nice and smooth, being sure to scrape down any strays from the sides as necessary. Return to the dutch oven and put over low heat. Gently stir in 1 cup of the chicken stock, and then use your judgement wether you want to add more or not once well stirred - just depends on how thick or thin you like your soup.

Taste for salt and pepper, adding any more if need be. ONE WORD OF CAUTION - if you're making the soup for another day and going to refrigerate it - maybe hold off adding more salt as the soup will continue to 'develop' in the fridge. By the time it's reheated - it might be saltier than you think it is.

Serve garnished with fresh herbs, if desired.

Tuesday, March 15, 2011

SXSW, Giada's Turkey Meatloaf, and Roasted Vidalia Onion and Carrot Salad with Dill Dressing


I am so sorry I have been MIA with my posts and comments lately. I have been busy attending SXSW - my first time ever even though I'm from here...practically.

Anyway I am so thrilled to report back to you with what I've seen, heard, and learned. I even went to a blog panel with Molly Wizenberg of the famous blog Orangette and book, A Homemade Life. But as sexy as SXSW sounds - it's exhausting and at times actually painful. Especially when you're nearing your mid thirties and your best night imaginable involves dinner at home and being asleep by 11:30. The point is - tonight was my first evening of respite from all of the festivities and I took full advantage and made dinner at home ( know - I'm crazy!)

I may be over biased based on the past few nights in a row of eating Taco Cabana at 1 am (nothing wrong with that...if you're 20) but this dinner will go down in history as one of my all time favorites on earth. It made me grateful to have taste buds. In fact I'm drooling now just thinking about it even though I only finished it two hours ago.

The meatloaf recipe was courtesy of Giada DeLaurentiis. How bizare is it that my two favorite meatloaf recipes on earth come from a woman famous for Italian cuisine (the other is her lamb meatloaf.) This meatloaf has nothing in common with the other recipe aside from sundried tomatoes (I.E it has everything in common, if you're a sundried tomato fan.)

Anyway as you make the meatloaf you will think to yourself - 1/4 cup olive oil? Really? But you will carry on with the hope that the recipe was created by a famous person and printed in a danged book for Christ's sake and therefore must be accurate. But later when you check on it in the oven you will look at the liquidy mess and say I knew it - it was a damn typo!

But then you'll finish cooking it, having no other choice at this point, let it cool, and notice that the drippy mess has somehow transformed into a beautiful 'loaf'. And then you taste it and realize - that bobble headed beauty knows her stuff! It's downright dreamy. Rich and complex with the feta and sundrieds yet light and clean at the same time. One of my favorite all time recipes...but again...did I tell you how I felt about sundried tomatoes? Or that I have been binge drinking for the past five (seven) days?

Turkey Meatloaf with Feta and Sundried Tomatoes
* Lightly adapted from Giada DeLaurentiis

Ingredients:
Vegetable cooking spray
1/2 cup Italian seasoned bread crumbs
1/3 cup chopped fresh flat-leaf parsley
1/3 cup chopped sun-dried tomatoes packed in oil and drained well
2 cloves garlic, minced
2 eggs, at room temperature, lightly beaten
1/4 cup olive oil
zest of 1 lemon
1/2 cup crumbled feta cheese
1 teaspoon kosher salt (you may use less if you're salt sensitive or if using plain bread crumbs)
1/2 teaspoon freshly ground black pepper
1 package lean ground turkey (usually about 1.1 pounds)

Directions:
Place an oven rack in the center of the oven. Preheat the oven to 375 degrees F.

Spray a 9 by 5-inch loaf pan with cooking spray.

In a large bowl, stir together the bread crumbs, parsley, sun-dried tomatoes, garlic, eggs, olive oil, lemon zest feta, salt, and pepper. Add the turkey and gently stir to combine, being careful not to overwork the meat.

Carefully pack the meat mixture into the prepared pan and bake until the internal temperature registers 165 degrees F on an instant-read thermometer and/or it looks 'set' and no longer a liquid-y mess, about 50 minutes. Remove from the oven and let rest for 5 minutes. Transfer to a cutting board and slice. Put on a serving platter and serve with or over roasted carrot and vidalia salad with dill dressing, below.

Mustard Dill Dressing for Roasted Carrot and Vidalia salad:

Dressing:
3 tablespoons Dijon mustard
2 tablespoons white-wine vinegar
1 tablespoon water
1 tablespoon sugar
3/4 teaspoon salt
1/3 cup olive oil
3 tablespoons finely chopped fresh dill
pinch fresh cracked pepper

Combine all ingredients into a glass jar or other and shake until emulsified.

Salad Components/Instructions:
2 Vidalia onions and 4 carrots, sliced into thick slices, tossed with olive oil, salt and pepper and roasted at 375 for 45 minutes, turning over halfway.
2 cups Romaine lettuce or other type lettuce, for salad

* Toss lettuce leaves with salt, pepper and dill dressing. Top with roasted carrots and onions.

Tuesday, February 8, 2011

Spicy and Sweet Eggplant Stir Fry


This is so easy and simple, it's become a go to at our house. To make it a meal, I first fry up a couple of cubed chicken breasts in the pan, remove and set them to the side while I cook the veggies, then add the chicken back in to warm through just before serving. You could do the same with tofu. Just serve it over some rice and you're done.

Don't forget to enter the $55 CSN giveaway on this post!

Spicy and Sweet Eggplant Stir Fry
* Adapted from Epicurious
* You can add or subsitute mushrooms for the eggplant if you like.

Ingredients:
2 Japanese eggplants, tops trimmed, halved lengthwise, then cut diagonally into 1/2-inch thick slices
1 red bell pepper, cored and seeded, cut into 1/2 inch chunks
2 smashed and peeled garlic cloves
pinch kosher salt
2 tablespoons mirin (Japanese sweet rice wine)
2 tablespoons soy sauce
1/2 teaspoon finely grated peeled ginger (use a Microplane)
1/8 teaspoon Chinese Five Spice powder, or coriander
3 tablespoons vegetable oil
2-3 tablespoons finely chopped chives, plus extra

Directions:
Add the oil to a wok or large rimmed nonstick pan and let heat through over medium heat.

Add the eggplant, bell pepper, and garlic. Season with a pinch of kosher salt and cook, stirring often, for about 15-18 minutes or until the eggplant has begun to lose its shape and cook through and the bell pepper has started to brown and caramelize a little at the edges.

Meanwhile, stir together the mirin, soy sauce, ginger, and five spice powder. When the vegetables are thoroughly cooked, add the mirin mixture and green onions to the pan and stir for about a minute, until the sauce becomes a glaze and eggplant is browned and tender.

Serve over rice with additional fresh chives.

Wednesday, December 29, 2010

Savory Double Cheese Crackers a.k.a. What to drink with your Champagne on NYE


Actually these crackers are good with just about anything to drink from Coca Cola to milk, though my sister would like to cast her vote for red wine. We like our ripple, what can I say?

But the real beauty to these is that you can make them ahead, keep a log in your fridge for up to three weeks and slice and bake when needed. Because there's no egg in the dough, you're good to go. You can also bake them off and freeze them and then just reheat in a low oven. But I can't imagine there being any left to freeze once you've baked them. As soon as that savory cheddary goodness hits the air waves in my house, it's game over.

Although Rebecca suggests using your mixer to put these together, you can also use a good old wooden spoon and large bowl. Just be sure your butter is at room temp and to cream it thoroughly with the cheese before adding the rest of the ingredients. My little Kitchen Aid struggled a bit (the dough gets very stiff) so I ended up dumping everything into a large bowl and finishing mixing them by hand. You'll appreciate having done the arm exercise afterwards, trust me.

So what apps are you making for NYE and what are your plans?

Savory Double Cheese Crackers
* Adapted from Rebecca Rather
* Don't slice these too thin or they won't come out 'crackery'. Remember they won't rise much so what you cut is what you'll end up with when they come out.
* If I were you, I'd double the recipe since it keeps so well:)

Ingredients:
1 stick (1/2 cup) unsalted butter, at room temp
2 cups freshly grated extra sharp Cheddar cheese (about 8 oz)
1 cup grated Parmesan or Manchego (about 4 oz)
1 cup all purpose flour (use a light hand when measuring or sift the flour first)
1/4 teaspoon table salt plus a healthy pinch
1/4 teaspoon cayenne pepper
3/4 teaspoon mustard powder (I prefer Coleman's brand)
1/4 teaspoon paprika
1/2 cup chopped toasted pecans or walnuts

Directions:
Using an electric mixer with the paddle attachment, beat the butter and cheeses on medium speed until combined, about 1 minute. Add the flour, salt and cayenne pepper, dried mustard and paprika and beat on low speed until combined. Stir in the pecans or walnuts. Divide the dough in half; shape each half into a roll about 2 inches in diameter and 8 to 10 inches long. Wrap in wax paper and chill for at least 4 hours or overnight.

Preheat the oven to 350 F. Grease baking sheets with butter or cooking spray or line with silicone liners. Unwrap the dough and slice into scant 1/4-inch rounds. Place the rounds on the prepared baking sheets about ½ inch apart. Bake until the cookies are lightly browned around the edges and crisp, about 10 minutes.

Tuesday, December 28, 2010

Meaty yet Meatless Pasta with Parmesan and Pine Nuts


Well it's almost that time of year again. The time of year that makes me want to hide in the closet with a pack of Oreos (I keep some there for emergencies next to a box of unfortunate looking boots I bought one night while sipping and clicking online...)

Anyway, you know the time of year I'm talking about - the dreaded penance time for all the celebrating we've been doing. That said, I rarely manage to do any serious boot camping or calorie counting after the holidays. Instead I like to tell myself that eating more veg and less sweets makes for a saner, more realistic approach. So I dig through my archives and pull out recipes like this one - an oldie but a goodie from Giada.

I have to admit on the surface it's a pasta only a mother could love. The color is a bit like wet clay and there's not much you can do to dress it up. But it's (reasonably) healthy, fairly quick, and so easy a caveman could do it. Plus it's got a feisty little kick to it which I love. The last thing I'll say about it is even though it has eggplant in the sauce, non eggplant lovers would never know it's there. The overall taste is undefinable yet delicious. Rich and hearty like a meat sauce yet much, much lighter.

Me likey.

PS - the beautiful bowl above was a Christmas gift from my mom and stepdad. It's so beautiful I want to curl up and sleep in it!

Meaty yet Meatless Pasta with Parmesan and Pine Nuts
*Use more eggplant than you think is necessary. For instance I used 3 large (long, rather) Japanese eggplant thinking it would be WAY too much and it wasn't. A good rule of thumb is to take out your largest roasting pan and load it up.
* Don't forget to reserve as much pasta water as the recipe says - you'd be surprised by how thick the veggie mixture can get.

Ingredients:
1 large regular eggplant, cut into 1-inch cubes (or 3-4 long thin, Japanese style eggplant)
1 pint cherry tomatoes
1 clove of garlic, whole but peeled
3 tablespoons olive oil
1 teaspoon salt
1 teaspoon freshly ground black pepper
1/4 teaspoon red pepper flakes, plus extra for sprinkling over
1/4 cup toasted pine nuts
1 pound rigatoni pasta or spiral or penne pasta
small handful of fresh basil leaves
3 tablespoons lemon flavored olive oil (if you don't have any use regular extra virgin olive oil and add in the zest of a whole lemon)
3/4 cup grated Parmesan, plus extra for sprinkling over each portion

Directions:
Preheat the oven to 400 degrees F. Line a large baking sheet with parchment paper (you don't have to do this - just helps with cleanup.)

In a large bowl combine the eggplant, cherry tomatoes, garlic, olive oil, salt, pepper, and red pepper flakes. Spread the vegetables out in an even layer on the baking sheet. Roast in the oven until the vegetables are tender and the eggplant is golden but not charred, about 35 minutes.

While the vegetables are roasting, place the pine nuts in a small baking dish. Place in the oven on the rack below the vegetables. Roast until golden, about 4 minutes. Remove from the oven and reserve.

Meanwhile, bring a large pot of salted water to a boil over high heat. Add the pasta and cook until tender but still firm to the bite, stirring occasionally, about 8 to 10 minutes. Drain pasta into a large bowl and reserve 1 1/2 cups of the cooking liquid.

Transfer the roasted vegetables to a food processor. Add the basil and lemon extra-virgin olive oil (or plain EV olive oil and lemon zest if substituting.) Puree the vegetables.

Transfer the pureed vegetables to the bowl with the pasta and add the Parmesan. Stir to combine, adding the pasta cooking liquid 1/2 cup at a time until the pasta is saucy. Sprinkle the pine nuts over the top and serve along with any additional parm you like and/or freshly torn basil

Monday, September 27, 2010

Autumnal Penne with Swiss Chard and Butternut Squash


Every fall when the temperature drops and everyone begins to crave meaty roasts and thick hearty stews, I crave the very thing I have just eaten all summer long - pasta. Yet while the pastas I make in the summer time are light and perky filled with basil, tomatoes, and corn, I prefer my 'fall' pasta to reflect the cozier, comforting vibe of the new season.

So every year like clock work, my first fall pasta starts with a massive tray of roasted cubed butternut squash that gets chucked into the cooked pasta along with plenty of olive oil and other autumn veggies. This year I tried adding Swiss Chard for the first time with great success. Chard is a heartier green than spinach or arugula with a bit more bite (just look at the color of the spine on that chard! I have a recurring dream about hunting for a prom dress that color and probably will until the day I die.) Anyway between the squash, chard, Parmesan and toasted walnuts I didn't feel the need for any meat at all. Just a nice warm fire and a heaping glass of cheek-warming red wine.

What are some of your fall recipe traditions?

Autumnal Penne with Swiss Chard and Butternut Squash

Time saving tips:
* Use a big, lidded pot to boil the chard in. As soon as its cooked for a few minutes and drained, dump the water and refill the pot to boil the pasta in. Once the pasta's cooked, drain it and put it back in the same pot so you can mix the rest of the ingredients in.
* Line a large roasting tray with aluminum foil to roast your squash on so there's no need to wash it later (you just have to dispose of the aluminum.)
* You can bake the squash a good hour or two ahead of time and let sit at room temperature as well as the Swiss chard.
* You can skip the step of shocking the chard if you're short on time - it won't have as much texture but will still be good.

Ingredients:
1 box (13.25 oz) whole wheat or regular penne
olive oil (preferably lemon infused) and plenty of it
1 bunch of Swiss chard, leaves removed from tough stems, cut or torn into large bite sized chunks
3 cups butternut squash, cut into 3/4 inch chunks
pinch red pepper flakes
1/3 cup Parmesan
fresh nutmeg
lots of fresh cracked black pepper
lots of sea or kosher salt
1 1/2 teaspoons fresh thyme leaves, or slightly less if using dried thyme
1/3 cup toasted walnut pieces
goat cheese, to taste

Directions:
Preheat the oven to 375 and line a large rimmed baking sheet with aluminum foil. Add the cubed butternut squash to the pan and drizzle a good tablespoon or so of olive oil over them. Toss with your hands (they work best) to be sure each piece is coated then sprinkle with a good pinch or two of kosher or sea salt, a pinch of red pepper flakes, some black pepper and toss again. Put in the oven for 20-25 minutes until the sides touching the pan begin to brown. Carefully flip to the other side with a spatula and roast for another 20 or so minutes until they're nice and golden. Remove and set aside.

Meanwhile heat a large, rimmed pot full of water over high heat. At the same time, prepare an ice bath in another bowl and have a spider or strainer nearby. Once boiling, add a handful of salt and stir through then add the chard using your spoon to make sure each leaf is immersed. Cook for two minutes then use your spider to drain and transfer immediately to the ice bath to shock it. Let sit in the ice water for a couple minutes then remove straining again (thoroughly) and transfer to a holding plate or bowl.

Immediately dump the old chard water out, refill with fresh water, and put over high heat again to bring to a boil. Once boiling, add another handful of salt, let come back to a boil and add the penne. Cook for 6 minutes or just until al dente and drain.

Put the drained pasta back into the pot and drizzle with about a half tablespoon (or more) of the lemon olive oil (if you don't have lemon olive oil then you can add in the zest of one lemon.) Stir well then add in the Parmesan and a good bit of fresh cracked pepper and stir again. Add in the chard breaking it up as it clumps together once cooked and stir again. Season with a good bit of fresh grated nutmeg, another good pinch of salt, and the thyme leaves. Finally add in the cooked squash and toasted walnut pieces stirring in gently.

Serve in big bowls with a slice of creamy goat cheese dropped in the center (or more Parmesan for goat cheese haters) with a final sprinkling of sea salt over the top.

Sunday, June 20, 2010

Heirloom Tomato Stacks with Whipped Ricotta and Pesto Oil


This is the ironic T shirt of salads. Two slices of the ripest, heaviest heirlooms you can get your hands on sandwiched between ricotta and goat cheese. Top the whole thing off with a little pesto oil and you're done (by the way this salad is kind of like Kathy Lee Gifford - it's prettier in person.)

Giada makes something similar with all goat cheese and heavy cream. I prefer the texture and lightness of ricotta, beat around a little with a fork with just a little goat cheese and lemon zest thrown in for interest. The only problem with eating this 'salad' is how much white wine I tend to drink with it. Those two are damn good friends.

Zesty Heirloom Tomatoes with Ricotta and Pesto Oil

Ingredients:
2 heirloom tomatoes, preferably large and different colors/varietals
3/4 cup part skim ricotta cheese
2 tablespoons goat cheese
zest of 1 lemon
pinch of kosher or sea salt
1 tablespoon prepared pesto (I prefer Cibo brand)
2 tablespoons extra virgin olive oil
black pepper
kosher or sea salt

Instructions:
Set the ricotta and goat cheese out for 20 minutes or so to let soften. Place in a small bowl and stir in the majority of the lemon zest with a fork, leaving a pinch of zest to stir into your oil mixture (don't let it sit too long or it will dry out.) Add a pinch of salt and pepper, stir again and set aside.

In a separate coffee cup or small bowl, combine the pesto, oil, and last bit of lemon zest. Set aside while you cut your tomatoes into thick (about a half inch) slices. Place the widest slice on the bottom of your serving plates. Season oh so lightly with salt and pepper then spoon some of the cheese mixture over the slice. Place a smaller slice (ideally from a different colored tomato) over the cheese, putting a little more (a spoonful) on top. Drizzle with the pesto oil and serve immediately. You can top with a teensy bit more of salt and pepper if desired.

Tuesday, June 15, 2010

Summery Corn Chowder with Coriander


Corn hating makes me sad. Yes it may be partially responsible for the fattening of America (corn syrup) but it's also the most summery vegetable of them all. The two go hand in hand. It's even the color of summer. And in my opinion, a barbecue isn't a barbecue without a cilantro-buttered cob or two.

This soup is further proof that cilantro and corn were meant to be together. It's creamy (yikes! I hate that word! I must need coffee...), slightly sweet, and spicy all at the same time. I could eat it by the bucket full, even at the risk of being described as 'corn fed'.

PS - this soup gets better as it sits in the fridge. I suggest making it the day before a dinner party then reheating it to serve as a first course.

Creamy Corn Chowder with Cilantro and Cayenne
* Can be made vegetarian if you sub vegetable stock for the chicken stock.
* Yes I used frozen corn instead of fresh b/c I was in a hurry. Feel free to cut the kernels off two fresh cobs as a replacement.

Ingredients:
1 tablespoon butter
dash olive oil
1 small/medium Vidalia or Spanish onion, chopped
1 small/medium yellow squash, chopped into smallish dice
pinch salt
pinch white pepper
1/2 teaspoon coriander
1/4 teaspoon cayenne
1/4 teaspoon cumin
1 large garlic clove, or 2 small minced
1 (10 oz) package frozen corn kernels, thawed
1 1/2 cups low sodium chicken stock
2 green onions, rinsed and cut in half

1/3 cup half and half
extra dash of white pepper

Instructions:
Heat the olive oil and butter in a dutch oven (large, heavy lidded pot) over medium heat. Add the onion and cook for about 3 minutes, seasoning with a pinch of salt and pepper, until it's begun to soften. Add in the squash and season with the coriander, cayenne (you can add more if you're a heat addict), and cumin. Saute, stirring often, for about 5 minutes.

Stir in the garlic and saute another 2 minutes. At this point, if any of the onions or veg don't look completely soft and cooked through, put the lid on to speed things up leaving it on for a few minutes. Add in the corn, stock and green onions and bring to a boil over high heat. Let boil for about a minute, then lower the heat and simmer for 10 minutes on low.

Kill the heat and let cool for a few minutes. Remove the green onions and discard, then use an immersion blender to blend everything up and make it smooth. Stir in the half and half and a dash more white pepper and serve garnished with chopped fresh jalapeno and cilantro leaves.

Oh Pioneer Woman - please forgive me.


Remember how I told you I followed the recipes to a "T" for the homemade pizza dough smackdown for the sake of keeping things fair and square? Well I did...up until the baking part for the Pioneer Woman's dough.

For some reason I felt possessed to cook Ree's on a pizza stone versus the baking sheet like she advises in her book. I don't know why I did this. Actually I do know why. I was suffering from a bad case of over confidence since Rebecca's dough had slipped off the peel so easily like an Ambien-infused supermodel. Over confidence does not belong in the kitchen. It can cause house fires, personal injury, and epic spousal eruptions (once after I cut my finger slicing fresh mozzarella I looked at my husband and screamed 'F@*k! I HATE cooking!!' The poor guy hadn't done anything but breathe yet he fell victim to my wrath.)

So there I was the other night assembling a pizza which had rolled out easily enough right onto the peel. Only when I went to move it, there was trouble. That pizza wasn't going anywhere. I put it in the fridge for a few minutes thinking this would help. It did but not much. At this point I should have realized this was bad-idea.com and used the baking sheet. But that would have made too much sense so instead I messily transferred it onto a slip of parchment paper scattered with cornmeal. This will do it, I thought, and even if it doesn't I can just put the parchment right onto the stone. After all parchment is meant for baking. Right?

Sure enough, I tried slipping it off the parchment and onto the stone to no avail. That pizza was like an old school breast implant - it wasn't going anywhere without surgery. Moving onto my backup plan (patting myself on the back while doing so) I put the whole kit and kaboodle onto the preheated stone and shut the door.

It took about two seconds for the smoke to begin billowing around inside the oven. It seemed like it took me no less than 45 years to lunge for my oven mitts and rip the door back open to retrieve this inferno-in-waiting. Since it literally had been in there for mere seconds I thought I could use my spatula to get it off the parchment safely onto a baking sheet. Nope. That pizza had already devotedly welded itself onto the paper.

Any normal person would have chucked the whole thing into the garbage but I was out of cheese and I've told you before how I feel about going to my local grocery store (I've actually been screamed at by one of the checkers for asking if the raspberries were on sale. She also threw a pencil across the register at me but that's another story) so I wasn't about to give up now.

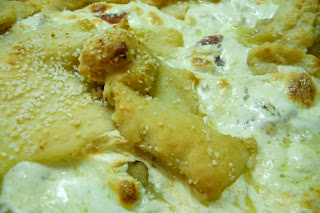
I picked it up like it was a wet cat and flipped it over onto the baking sheet. In the process it kind of fell over on itself in a goopy mess - the majority of it thankfully parting ways from the paper. I almost started to cry seeing the carefully hand sliced salami and fresh mozzarella recklessly piled within the gooey mess. And then I realized something. It kind of looked like a calzone (actually more like a pizza cobbler - or even like a half-developed alien embryo...just see above picture.) But if I told Kris I had intended to make a calzone he just might buy it...

But he was onto me.

"What is that?" he asked (rudely I might add) when I pulled it from the oven.

"A calzone..." I said as if it was the most obvious given on earth like rain or grass or babies.

He looked anything but psyched as he tried the first bite. But he ate it then another and another. And so did I. In fact we couldn't stop eating it and as we did, I couldn't help but think something that made just about negative sense. This dough is better than Rebecca's! Even cooked incorrectly and flung around and reshaped and cooked again it had that complex, yeasty flavor I had been looking for. It was delicious. Addictive, even.

Despite all the odds - Ree won the pizza smackdown!

I will say that her dough isn't as easy to work with as Rebecca's - it's wetter and will stick so you can't have it out of the fridge for too long before you're ready to bake it (nor can you use hers on a pizza stone) but if you age it for a couple of days like she says to it's hard to beat. I want some right now.

Well done Pioneer Woman! You wrangled the hell out of that pizza dough!

The Pioneer Woman's Pizza Dough

1 teaspoon or 1/2 packet active dry yeast
4 cups all purpose flour
1 teaspoon kosher salt
1/3 cup extra virgin olive oil, plus more for drizzling

1. Pour 1 1/2 cups warm water into a bowl. Sprinkle the yeast over the water.
2. Combine the flour and salt in a mixing bowl.
3. With an electric mixer on low speed, drizzle in the olive oil until just incorporated.
4. In a separate bowl, gently stir in the yeast/water mixture.
5. And drizzle it into the flour/oil mixture. Mix until the dough forms a ball. (You can also mix by hand until it comes together.)
6. Drizzle a little olive oil into a clean bowl and turn the dough over in it to coat it in the oil.
7. Cover the bowl with a moist kitchen towel (I used paper towels) and set in a warm place for 1 to 2 hours. After the dough has risen, cover with plastic wrap and store in the fridge for up to 3 days (it freezes well too) or proceed to the next step if making right away.
8. To prepare the pizza, preheat the oven to 500 degrees.
9. Divide the dough in half. Lightly drizzle olive oil on a pizza pan or rimmed baking sheet.
10. Using your hands, stretch the dough to the desired shape, pressing the dough into the pan with your fingers. The thinner the better. The surface of the dough should be lumpy from finger marks (Ree says this holds the toppings better this way.)
11. Pay the desired toppings over the dough and bake for 8-10 minutes, until the edges of the crust are golden brown.
12. Again If not using all the dough right away, you can freeze it for up to 6 months, thawing in the fridge again before using

Thursday, April 15, 2010

Pile 'Em High Portabellos (Raw Picture Thursday)


I know rinsing mushrooms under water is considered a no-no among chefs, but for me biting into grit/dirt is like farting on a first date. I don't care how or why it happened - you're out (and yes I'd be just as harsh on myself if I were the culprit.) I'd happily risk a soggier mushroom in lieu of biting into dirt any day but to be honest I've never encountered this problem from rinsing them. A quick, brutal pounding under the faucet followed by an immediate pat down with paper towels and you're safe.

A final note - it's counter intuitive for me not to season every layer as I cook but it's the right call here. If I were to salt the portabellos before stuffing, they'd break down too quicky during cooking and lose their shape causing the filling to run amok. Besides the stuffing is seasoned enough I promise. And though I don't cook vegetarian all the time, when I do I'm always amazed by how satisfying veggies can be. Here the beans on top get a little crunchy while cooking and take on a whole new fabulous texture. More please!

Pile 'Em High Portabellos
* Pics are of unbaked stuffed mushrooms. Sadly they get less photogenic after cooking but luckily they're delicious!
Serves 2-3.

Ingredients:
3 medium portabellos or 2 very large

2 oz goat cheese, preferably at room temp
1/2 cup shredded Parmesan
3/4 tspn cumin
1/2 tspn coriander
1/2 teaspoon hot English mustard
1 (15 oz) can diced tomatoes (preferably Muir Glen), well drained and pressed lightly with a paper towel
3/4 of 1 (15oz) can red kidney beans, drained but not rinsed
2 minced green onions
2 tablespoons Panko
Black pepper or white for seasoning
1/8 tspn kosher salt
Drizzle olive oil - about 2 teaspoons

Instructions:
Preheat the oven to 375. Meanwhile, spray a medium rimmed skillet with nonstick spray (line it with aluminum foil beforehand for easy cleanup if desired.) Rinse your Portabellos, making sure you remove stems first, quickly under the tap flipping over to get both sides and brushing quickly and vigorously with the flat side of your fingers. Place immediately onto a bed of paper towels and pat gently but furiously to absorb any water that might already be sinking into the the spongy creatures. Set onto another dry set of towels while you make the filling.

Meanwhile in a medium sized bowl, mix the goat cheese through English mustard well with a fork. Add in the well drained diced tomatoes and stir again. Add in the drained beans, green onions, Panko, pepper and salt. Stir gently until all is mixed.

Place the mushrooms bottom-side down in the prepared pan spreading them out evenly. Using a spoon, gently stuff them filling the nooks and crannies and piling high making sure every Portabello is evenly stuffed. Drizzle each with olive oil, rubbing any extra around the sides of the mushroom.

Bake at 375 for 15-18 minutes, just until the sides of the mushrooms have begun to cave, the tops are just golden, and the liquid from the shrooms has pooled around the pan. Let set for 3 minutes before serving.

Monday, April 5, 2010

Spring Pasta with Brie and Basil


Spring Pasta with Brie and Basil
* Keeping the brie cold before adding it to the pasta will help keep it from all melting/sticking together when you add it to the hot pan. It's also much easier to cut into cubes when chilled.

Ingredients:
1 tablespoon olive oil
1/2 tablespoon butter
2 medium shallots, finely minced
2 medium zuchinni, finely diced
sea or kosher salt and pepper
freshly grated nutmeg
red pepper flakes

1 box (13.25 oz) wheat pasta
10 oz frozen peas, ideally but not imperatively thawed
1 cup basil leaves
1/2 pound cold brie (straight from the fridge) cut into small cubes
1/4 cup toasted pine nuts, or pistachios to drive officially go overboard on the green theme
teaspoon olive oil
sea salt
red pepper flakes

Instructions:
Put a large pot of water over high heat. While you wait for it to boil, you can get on with your veggies. Add a tablespoon of olive oil and half tablespoon of butter to a large, rimmed nonstick skillet and bring over medium heat. Give the fat a few seconds to heat through, then add the shallots, seasoning with salt and pepper. Cook, stirring once or twice, for two minutes. Add the zuchinni along with a teeny bit more salt and saute until soft and just beginning to brown - about 10 to 12 minutes. Season with a grating of fresh nutmeg, a pinch or two of red pepper flakes, and keep on low or turn off while you boil your pasta.

Meanwhile, season your boiling pasta water with a handful of salt, let return to a boil, and then add in the pasta. Cook for 6 minutes, then add the frozen peas, cooking just until they turn a bright, poppy green - about 2 minutes. At this point your pasta should be al dente, so using a spider or slotted spoon, strain and transfer it and the peas to your awaiting veggies, placing over low heat if not already on it. Stir gently to incorporate everything, adding in a ladle of pasta water if desired. Stir in the basil, cubed brie, and pine nuts. Drizzle with an additional teaspoon olive oil and taste for salt/red pepper flakes adding extra if necessary. Serve warm.

Saturday, March 13, 2010

Something to Brunch On


A nice little egg dish for brunch (or dinner) that won't leave you doing the walk of shame afterwards. Because as it turns out, winter might actually leave us, and I cancelled my gym membership in February... Of course you can go whole hog and use egg whites, but the entire reason I make this is to be able to stab those round, yellow yolks and watch their buttery ribbons ooze into the veggies. It's better than popping bubble wrap.

Sunnies over Sauteed Asparagus, Mushrooms, and Peppers with Parmesan and Chives
* Serves 2.

Ingredients:
1/2 tablespoon butter
2 teaspoons olive oil, divided
2 portabello mushrooms, cut into 1 inch chunks
1 bunch asparagus, tough ends removed and cut into 1 inch pieces
1/2 yellow bell pepper, diced
kosher salt and fresh cracked pepper for seasoning
good grating of fresh nutmeg
pinch red pepper flakes, optional

1/2 tablespoon butter
1 teaspoon of olive oil
4 eggs
sea salt
fresh cracked pepper
1/4 cup Parmesan, or to taste
1/4 cup freshly chopped green onions or chives

Instructions:
Heat 1/2 tablespoon of butter along with 2 teaspoons olive oil in your largest saute pan, preferably nonstick, over medium heat. Add the portabellos, season with salt and pepper, and cook for 3 minutes, stirring occasionally. Add in the asparagus and diced pepper along with another small pinch of salt. Cook the veggies to your liking - I like mine to get a little carmelized but not to the point of being mushy which usually takes about 7 minutes. Season with a good grating of freshly ground nutmeg and red pepper flakes if you like the addition of heat. Leave on low heat while you cook your eggs (or even better - start the eggs in another pan when you add in the asparagus for perfect timing.)

In another medium skillet, heat the butter and olive oil over medium heat until the bottom of the pan is coated. Carefully crack the eggs and add them spacing them out evenly in the pan. Cook for about 7 minutes for sunny side up, or longer to your liking, watching the heat so that you can turn it down if the edges brown too quickly. If you like yours really cooked - you can run the pan under a hot broiler afterwards. Season lightly with sea or kosher salt and pepper.

To plate, divide the veggies between two wide-rimmed bowls. Put two eggs over each pile, then sprinkle the Parmesan and chives over and around the eggs. Serve hot.

Tuesday, March 9, 2010

Creamy Eggplant and Arugula Pasta with Pine Nuts and Cream Cheese


Whole wheat pasta and I are becoming friends. It's all very high school - I hated it on first site but over time think we actually might be bffs. At the very least I've figured out I don't mind the texture when paired with cream sauces and sauteed vegetables - in fact I think its slight chewy bite enhances these ingredients (tomato sauce, not so much. Takes me back to my first impression - cardboard.)

Kris humored me in eating this even though he's not an eggplant fan. What is it with men and eggplant and butternut squash? Or rather - what is it with women and these two vegetables? Every girl I know adores them while every man I know is like...eh. One boy friend had this explanation to offer - "Butternut squash is like eating baby food. It's boring." This really ramped up the debate, but that's for another post.

Back to the pasta, DO NOT toss out your pasta water after you strain the pasta from it. It's crucial to breaking up the cream cheese and making a nice velvety sauce. And just remember, you don't have to salt baby or 'Chinese' eggplant before cooking but it does take a while to saute and become cooperative. Do yourself a favor and put a pot of water over a boil the same time you begin cooking the eggplant, then wait 20 minutes before adding your pasta to the water as the eggplant needs that much of a head start. If the water begins boiling way before the 20 minute mark, it's okay. Just let it go quietly on a back burner until you're ready to put it to work.

Creamy Eggplant and Arugula Pasta with Pine Nuts and Cream Cheese
Serves 6-8.

Ingredients:
13.25 oz box whole wheat short pasta, such as ziti or spirals
handful salt
4 oz reduced fat cream cheese
1 tablespoon olive oil, plus extra
6 baby (or Chinese) eggplant, roughly 5 inches in length, cut into 1/2 inch chunks
kosher salt, for seasoning
fresh black pepper, for seasoning
good grating fresh nutmeg
good pinch red pepper flakes
2 cups shredded parmesan

2 tablespoons toasted pine nuts, toasted in a 325 oven for 6-8 minutes until light golden
1 package arugula

Directions:
Put your largest pot filled with water over high heat for the pasta. Wait 20 minutes after you get the eggplant going (should be boiling by now, of course) before salting with a handful of salt and adding the pasta. Cook for 6-7 minutes or JUST until al dente at which point you should be ready to strain and transfer to your eggplant mixture.

For the eggplant mixture, add 1 tablespoon olive oil to a large, rimmed, nonstick skillet and put over medium heat (you may need to add another dash or so as it cooks - just keep an eye out to see if the bottom of the pan dries out too badly during cooking.) Once warm (give it 30 seconds or so), add the eggplant, salting well and seasoning with pepper. Cook, stirring every so often, for about 20 minutes (at this point you can add the pasta to the boiling water.) Continue sauteeing the eggplant, and season with a good grating of fresh nutmeg and a hefty pinch of red pepper flakes. The eggplant should be nice and tender after few more minutes at which point you can stir in the cream cheese, breaking it up with your fingers to help it melt in. Once smooth, add in the parmesan, killing the heat. Add in the drained pasta, along with a ladle or two of the pasta water to help create the sauce. Once blended, add in the arugula and pine nuts, tossing lightly. I like for the arugula to retain its punch and not wilt down too much, but it's just a personal preference. Taste for seasoning (I alway like a little more of the red pepper flakes) and serve.

Monday, March 8, 2010

Sweet Cornbread Casserole


After being seduced by Food and Wine Magazine, I went out and bought another cookbook - Miss Dahl's Voluptuous Delights. Sophie Dahl is the granddaughter of my favorite childhood (and adult) writer - Roald Dahl. My mom must have read me every one of his books growing up and I plan to repeat this tradition if and when it applies. Anyway, if you like books you might recognize Sophie through her literary heritage and/or own literary career. Or if you like fashion, you might recognize her wide, doe like eyes and porcelain skin from magazines. Sophie was a model for several years, gracing the likes of Vogue and Elle in all of her 5' 11" voluptuousness. And even though she was applauded for her size, she still struggled behind the lens with comparisons to all those coat hangers she had to share the limelight with.

She documents some of this, hilariously, in her new cookbook. She also imparts a down to earth, common sense approach to cooking and eating healthfully. The recipes are simple, fresh, and light on meat. Shortly after reading it cover to cover, I vowed to give up evil, processed food and ingredients as much as possible.

I felt empowered. I felt healthier. And then PMS happened and brought along with it visions of cornbread. Worse than cornbread actually, cornbread casserole, which if you haven't had it is something you have to make this instant or at least put on your holiday buffet next year. And while, to be fair, I did add a secret ingredient that let me cut out half the butter with none the wiser (don't ask! don't tell! It's a....banana!!), this is still not something you want to make often if you like closing your jeans. It's a sugar bomb - a genius cross between a side dish and dessert - neither bread nor pudding but some ethereal mix of the two. It's truly heaven on earth. And it's lethal.

"Hello police? Please come right away - I've just killed another batch of cornbread casserole..."

Sweet Cornbread Casserole
* This casserole was made for the sweet/savory hedonistic festival we call a BBQ. Put it next to a big plate of ribs, coleslaw, and deviled eggs.
* You want to cook this until the whole dish has puffed and turned an even golden brown over the top, the edges just getting a little dark - usually about 50 minutes. Let it set up/cool for five minutes before cutting. It will be just a little soft and squishy on the inside but that's the beauty of it. Of course if this bothers you, cover the top and put back in the oven another 10 minutes until completely solid.

Ingredients:
1 banana, well mashed
1/4 cup melted butter
good grating fresh nutmeg
1 tablespoon sugar
3/4 teaspoon kosher salt
1 cup light sour cream
1 (8 ounce) box Jiffy cornbread mix
1 (15 ounce) can whole kernel corn, drained
1 (15 ounce) can creamed corn (not drained)

Directions:
Preheat the oven to 350.

Grease a 9x9 ceramic or glass baking dish and set over a large rimmed baking sheet. Set aside.

In a large bowl, thoroughly mash a ripe (but not brown) banana with a fork or whisk until slightly pureed. Mix in the butter, nutmeg, sugar, salt and sour cream. Make a well in the center and pour in the jiffy mix. Stir just until blended, then add in the corn kernels (don't forget to drain) and the entire can of creamed corn (don't drain) just until smooth.

Pour into the greased baking dish and bake for 50-55 minutes, until puffed evenly all over, and golden brown. Let set up for 5 minutes before serving with a big spoon.