Showing posts with label sweets. Show all posts
Monday, January 12, 2015
Marvelous Zuchinni Muffins. Tops like a sugar cookie, bottoms like a crumb cake.
It's amazing to me that just now, with Sawyer edging towards 17 months, I JUST now feel like I have control of my life again. And that said, now that he's in his second round of teething - that's even debatable most days.
Yet I feel kind of giddy that last Friday evening after a crazy workday, I managed to dream up this recipe and have it turn out as well as it did. It's so classic - I have no less than a couple hundred cookbooks and yet I couldn't find the trusty zuchinni bread recipe I made last. So I wrote down what I thought would work, set out the butter and eggs and went to bed, thinking I'd likely be tossing my experiment the next day. Quite the contrary - I don't think I'll make zuchinni bread or muffins from another recipe for a long time to come.
You can dress these up for winter with a hit of orange zest (or a grating of fresh ginger) or for summer with some lemon zest or just make them exactly as is. I do have to tell you, they are more of an adult muffin recipe as they have a nice mildly salty bite to them. Kris and I love a little salt in our sweets and in my opinion, the flavor balance here is perfect. But it gives them a more complex taste than most super sweet muffins - not that this bothered Sawyer Lee in the least. He LOVES them and to say he is picky is an understatement.
I hope you make them. The crust gets this amazing sugar cookie/oatmeal cookie texture while the center is dreamy and fluffy and soft. Eat them warm (micro the leftovers) with a pat of butter.
Marvelous Zuchinni Muffins
If you set out the butter and eggs the night before so you can literally whip this up in the morning in a half an hour. I was too lazy to get out my electric hand held mixer so I just whipped the butter an oil together by hand with a whisk. Totally worked but no doubt the hand held would be faster.
Ingredients:
1 stick salted butter, room temp (leave out the night before morning of baking)
1/2 cup oil (I use Spectrum Canola/Coconut blend) though vegetable or canola would work
1 1/4 cups sugar
2 cups flour
1/2 teaspoon baking soda
1 teaspoon kosher salt (if using table salt, 1/2 teaspoon)
2 eggs, room temp and beaten
1 teaspoon apple cider vinegar
1 cup grated zuchinni, pressed with a towel to remove excess moisture
1/2 cup chopped pecans
20-24 muffin liners, optional, or baking/nonstick spray
Directions:
In a large bowl, cream the softened butter and oil with a handheld mixer until smooth. Add in the sugar and cream again until well blended.
In a separate (smaller) bowl, whisk together the flour, baking soda and salt. Fold into the sugar/oil/butter mixture in three additions until combined. Stir in the eggs then vinegar, zuchinni and pecans.
Fill prepared muffin tins (either lined with muffin cups or sprayed with nonstick spray, number depending on size of your muffins tins but usually between 20-24) 3/4 the way full and bake at 375 for 15-17 minutes, just until tops are very light gold and cake tester comes out clean/with crumbs rather than wet batter when poked down the center.
Serve right away with butter or let cool completely and store in an airtight container up to 3 days.
Labels:
Alisa's All Stars,
breakfast,
muffins,
sweets,
vegetables
Saturday, July 5, 2014
Margarita Cheesecake, My Kinda Birthday Cake
Yesterday was America's birthday and mine. I hope you all had a fantastic 4th! I had a great one. My husband flew in on a red eye from a shoot so we could spend the day together, I got to take a nap with my baby in the morning and watch him eat (inhale) scrambled eggs for the first time at our favorite place, Elizabeth Street, before we spent the day with friends and family.
This was the cake I made to celebrate my 37 years on earth. I made it gluten free by using gluten free ginger snaps in the crust and no one was the wiser. But feel free to use regular ginger snaps or graham crackers. The filling is a classic key lime cheesecake filling but since it was my birthday I had to step it up a notch.
Enter the topping: a tequila infused whipped sour cream situation. You two should get to know one another.
Margarita Cheesecake with Tequila Whipped Sour Cream
Makes one big ass cheesecake.
*Takes a few prep bowls and steps, but worth it. Like all cheesecakes this MUST be made 1-2 days ahead and kept chilled in fridge for it to achieve the right consistency.
Crust:
2 cups crushed ginger snap cookies (I used one 8 oz box Mi-Del Gluten Free Ginger Snaps), vanilla wafers or graham crackers
4 tablespoons salted butter
pinch kosher salt
zest of a small lime
Cheesecake Filling:
3 (8 oz) packages cream cheese, room temp
1 1/4 cups sugar
4 large eggs, separated
1 cup (8 oz) sour cream (I used light)
1/2 cup freshly squeezed lime juice
1 teaspoon lime zest
1 teaspoon vanilla extract
pinch kosher salt
Topping:
1 pint heavy cream, very cold
heaping 1/4 cup powdered sugar
1/2 teaspoon vanilla extract
1 tablespoon tequila
pinch kosher salt
zest of 1 lime
1/3 cup sour cream (I used light)
slices of lime, for garnish (optional)
whole strawberries, for garnish (optional)
Directions:
Preheat oven to 350 (I used convection bake setting.) Lightly butter a 9 inch round springform cheesecake pan, coating all sides and bottom. Use a large piece of aluminum foil to 'wrap' the base of the pan (just to prevent leaks) tucking it up and around the sides. Set aside.
In a medium bowl, combine cookie crumbs, melted butter, salt and lime zest until well blended. Press the crumb mixture into the bottom of the buttered pan and just slightly up the sides. Use a lighter hand when doing this or it will be brick-like after being baked.
Bake for 8-12 minutes until edges are golden. Set aside to cool on a wire rack.
Meanwhile in a standing mixer or big bowl with hand held mixer, beat the cream cheese on medium speed until fluffy. Gradually add in the sugar, mixing until very well blended and being sure to scrape along bottom/sides for any hiding clumps.
Add egg yolks, one at a time blending after each addition just until yellow disappears. Add in the sour cream, juice, zest, vanilla extract and pinch salt. Mix well, scraping down sides and bottom once again.
In a separate (clean and dry) large bowl, whip the egg whites on high until stiff peaks form at the end of a beater when the beater is turned off but mixture is not dry (meaning there's still a little shine to them but they are no longer liquid.)
Gently fold the egg whites into the cream cheese mixture, until just mixed. Pour into the prepared crust and bake for one hour. Gently slide the tray the cake is on out and watch how the cake moves. If the entire thing is still jiggly/watery, bake another 10-15 minutes until JUST the very center is quivery. The center being loose is the goal - not the entire cake.
When just your center is jiggly, shut the oven door and shut the oven completely off. Leave for 15 minutes. Then crack the door and leave another 20 minutes.
Remove from the oven and allow to cool completely. It's a big cake and will take a while so be patient.
Cover and chill over night or at least 8 hours.
Meanwhile, make your topping (topping can also be made several hours ahead or even overnight and put on the cake before serving.)
Using a standing mixer or large bowl with hand held mixer, beat the cream on high until it forms soft peaks, gently add in the confectioners sugar and continue to whip until you achieve classic whipped cream texture. Add in your extract, tequila, salt and zest and beat again just until incorporated. Make sure no little clumps of lime zest are lurking. Finally fold in the sour cream.
Store in an airtight container in the fridge until ready to use.
To assemble, remove the cake from pan. Spread the whipped topping evenly over and decorate with lime slices, strawberries and more lime zest or strips of lime zest if desired.
Labels:
#glutenfree,
Alisa's All Stars,
cake,
holidays,
sweets
Friday, May 30, 2014
Mocha Heath Bar Bundt Cake (Can't Stop Won't Stop Cake)
Got to co-host the cutest sweetest baby shower last weekend for my new friend Jess who is due very soon with her first baby. My co-hostess with the mostess Krystle organized a fun project for us all to do painting onesies for Baby Gaffney which was really cute. Gurls got all crafty up in here! My backyard looked like a Pinterest board. Didn't think I was the crafting type but give me some wine and apparently I'll do anything. Except run.
Krystle also made an insanely delicious savory tomato cobbler which I'll post next as well as lots of other goodies. I also had grand plans to make a lot of food but with Kris out of town and the baby now crawling, I was just lucky to pull off this cake.
And I'm so glad I did because it just may be one of my favorite things I've ever made. After harassing Jess' hubby for details on what kind of treats she likes, we got the lowdown that she's a Heath Bar/mocha/toffee ice cream kinda gal. So Krystle made Heath bar coffee ice cream (to die for) and I made this chocolate mocha bundt cake that got drowned in a mixture of condensed milk and coffee after baking THEN caramel sauce and toffee bits. Mmm hmm. You heard me.
Next time I make it I'm going to soak it in the suggested Kahlua mixture and see what kind of party that leads to. I suspect a fun one.
Lastly I can't take credit for its new official title - Can't Stop Won't Stop Cake. That was all the mama-to-be.
Mocha Heath Bar Bundt Cake (Can't Stop Won't Stop Cake)
From Allrecipes, submitted by alijmorris
* For a nonalcoholic version, replace the kahlua with 3/4 cup chocolate syrup mixed with 1/4 cup warm water.
* When I made this the first time, I used the chocolate syrup/water mixture for the Kahlua substitution in the cake but mixed a can of condensed milk with some hot coffee to pour over the cake instead of mixing the other half with confectioners sugar which worked well. But I suspect the more Kahlua, the better.
* This cake gets better the more it sits soaking up the glaze. Make it at least the day before you want to serve it but do not apply the caramel sauce/Heath Bar bits until closer to serving or it will drink it up and not look as pretty.
Ingredients:
3/4 cup salted butter, room temp (1 1/2 sticks), plus extra for buttering pan
2 cups white sugar
3/4 cup unsweetened cocoa powder, plus extra for dusting pan
4 eggs, separated and at room temp
1 teaspoon baking soda
2 tablespoons water
1/2 cup strong brewed coffee (can use decaf)
1 cup coffee flavored liquor (kahlua), divided (if subbing see above note and divide prepared mixture)
2 tablespoons vanilla extract
1 1/3 cups all purpose flour
tiny pinch salt
Glaze:
1 cup confectioners sugar mixed well with 1/2 cup Kahlua OR 1/2 can condensed milk mixed with 2 tablespoons hot coffee
Topping:
1/2 jar store bought caramel sauce (like for ice cream)
1 cup Heath Bar bits/toffee bits
Directions:
Preheat oven to 325.
Butter the inside of a 10 inch bundt pan then 'flour' liberally with cocoa powder. Tap out excess and set aside.
In a large measuring cup, dissolve baking soda in water, stirring well. Add in coffee, 1/2 cup of the coffee liquor (OR chocolate syrup mixture if subbing) and vanilla.
In a large bowl or standing mixer, cream together the butter and sugar until fluffy (will be a little stiffer than other butter/sugar combos but be sure to scrape bottom to get any sugar sticking to the bottom.) Beat in the cocoa, then egg yolks one at a time. Alternately beat in the flour and coffee mixture just until incorporated along with a pinch salt.
In a large glass or metal mixing bowl, beat the egg whites until stiff peaks form. Fold 1/3 of the whites into the batter, then quickly but carefully fold in remaining whites until no streaks remain.
Pour batter into pan. Bake for 55-6- minutes until a tester inserted in center comes out clean.
Meanwhile prepare glaze (either 1/2 cup Kahlua with 1 cup confectioner sugar OR 1/2 can condensed milk with 2 tablespoons hot coffee.)
Let cake cool for 10 minutes in the pan then turn out onto a wire rack lined with wax paper (so you can move it later.) Pierce warm cake all over carefully with tester or fork and drizzle the glaze over until it soaks it all up (careful - makes a mess!)
Let cake cool all the way and either wrap well in plastic wrap or transfer to a cake keeper until ready to serve. An hour before serving, drizzle liberally with warmed caramel sauce (microwave for a few seconds so it pours easily) and sprinkle Heath bar bits over the top.
Labels:
Alisa's All Stars,
cake,
chocolate,
Christmas,
holidays,
Make Ahead,
pregnancy,
sweets
Wednesday, May 7, 2014
Deep Dark Chocolate Mousse Pie with Chocolate Cookie Crust
Well when falls off the Paleo wagon, one really falls off. I have to admit being able to eat dairy again is the best thing ever. I had big plans for a French Silk pie yesterday but a non-napping baby forced me to try go with plan B that didn't involve so many mixing bowls and steps. As it turns out it was a delicious plan B.
The original recipe (from my beloved dog-eared Mrs. Fields Cookie Book) called for cream cheese. Since I didn't have any on hand I subbed creme fraiche and crossed my fingers. I think it gave it a particularly amazing texture. Definitely more 'mousse' like than it would have been with cream cheese and I loved the subtle depth of tanginess the creme fraiche lent to the filling really playing up the dark chocolate flavor. Another bonus to using creme fraiche? You can make this pie on the spur of the moment without having to wait for any of the ingredients to come to room temp first.
By the way my husband and our good buddy staying with us topped this pie with…are you ready?…Blue Bell and a big splash of bourbon. They swear it's the best thing ever.
Deep Dark Chocolate Mousse Pie
* Adapted from Mrs. Fields Cookie Book
Crust:
1 1/2 cups chocolate wafer crumbs (ground fine)
5 tablespoons salted butter, melted
2 tablespoons granulated sugat
Filling:
6 oz dark chocolate (55%-75%), chopped
1/2 cup heavy cream plus 1/4 cup, plus additional for whipping if desired
8 oz creme fraiche
1/4 cup packed light or dark brown sugar
1 tablespoon vanilla extract
pinch salt
3/4 cup semi sweet chocolate chips
Directions:
Preheat oven to 350.
In a medium bowl, combine the crust ingredients until well mixed. Gently press the mixture into the bottom and up the sides of a 9-inch pie plate. Bake for 10 minutes then place on a wire rack to cool.
For the filling, place chopped chocolate in a small bowl. In a small saucepan, bring 1/2 cup of heavy cream to just a simmer. Pour the hot cream over the chocolate. Let stand, covered, for 5 minutes, then stir until smooth.
In a medium bowl with an eclectic mixer, beat the creme fraiche, sugar, vanilla and pinch salt until smooth. Beat in the remaining 1/4 cup heavy cream. Gently beat in the melted chocolate mixture. Set aside.
Sprinkle the 3/4 cup chocolate chips evenly over the bottom of the crust (if it's still a little warm that's fine - the chips will melt a little which is just groovy.)
Pour the filling over, and if the crust was still warm, let cool a bit before covering with plastic wrap and refrigerating for at least 2 hours before serving to firm up a bit.
Pie will keep, covered, for up to 4 days in the refrigerator.
Labels:
Alisa's All Stars,
chocolate,
Christmas,
pie,
sweets,
Valentine's Day
Monday, April 21, 2014
Simply Perfect Carrot Cake with Maple Cream Cheese Frosting. No one has to know it's Paleo.
So here's my thing with Paleo desserts so far. They're actually pretty good. You don't miss the refined sugar because real maple syrup and/or honey do a fine job providing the sweet. You don't miss the fat because you don't have to worry about using low fat nonsense. But the texture can be tricky. The initial product is often great but gets soggy after a few hours because almond flour is so rich and dense.
This carrot cake changed my tune. It's honestly authentically carrot cake like. Moist and rich, yes. Soggy no. Even my husband had no freaking clue I'd sabotaged a perfectly good Easter tradition with something sans refined sugar, flour or weird preservatives. And he's a PICKY dessert eater. Like crazy picky.
Anyway I know I just shared the oh so exciting news that my baby is over his dairy issues and therefore I could have gone ahead with a traditional full fledged carrot cake recipe with loads of butter, flour and sugar but honestly I think I'll have a hard time doing that sort of recipe unless it's a holiday from now on. Okay fine - Easter is most definitely a holiday - if not the mother of them actually but I mean a more fun holiday. Like Halloween or Christmas which is just a lovely excuse to eat badly (awesomely) for a month. You know what I mean.
Anyway if you're curious about Paleo or just want to try something a little different with your baking experiments I heartily recommend this recipe. Obviously not calorie free but undoubtedly better for your than the old school version.
Simply Perfect Carrot Cake
*slightly altered from the recipe by She Cooks He Cleans
Ingredients:
small amount of butter or coconut oil for buttering pans
small amount of coconut flour for dusting pans
1/2 cup walnut or grape seed oil
1/2 cup honey
3/4 cup coconut palm sugar
5 eggs, room temp
1 1/2 teaspoons vanilla extract
3 cups blanched almond flour (I use WellBee)
1 1/2 teaspoons baking soda
1 1/2 teaspoons kosher salt
1 1/2 teaspoons ground cinnamon
1/2 teaspoon nutmeg (I use fresh ground)
3/4 cup shredded unsweetened coconut (I use Let's Do Organic)
3 cups shredded carrots (preferably organic)
3/4 cups raisins (preferably golden) or chopped dates or even dried pineapple
3/4 cup chopped toasted walnuts or pecans or even slivered almonds
Zest of a medium orange, optional
Directions:
Preheat oven to 325F (I used convection bake.) Line two 9-inch-diameter cake pans with parchment paper and butter bottom and sides with either butter or coconut oil. Lightly dust with coconut flour and tap out excess in the sink.
Using electric mixer, beat oil, palm sugar, and honey until well mixed. Add eggs one at a time, beating well between eggs. Mix in vanilla extract.
In a separate bowl, mix together almond flour, baking soda, salt, cinnamon, nutmeg, and shredded coconut. With mixer on low speed, slowly add the flour mixture to the wet ingredients. When it has all been added, beat until well blended. Stir in carrots, raisins, toasted walnuts and orange zest if using.
Divide batter between cake pans. Bake at 325 for 35 minutes, or until toothpick inserted into center of cake comes out clean. Cool cakes in pans for 15 minutes. Run a small knife around the edge of the pans to loosen the cakes, then invert carefully on a cooling rack; cool completely.
Maple Cream Cheese Icing (*some additions NOT Paleo, but optional - I also use more sweetener than original recipe called for as I found it not sweet enough but feel free to start with 1/4 cup maple syrup and adjust accordingly)
2 (8 oz) packages organic cream cheese, room temp
1 stick salted organic butter, room temp
*1 tablespoon orange liquor
1 teaspoon vanilla extract
small pinch kosher salt or sea salt
1/2 cup maple syrup
2 tablespoons honey or 2 tablespoons coconut palm sugar, or to taste, OPTIONAL
3/4-1 cup shredded coconut (unsweetened) for decorating, optional OR chopped toasted nuts
Cream together cream cheese and butter in an electric mixer. Add liquor if using, vanilla extract and pinch salt and mix well. Gradually add maple syrup and beat until well-combined and fluffy. Taste for sweetness then mix in additional honey or palm sugar if desired (palm sugar will dissolve into icing if mixed long enough.)
Place 1 cake layer, flat side up, on cake platter. Spread approximately 1 cup of frosting over the layer. Top with the second cake layer, flat side down. Spread remaining frosting over the top and sides of cake. Top with coconut or chopped nuts (optional). Refrigerate, if possible (I don't.) Serve at room temperature.
Labels:
#glutenfree,
#paleo,
#soyfree,
Alisa's All Stars,
Birthday,
cake,
Easter,
holidays,
sweets
Tuesday, November 12, 2013
Chocolate Hug Cookies
When you live in Texas and it gets cold enough to turn your heater on and that heater smell of toasting lint (is that what it is?) wafts through your house it feels like Christmas. Or at least it does to me.
So here we go with my first Christmas cookie post of the season. Hooray commercialism! And malls! And sugar!
My hands down favorite cookie at the holidays (AT the holidays? Southern much?) are peanut blossoms. AKA chocolate kiss cookies or Hershey Kiss peanut butter cookies. My mom made them for us growing up and for me they are edible childhood. I honestly can't be trusted with them. An entire batch will disappear into thin air David Blaine-style.
The only problem is my husband isn't a fan. I try not to let this change my deep endearing love for him but it's tough. Who doesn't like peanut blossoms? WHO???
Anyway I recently had an idea to try and appease his tastes while keeping with my own traditions, now that we have a kid and all. He is a bonafide chocoholic so when I saw a few recipes for Nutella Kisses I thought - SCORE!
Well it was a score alright but of course there was a minor drawback. They didn't taste so much of Nutella as they did chocolate. Personally I thought this was a bonus given the fact a lot of people don't like Nutella. So I changed the name to something that reflected their intensely chocolate, chewily rewarding, chocolate-studded chocolate-kiss topped vibe.
Will they replace my personal favorite in the holiday lineup? We'll see. Actually the tie breaker will be when my son is old enough to taste between the two of them and choose. Though if his tastes are as similar to his father's as his looks are, I'm screwed.
Thankfully I like the alternative almost as much...
* As the picture indicates I made these for Halloween and rolled them in orange sugar before baking. If making for the holidays simply choose another color if desired.
Chocolate Hug Cookies
Adapted from All Recipes
Ingredients:
2 1/2 cups all-purpose flour
1/4 cup unsweetened cocoa powder
1 teaspoon baking soda
1 teaspoon kosher salt
1/4 teaspoon instant espresso powder
1 cup salted butter, at room temp
3/4 cup packed brown sugar
3/4 cup white sugar
2 large eggs, room temp
2 tablespoons vanilla extract
1/2 cup Nutella (chocolate hazelnut spread)
2 cups chocolate chips
2 packages dark chocolate Hershey kisses
colored sanding sugar, optional
Directions:
- Preheat oven to 350 degrees F (175 degrees C). Grease a baking sheet or line it with parchment paper.
- Combine flour, cocoa powder, baking soda, salt and espresso powder in a bowl. Mix with a whisk to break up any lumps.
- Beat butter, brown sugar, and white sugar with an electric mixer in a large bowl until smooth. Beat in eggs one at a time until completely incorporated. Mix in vanilla and chocolate-hazelnut spread.
- Slowly add in flour mixture and stir just until combined. Fold in chocolate chips. Use a small cookie scoop to keep the cookies a uniform size and roll each scoop of dough between your hands to form a ball. Roll the ball in sugar, if desired.
- Bake in preheated oven until edges look dry and cookies are fragrant, about 8-9 minutes. Press a chocolate kiss in the center and let cool slightly on the sheet before transferring to a wire rack to cool completely.
Wednesday, November 6, 2013
German Chocolate Peanut Butter Cookie Bars (Queen of the Potluck Bars)
I should also warn you that they freeze well and are even better pulled from the freezer and heated for 30 seconds in the microwave. It's criminal. I'm not kidding. I'm going to go fast now.
Lastly I only mentioned OM-ing because we recently had a group of them living across the street from us and were convinced they were a scary underground group plotting to do something crazy. And it turns out they were. Oh they certainly were. Gotta love living in South Austin.
German Chocolate Peanut Butter Cookie Bars
Cookie Layer, adapted from Crazy for Crust
Ingredients:
1/2 cup salted butter, at room temp
3/4 cup peanut butter (I used chunky)
3/4 cup packed brown sugar
1/4 cup white sugar
1 egg, room temp
1 tablespoon vanilla
1 tablespoon whole or 2% milk
1/4 teaspoon salt
1 teaspoon baking soda
2 cups AP (all purpose) flour
Toppings:
1 (14 oz) can sweetened condensed milk
1 1/2-2 cups semi sweet chocolate chips
1 1/2-2 cups shredded sweet coconut
Instructions:
Preheat oven to 350. Line a 9x9 inch pan with foil (so that you can lift it out later) and spray well with nonstick spray. Or just grease a ceramic 9x9 inch pan that you can cut them in later and serve from. Up to you.
Cream the butter, peanut butter and both sugars well in a mixer with a paddle attachment or in a large bowl with a hand mixer. When smooth and well mixed, add the egg, vanilla, milk, baking soda and salt and mix until combined, scraping down sides. Slowly add flour in 2-3 additions and blend until just mixed each time.
Carefully press the cookie dough (it will be thick, not pourable) into your greased pan and bake for 18-22 minutes just until golden on top and set.
Remove and spread the chocolate chips in an even layer over the top followed by the coconut.
Stir the sweetened condensed milk and drizzle it as evenly as possible over the top. If using an 8x8 inch pan you may not be able to fit it all so just be careful and don't over fill!
Put in the oven for another 5 minutes just until the coconut has lightly begun to toast but not brown (you don't want to burn the cookie layer.)
Remove and let cool completely before cutting and serving.
Tuesday, October 29, 2013
Pumpkin Chocolate Chip Coffee Cake
I am a sucker for Halloween themed cookbooks. Most of these impulse purchases end in disappointment, the books full of gimmicks and fluff. All filler and no substance.
But over the summer I came across 'Ghoulish Goodies' by Sharon Bowers at Half Price Books and have been happily surprised recipe by recipe. These Chocolate Chip Pumpkin Bars, which I baked in an 8x8 inch ceramic dish to make them more cake-like, are honest to God delicious.
She sells them as being adult oriented with the whole wheat flour and spices. I sell them as one of the best coffee cakes I've ever had. Even my husband who is VERY
So tis the season for pumpkin and things that go bump in the night and baked goods that help you get through a 3 am feeding followed by another at 4 am and 5:30 am. Did I mention my baby is a vampire?
One last thing. I added toasted walnut pieces which I think turned these up to 11. You know you're getting old when you're tempted to add nuts to about every baked good. I can remember being little and wishing like hell my mom had left them out!
Pumpkin Chocolate-Chip Bars (or Coffee Cake)
Ingredients:
1 1/2 cups all purpose flour
1/2 cup whole wheat flour
1 teaspoon baking soda
1 teaspoon kosher salt
2 teaspoons ground cinnamon
1 teaspoon ground ginger
1/4 teaspoon ground nutmeg
1/4 teaspoon ground cloves (I was out so used more nutmeg)
1 cup (2 sticks) salted butter, at room temp
1 cup granulated sugar
1/2 cup firmly packed brown sugar
1 egg, room temp
2 teaspoons vanilla extract
1 cup canned pumpkin puree (not pie filling)
1 (12 oz) package (2 cups) semi sweet chocolate chips
3/4 cup to 1 cup lightly toasted walnut pieces, if desired
Directions:
Preheat oven to 350. For bars, grease a 9x13 baking pan and set aside. For coffee cake, grease an 8x8 ceramic pan with nonstick spray and see my tip below.
Combine the all purpose flour, whole wheat flour, baking soda, salt, cinnamon, ginger, nutmeg and cloves in a medium bowl.
Beat the butter, two sugars, egg, and vanilla in a large bowl with an electric mixer until smooth. Mix in the pumpkin puree until well combined, then add in the flour mixture in about 3 parts, beating each time until just combined. Use a wooden spoon to fold in the chocolate chips and walnuts then spread the batter which will be a bit on the thick and dry side evenly into the pan.
Bake for 35 minutes, until lightly golden and set.
Alisa's Tip:
For a cake like consistency instead of bars, Bake in a well greased 8x8 ceramic or glass pan at 350 for 20 minutes. Reduce heat to 325 and bake another 10-15 until the sides begin to turn dark but the middle is still quivery. Reduce heat to 300 and bake another 15 or until middle is set, entire 'cake' has risen and a cake tester comes out clean.
Monday, October 28, 2013
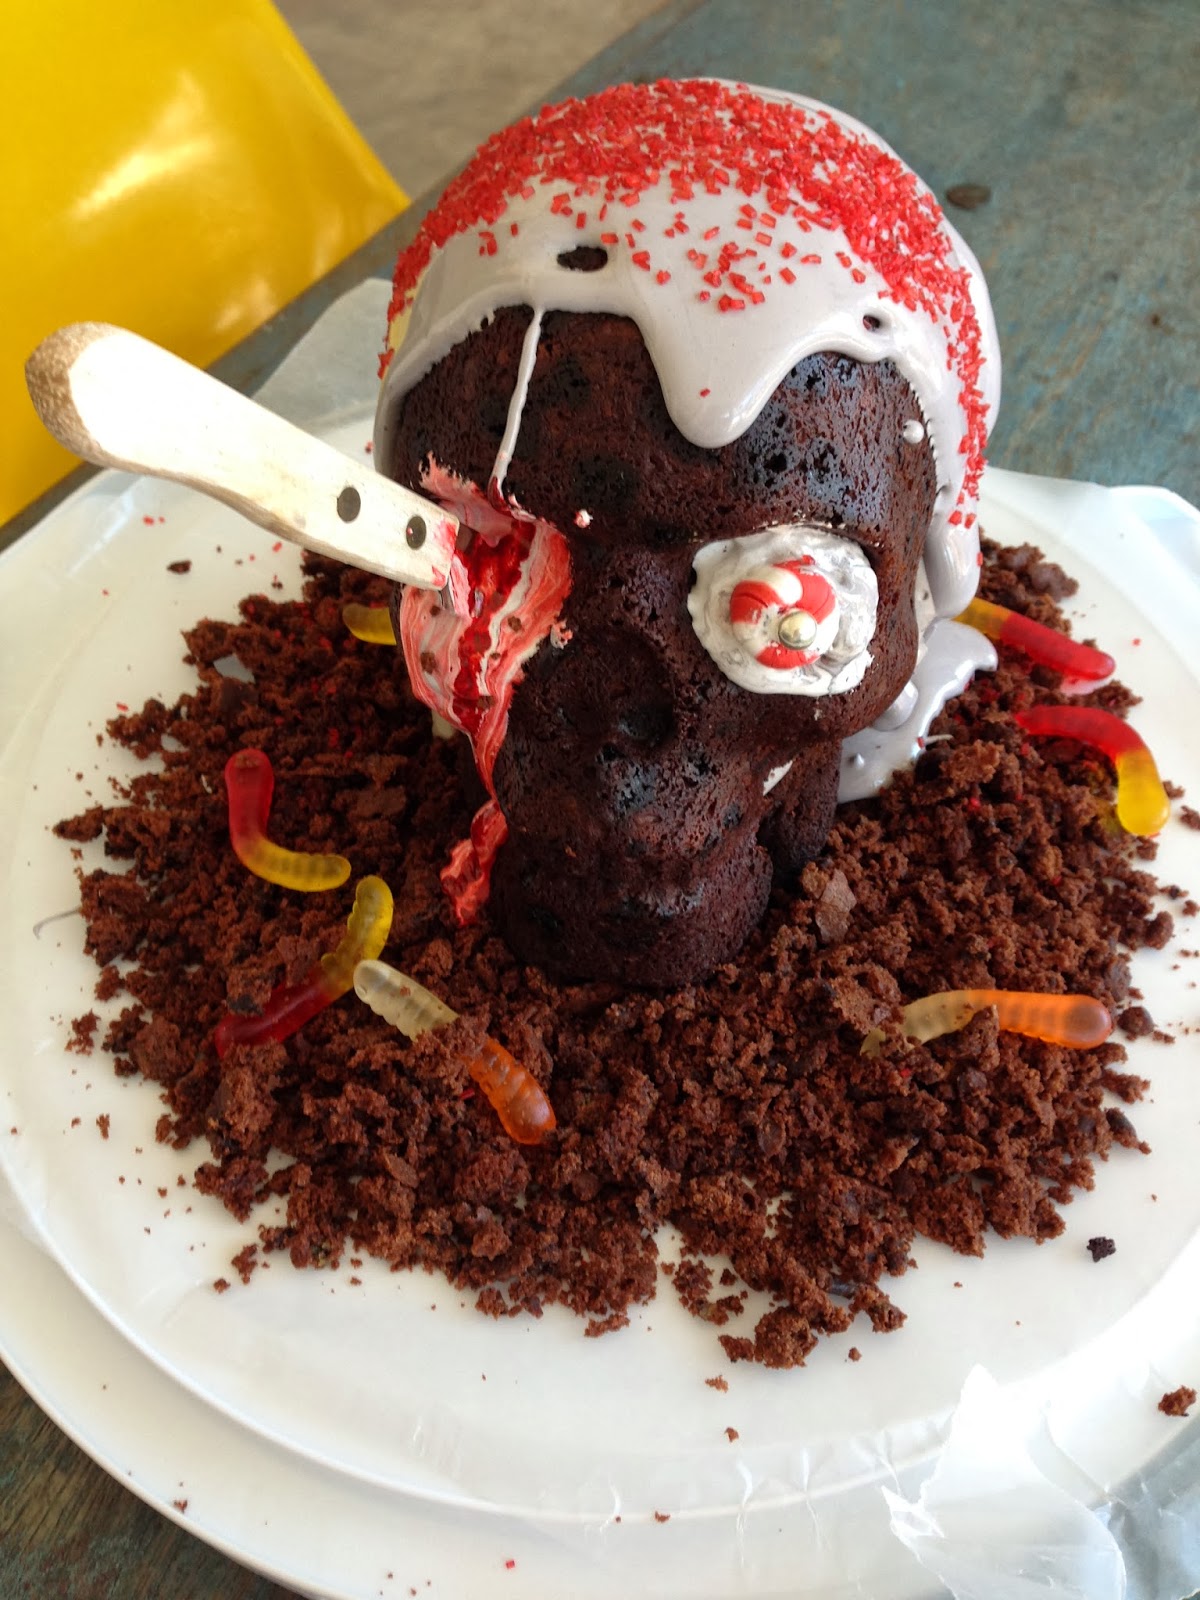
Happy Halloween Cake
I made this cake for my sister Julie's birthday as she loves Halloween. It was supposed to be a rotting skull buried in dirt with pus oozing out of it. But decorating a cake and 7 week olds don't mix so I ended up over heating the icing which began to ooze instead of hold pustule shapes and before I knew it I had to call it a 'doo-rag' and make him a charred dirty pirate instead.
I used a chocolate cake recipe from Nigella that never fails me. I love it because it breaks every baking rule you've ever learned about keeping the dry and wet ingredients separate and painstakingly adding the wet slowly into the dry. You just dump everything into a food processor, give it a whirl and call it a day.
And it turns out EVERY time - moist and rich yet fluffy and light - and as a bonus it fit the skull pan perfectly. The pan can be found on sale right now at Williams Sonoma by the way and is worth every penny if you're a pan hoarder like myself. I sprayed it with nonstick spray and dusted it with cocoa powder before pouring the batter in and the cake released easy-peasy.
The cool thing is (yes I said cool thing in relation to cake baking - I'm five) is that you'll need to slice the inner halves of the skull after baking and cooling to make them flush and flat (so that when pressed together to make a skull it's not kattywompus.)
But this excess cake isn't wasted. You can crumple this bit of cake up with your fingers to make the 'dirt' for the skull to sit on. I had bought a packet of Oreos to grind up to use and found I didn't need to - I had delicious cake dirt!
The icing is where I took a major shortcut with Marshmallow Creme that actually suited my purposes just fine but I bet Pinterest or any other nerdy site could hook you up with an icing that is more profesh if desired.
Well my baby's up from his nap and ready to eat. Until next time - Happy Halloween y'all!
Halloween Skull Cake (Mint Chocolate Chip Cake)
Altered from a recipe by Recipe by Nigellas Lawson, Nigella's Quadruple Chocolate Loaf Cake
Cake:
1 2/3 cups all-purpose flour
1/2 teaspoon baking soda
1/2 cup cocoa, plus extra for dusting pan
1 1/3 cups sugar
1 1/2 sticks soft unsalted butter (I use SALTED)
2 eggs
1 tablespoon good-quality vanilla extract
1/3 cup sour cream
1/2 cup boiling water
1/2 teaspoon mint extract
1 cup Andes mint chocolate pieces or semisweet chocolate chips or morsels
Glaze for decorating/icing:
1 teaspoon cocoa
1/2 cup water
1/2 cup sugar
1 (7 oz) carton Jet Puffed Kraft Marshmallow Creme
Black food coloring, or other for coloring the pirate's 'doo rag'
Red food coloring, for blood
colored sprinkles for decorating doo rag
1 candy eyeball or a round peppermint candy for an eyeball
1 silver or gold dragee for center of the eye (use a dot of icing for the glue onto the candy eyeball)
An old steak knife, for stabbing through one of the eyes
Gummy worms, for planting in the 'dirt'
Special equipment: Halloween skull pan, found at Williams Sonoma
Directions
Take whatever you need out of the refrigerator so that all ingredients can come room temperature.
Preheat the oven to 325 degrees F, putting in a baking sheet as you do so.
Spray both sides of the skull cake pan well with nonstick spray, then lightly but thoroughly dust with cocoa powder. Place the pan on a sturdy flat cookie sheet for stability.
Put the flour, baking soda, cocoa, sugar, butter, eggs, vanilla, and sour cream into the processor and blitz until a smooth, satiny brown batter. Scrape down with a rubber spatula and process again while pouring the boiling water down the funnel. Blend again, add in peppermint extract and give a final whirl. Switch it off, then remove the lid and the well-scraped double-bladed knife and, still using your rubber spatula, stir in the Andes chocolate pieces or chocolate chips or morsels.
Scrape and pour the batter into the prepared loaf tin and put into the oven for 25 minutes. Carefully rotate the pan to the other side then bake for another 10-15 minutes until the cake has risen all the way and 'puffed' but is no longer jiggly in the center. You want to be careful not to over bake this cake as all the detail in the sides can darken the edges and make them crispy if over baked. Using a cake tester or a strand of spaghetti is good insurance if you're iffy.
Remove the cake and let cool on a wire rack completely then carefully invert onto another greased wire rack. When you're sure the cake has cooled all the way, use a serrated bread knife to 'slice' off the undersides of the skull halves ,making them flat. Save these scraps to crumple into 'dirt' onto whatever plate or cake plate you're constructing the cake on making a nice bed for it.
Meanwhile put the syrup ingredients of cocoa, water and sugar into a small saucepan and boil for about 5 minutes, to give a thick syrup. Stir in the marshmallow creme and food coloring getting it to the color you like for the doo rag. Use about 1/4 of this mixture, a tablespoon at a time, to spread on the flat inner side of one of the skulls. This will be your glue to stick them together so don't use so much that it oozes out (though no big deal if it does) and add a little at a time.
Once the cake is together and the creme has set (should happen quickly, this stuff is like edible crazy glue) carefully set the skull into the center of the dirt.
Use the rest of the icing mixture to create either a doo rag or pus or whatever you like. If you let it cool a bit to where it's not so oozy, you can use a fork to drizzle 'brain matter' in little circles over the head. If the mixture gets too hard, gently heat it up over a low flame and stir again until it's smooth and oozy.
Finish decorating to your liking using a candy for an eyeball, more 'pus' in the other eye with a couple drops of red food coloring, and plant the worms in the dirt. Stab a steak knife in the empty pus filled eye socket if desired.
Labels:
Alisa's All Stars,
cake,
chocolate,
Halloween,
holidays,
sweets,
williams sonoma
Sunday, August 25, 2013
Key Lime Pie for Cheaters. No Apology Necessary.
For Father's Day this year I had my dad and stepmom over for a nice lunch. I made chicken fried chicken, chipotle and white cheddar garlic mashed potatoes, spinach salad and key lime pie.
My dad has a huge sweet tooth so initially I had higher ambitions than key lime pie using bottled key lime juice. But being pretty pregnant at that point something had to give and as I looked at the cheesecake recipe I'd pulled out the night before I realized it was a little ambitious in addition to making everything else including the salad dressing from scratch.
I found a bottle of Nellie and Joe's Key West Lime Juice in my pantry along with a chocolate graham cracker pie crust and off we went. And here's the thing. It didn't matter. I'd put this pie up against a made from scratch one any day. I jazzed things up a little with a sweetened sour cream topping and fresh lime zest. The sour cream topping was a component of my mom's cheesecake growing up and it added a nice counterpart to the sweet key lime filling (something a little different than whipped cream.)
If I had one thing to do over I'd have made the chocolate graham cracker crust from scratch. It wouldn't have added much time to the recipe and probably would've taken it up a whole other level but in a pinch you can't beat a tasty pie that you can whip together in five minutes flat.
Nellie and Joe's Key Lime Pie
*Slightly Adapted by Alisa Wixom
Ingredients:
1 (9 inch) prepared chocolate graham cracker pie shell (regular is fine too)
14 oz can sweetened condensed milk
3 egg yolks
1/2 cup Nellie and Joe's Key West Lime Juice (from a bottle found in grocery store)
1 (16 oz) carton sour cream
heaping 1/4 cup powdered sugar
zest of 1 lime
How To:
Preheat oven to 350. Combine the condensed milk, egg yolks and lime juice together in a medium bowl. Blend until smooth. Pour the filling into the prepared pie shell and bake for 15 minutes. Allow to cool for at least 30 minutes on a pie rack. While the pie cools, combine the sour cream and powdered sugar together until well mixed. Spread the mixture evenly over the whole pie (you probably won't need or want all of it but up to you.) Garnish the top with lime zest and a thin slice of lime if desired.
Cover lightly with plastic wrap and refrigerate until chilled. Will last for 3 days in the fridge.
Thursday, April 18, 2013
M&M Cookies to Brighten Your Day
I had a wicked urge to bake on Saturday. It wasn't even a case of pregnancy munchies. I'd been having visions of brightly colored M&M cookies from my childhood (pregnancy has made me weirdly nostalgic for foods from when I was little) so I did a quick Google search and was on my way.
I had no way of knowing how badly I would need these cookies two days later when we woke up to find my 16 year old cat Lily on the floor, her back legs paralyzed. It wasn't going to be a good day.
But back to the cookies. These are my favorite kind of cookies to make. They're one-bowlers and as long as you've set the butter out a good couple hours ahead of time to soften you can whip them up in less than thirty minutes. No need to refrigerate the dough before baking either. And while they no doubt satisfy that nostalgic cookie craving, the addition of lemon zest adds enough complexity to offset all that sugar for grown up taste buds.
I see these cookies becoming one of my go to recipes and I can't wait to make them during different times of the year when M&Ms get all festive and seasonal (Halloween, Christmas, Easter, etc.) Ooh all the pretty colors! I'm such a girl. I might even try adding lemon extract to them next time as I love the lemon/chocolate combo.
Anyway if you need a little pick me up these will set you straight. Especially when wine isn't an option;)
M&M Cookies
Makes 16 large bakery-sized cookies.
* Adapted from All Recipes - "Robbi's M&M Cookies"
Ingredients:
1 cup packed brown sugar
1/2 cup white sugar
1/2 cup shortening, room temp
1/2 cup (1 stick) salted butter, room temp
2 eggs, room temp
1 1/2 teaspoons vanilla extract
zest from 1 medium or large lemon (I like more!)
2 1/2 cups all purpose flour
1 teaspoon baking soda
3/4 teaspoon kosher salt
1 1/2 cups candy coated milk chocolate pieces, plus 1/4 cup
Instructions:
Preheat oven to 350 (convection bake if you have it.)
In a large bowl, mix sugar, butter and shortening together until everything is really well combined and smooth. Stir in the eggs, vanilla and lemon zest. Finally pour the flour, baking soda and salt over the wet mixture and stir until just well combined. Gently stir in the 1 1/2 cups of chocolate candies.
Use a large ice scream scoop to scoop them onto an ungreased pan giving at least 2 inches between cookies. Carefully press in any extra M&Ms you can fit on the tops. Bake for 10-11 minutes, just until the tops are beginning to turn golden in places as well as the edges. Remove and let set up on the sheet for another 60 seconds. Carefully transfer with a spatula to a cooling rack. Can be stored at room temp in an airtight container for up to 3 days.
Labels:
Alisa's All Stars,
chocolate,
cookies,
holidays,
sweets
Saturday, March 30, 2013
Rocky Road Pie and a Baby
Well looky there. You would think my four month, two week old baby bump would have a little something to do with two pie recipes in a row wouldn't you? Oh wait - I haven't told you I'm having a baby? How rude of me. I'm having a baby!
This little bundle of joy and purveyor of sleepless nights arrives in early September and I couldn't be more excited. Though I do miss my wine. There I said it.
Anyway I've been a little busy between gestating and my day job and SXSW (which I am SO glad is over. Who knew how much a little vino could help you survive that two week shit storm of culture, music, technology and lack of cabs?)
But back to the pie. This chocolatey-nutty-salty-gooey-marshmallowy delight was actually no fault of my little fetus. It was my hubby's birthday this past Monday and he requested a rocky road pie. I had never made a rocky road pie so I did a quick google search thinking I'd be golden. Not so simple. The recipes with the best ratings were rocky road ice cream pies which basically consisted of - you guessed it - pouring softened rocky road ice cream into a graham crust and freezing it. I have nothing against easy recipes but I felt compelled to put forth a little effort. After all the poor guy's birthday was already on the worst day of the week (Monday) and with me being knocked up and all I was too tired to do anything more festive than an early dinner with friends. I owed the man a decent pie.
Suddenly a pie from my past came to me in a vision (since getting pregnant I have these really vivid food memories that hit me out of nowhere like a ton of bricks.) This time it was a pie my mom made often growing up which was hands down the most divine, ridiculously addictive pie I've ever tasted. I hadn't thought of it in years. When I tell you the recipe you're going to laugh: one store bought chocolate graham cracker pie crust + 1 tub of Cool Whip mixed with a giant almond hershey bar that's been melted. Freeze and serve. That's it. I'm telling you though - it is the devil himself.
I knew immediately I'd be swapping out my childhood Hershey bars for my husband's favorite (XOXO Dark Chocolate, Sea Salt and Almond) and since I didn't have any Cool Whip on hand I improvised the rest. What came out was a ludicrously decadent, slightly more sophisticated homage to my mom's recipe.
The husband was happy, the baby bump was happy and despite the lack of cocktails and the fact that we were in bed by 10 it wasn't such a bad birthday after all. Happy Happy Belated Birthday my sweet husband! Next year I promise to paint the town red with you. Or at least to handle diaper duty...
Rocky Road Pie with Chocolate Wafer Crust and Marshmallow Creme Topping
Ingredients:
1 store bought Oreo or chocolate graham crust
2 (3.2 oz) bars of XOXO Dark Chocolate, Sea Salt and Almond
1/2 cup of semi sweet chips, plus extra for garnish
2 pinches sea salt or kosher salt
Splash of coffee or vanilla extract
1/4 cup toasted sliced almonds (can up this if you want more almond to filling ratio)
1 1/2 cups heavy cream
1/3 heaping cup confectioner sugar
splash of vanilla extract
1 (7 oz) tub Kraft marshmallow creme
Directions:
Break up the bars into small chunks and put in a medium microwave safe bowl. Add in 1/2 cups semi sweet chips and microwave at 30 second intervals, stirring in between, until the chocolate is just melted and smooth. Stir in the salt, coffee or vanilla, sliced almonds and set aside.
Add the heavy cream into a standing mixing bowl and mix on high until stiff peaks form. Pour in confectioner sugar and vanilla extract and blend until incorporated. Fold in the melted chocolate mixture just until well mixed but don't go overboard as you don't want to deflate the whipped cream too much.
Pour into the prepared graham shell, cover and refrigerate for at least four hours. Before serving, carefully pour the marshmallow creme out evenly over the top of the pie (using clean fingers is the best tool for distributing it evenly - it tends not to play well with utensils.) Decorate with semi sweet chips and serve. Pie will keep up to five days in the refrigerator if well covered.
Labels:
Alisa's All Stars,
Birthday,
chocolate,
Christmas,
Make Ahead,
pie,
sweets,
Valentine's Day
Thursday, February 28, 2013
Grasshopper Pie
This pie is perfect for St. Patrick's Day, the holidays or during those times when only pie will do. I'm curious - are you a cake or pie type of person? My husband is strictly pie. He'll eat cake but only if it's drowning in ice cream or even better when it's in an ice cream cake.
I'm not so picky. For me cake satisfies that nostalgic 'I want to relive my fifth birthday' craving while pie is more immediately gratifying and sinful - just a good 'ole down and dirty sugar fix. And the older I get the more types of pie I like which is GREAT news for my figure as I begin the downward spiral called the mid thirties. Take that, metabolism!
But of all the pies out there, this may be the most lethal kind. It is so light and fluffy and cool, disappearing like a snowflake on the tongue, that you might trick yourself into thinking it's just a bunch of calorie-free air. Well just go on and think that sweetheart. I for one won't spoil the fantasy.
By the way I had my reservations about using marshmallow fluff. I worried that it would make the pie taste 'fake' or sickly sweet. I've never been happier to be wrong. I also have to add that this was a 'cover my bases' pie I made for Christmas - an extra dessert just in case we blew through the rest. I even used one of those pre-made graham crusts so my expectations were fairly low. And OH the irony - it was the favorite dessert of the night even over the fancy desserts I actually slaved over.
Grasshopper Pie
This pie is so easy you could make it in your sleep. The other great thing about this pie is you can play artist when adding the green food coloring. Add a little as I did for that classic mint green or go whole hog and make it wake-me-up-before-you-go-go-green.
Ingredients:
1 chocolate graham crust (store bought is fine)
1 jar 'jet puffed' marshmallow creme (7 oz)
1/4 cup creme de cacao blanc
1/2 teaspoon mint extract
1 1/2 cups heavy cream
few drops green food coloring, to color preference
silver dragees or colored sprinkles for decorating, optional
Directions:
In a medium/large bowl, mix together the marshmallow creme, creme de cacao, and mint extract. Set aside while you whip the heavy cream in a standing mixer or in another bowl with a hand held mixer until the cream holds soft peaks. Gently fold the whipped cream into the marshmallow mixture then add a couple drops of food coloring and gently stir to mix. Pour into the prepared pie crust and refrigerate at least 4 hours until firm. Decorate with dragees or sprinkles if desired before serving.
You can also freeze the pie if you like more of a frozen texture or for just a few minutes if it needs firming up before slicing but I personally like it straight from the fridge with that soft as air texture that the fridge gives it.
Labels:
Alisa's All Stars,
Christmas,
Halloween,
Make Ahead,
pie,
St. Patrick's Day,
sweets
Wednesday, February 13, 2013
Rich & Chewy Butterscotch Brownies with Smooth Criminal Caramel Icing
When I first tasted these years ago at Rebecca Rather's former eatery - Rather Sweet - I thanked the dear Lord her restaurant was over an hour and a half from my house. Only distance could keep me from buying and eating these damn bars by the truckload.
They're so rich that after your first bite you're like 'holy sh*t - this is too much. No self respecting person would ever finish one of these.' Only the weird thing is the brownie has already disappeared. Into your stomach.
The problem was I bought her cookbook. And there the little vixens were again staring at me from a glossy photo all cute and wrapped up in wax paper.
It took me years to pull the trigger and make them for two reasons. One - I was afraid they wouldn't live up to my memory of them and two - I was afraid that if they did I'd be in BIG trouble.
They lived up.
The bad news of course is what this means for my backside. And my frontside. All my sides really.
But who cares! It's almost Valentine's Day.
Little sidebar real quick... For years I insisted on cooking on Valentine's Day (in hindsight I believe I was possessed.) Luckily the demon has left me and I now insist on going out to eat. Dirty dishes = UNSEXY TIME. As does making something your husband doesn't even like like filets with artichoke gruyere fondue like last year (he thinks gruyere smells like something I can't repeat on a food blog.)
Like I said I learned my lesson. That said I have no problem with making dessert for Valentine's Day. Particularly one that can be made ahead like these butterscotch brownies.
They truly are the stuff dreams are made of. And wether your spending Valentine's Day with your luva or spending it solo on the couch watching Nashville on DVR (ideally I'll be doing both!) - these bars will ensure it's a happy one.
Rich & Chewy Butterscotch Brownies with the Smooth Criminal Caramel Icing
Makes 2 1/2 dozen (30) 2 x 3-inch bars
* Rebecca uses unsalted butter in both the brownies and the icing. I use salted because I adore the sweet/salty thing when it comes to caramel recipes. It still won't be too salty, IMO.
Brownies:
2 sticks salted butter at room temperature
3 cups firmly packed light brown sugar
4 large eggs
1 tablespoon vanilla extract
3 cups all-purpose flour
1 tablespoon baking powder
1 teaspoon kosher salt
2 cups chopped pecans, toasted (I omit them but it's up to you!)
Icing:
2 sticks salted butter
2 cups firmly packed light brown sugar
4 cups confectioners sugar
1/3 cup half-and-half
1 tablespoon vanilla extract
To make the brownies:
- Preheat oven to 350F. Line a 13 x 18-inch pan with foil and coat with cooking spray.
- Using an electric mixer with the paddle attachment, beat the butter and brown sugar on medium high until fluffy, about 2 minutes. Add the eggs and vanilla and beat 1 minute.
- In a separate bowl, stir together the flour, baking powder, and salt. Beat the flour mixture into the butter mixture on low speed until incorporated. Stir in the pecans and pour into the prepared pan, smoothing the top. Bake until just set and slightly puffed, 25-30 minutes. Cool completely before icing.
To make the icing:
- Melt the butter and sugar in a saucepan set over medium heat. When the mixture bubbles lightly, reduce the heat to low and cook, stirring occasionally, 2 more minutes. Set aside.
- Using the paddle attachment on the electric mixer, beat the confectioners’ sugar, half-and-half and vanilla on medium speed until creamy, about 1 minute. Add the melted butter mixture and beat until combined. Pour over the cooled brownies and spread evenly. Allow the brownies to sit at least 30 minutes for the icing to set. Cut into squares.
Labels:
Alisa's All Stars,
Christmas,
cookies,
gifts,
holidays,
Rebecca Rather,
sweets
Saturday, January 19, 2013
The 'Chocolate Cure' Cake
*Adapted from 'Too Much Chocolate Cake' on Allrecipes.comIngredients:
1 (18.25 oz) box devil's food (chocolate) cake mix
1 (5.9 oz) package instant chocolate pudding mix
1 cup sour cream
1 cup vegetable oil
4 eggs
1/2 cup warm water
pinch salt
1 teaspoon vanilla extract
2 (or more) cups semisweet chocolate chips
Directions:
Preheat oven to 350. Spray a bundt pan with nonstick spray and set aside.
In a large bowl, mix together the cake and pudding mixes and make a well in the center. In another small bowl break the eggs up with a fork then add them into the well with the sour cream, oil, salt, and vanilla. Stir to combine. Pour in the water and stir until just well mixed.
Finally, stir in the chocolate chips then pour the batter into the cake mold. Place on a cookie sheet for stability and bake for 50-55 minutes or until a wooden pick inserted comes out clean. Cool cake for 20 minutes before inverting and cooling the rest of the way. Sprinkle with powdered sugar if desired.
Labels:
Alisa's All Stars,
cake,
chocolate,
sweets
Sunday, January 6, 2013
Pumpkin Rum Cake with Brown Sugar Icing
This rum cake is a labor of love compared to my 'go to' rum cake which starts with a mix and is the most beloved cake I've ever made. That said it's TOTALLY worth it. Like stop-looking-at-how-long-the-ingredient-list-is-and-just-make-the-damn-thing worth it.
Only then will you understand. Plus the upside is a sense of accomplishment that you likely haven't experienced since acing your high school chemistry test. Or birthing your first child. Or in my case...taking your Christmas tree down before February.
Pumpkin Rum Cake with Brown Sugar Icing
from Southern Living
*I always check my cakes for doneness before the suggested cooking time just because ovens vary so much.
* This cake is too gorgeous to risk burning and sticking so I grease my pan liberally with softened butter, then a little cooking spray, then sprinkle flour all over and tap out excess.
* This icing is maybe the best icing I've ever had and is easy to make but burns EASILY. Watch it like a newborn and be ready to remove it from the heat asap. The recipe called for boiling 3 minutes but I reduced this because mine scorched after that long.
Ingredients:
- 3/4 cup chopped pecans, toasted
- 3/4 cup firmly packed dark brown sugar
- 3 tablespoons all-purpose flour
- 1 1/2 teaspoons ground cinnamon
- 1/4 cup butter, melted
- 1 cup unsalted butter, softened (I use salted)
- 2 cups granulated sugar
- 2 cups firmly packed dark brown sugar
- 5 large eggs
- 1 teaspoon vanilla extract
- 2 cups canned unsweetened pumpkin
- 1/4 cup dark rum
- 3 cups all-purpose flour
- 2 teaspoons baking powder
- 1/2 teaspoon baking soda
- 3/4 teaspoon salt
- 2 teaspoons ground cinnamon
- 1/2 teaspoon ground ginger
- 1/2 teaspoon ground allspice
- 1/2 teaspoon ground nutmeg
- 3/4 cup firmly packed dark brown sugar
- 1/2 cup whipping cream
- 1/4 cup unsalted butter (I use salted and even add a tiny pinch salt)
- 1 generous teaspoon dark rum
- 1 cup plus 2 Tbsp. sifted powdered sugar
Preparation:
- Combine first 4 ingredients in a small bowl; stir in 1/4 cup melted butter. Use fingers to pinch streusel into big clumps. Set aside.
- Beat 1 cup butter at medium speed with an electric mixer about 2 minutes or until creamy. Gradually add 2 cups each granulated and dark brown sugar, beating at medium speed 5 to 7 minutes. Add eggs, 1 at a time, beating just until yellow disappears. Pour in vanilla extract and beat just to incorporate.
- Stir together pumpkin and 1/4 cup rum in a bowl. Combine flour and next 7 ingredients in a medium bowl. Add flour mixture to butter mixture alternately with pumpkin, beginning and ending with flour.
- Pour half of batter into a well-greased and floured 12-cup Bundt pan. (We recommend greasing pan with shortening.) Sprinkle batter with streusel; top with remaining batter.
- Bake at 325° for 1 hour and 28 minutes or until a long wooden pick inserted in center comes out clean. Cool in pan on a wire rack 10 minutes; remove from pan, and let cool completely.
- Combine 3/4 cup brown sugar, whipping cream, and 1/4 cup unsalted butter in a medium saucepan along with a pinch of salt (optional). Cook, stirring constantly, over medium-low heat, until butter melts and sugar dissolves. Increase heat to medium-high, and bring to a boil. Boil for 60 seconds and IMMEDIATELY Remove from heat. Off the heat stir in a splash of rum (recipe calls for a teaspoon but hey - it's the holidays.)
- Place powdered sugar in a bowl; pour brown sugar mixture over powdered sugar, stirring with a wire whisk 1 minute or until smooth. Let cool 20 to 25 minutes or until lukewarm. Spoon icing over cooled cake, and let stand until icing is firm.
Labels:
cake,
Christmas,
holidays,
sweets,
Thanksgiving
Subscribe to:
Posts (Atom)