Showing posts with label breakfast. Show all posts

Saturday, April 18, 2015

Sourdough Crumpets from Starter

                               
I can't vouch for these being genuine crumpets as I've never had one before but I can vouch for them being a perfect cross between an English muffin and a sourdough bagel. I can also vouch for the fact they're going to be a problem for me. They are just too damn good. Full disclose as to how I ended up making them. They were supposed to be hamburger buns. Or at least so the recipe told me. And while they did the job they were a little too dense for a classic hamburger bun. But the next morning after being popped into the toaster and smeared with butter and jam I found their true calling. Breakfast!

They have that unmistakable sourdough tanginess, a chewy bagel like exterior and yet a soft yielding inside filled with all sorts of mysterious nooks and crannies that equal fluffy bread heaven.

If you're afraid of keeping a sourdough starter - don't be. Seriously if I can do it anyone can. For example, Kris is on this kick of bringing home succulents for the house. And while I love them, I die a little inside every time he buys a new one because I just know that sucker is gonna die on my watch. I've killed literally eight in the past three months.

So trust me when I say if I can keep a sourdough starter alive, so can you. A trick to avoiding the headache of maintaining a starter is to keep it in the fridge instead of at room temp. That way if I forget to 'feed' it for a couple of weeks it's totally fine. On that note feeding your starter isn't scary at all. You basically remove a cup of stirred starter from your batch and either use or throw away then replenish it with a cup each of flour and water (though I tend to use less water sometimes when I think mine's getting too liquid.)

Is 'too liquid' proper grammar? Google's not correcting me so I'm going with it. Anyway if you like to bake, you are always just a few hours away from something hot from the oven. Pretty good payout for letting something just hang out in your refrigerator.

That said 'starting' it is a different story. Not difficult but it has a few steps and involves actually following directions which I'm not always great at much less while chasing after a 19 month old. Anyway I bought mine online from King Arthur and followed the instructions here.

So back to this bagel/English muffin situation. Mine didn't rise that much before baking (probably because I didn't wait for my starter to come to room temp first.) In fact I was pretty much convinced I was making little sourdough flatbreads but then they rose and puffed in the oven and became crumpet like.

One bit of advice is to not over bake them. Once the bottom edges are golden brown - get those suckers out!

Sourdough Crumpets
*adapted from Sparkle People
*yields about 10 crumpets though recipe easily doubles if needed

1 cup sourdough starter (well stirred and if you have the time, at room temp)
1/2 cup lukewarm water
1/4 cup sugar
2 tablespoons coconut oil (gently heated to liquid state) or vegetable oil
1 egg yolk (plus one additional egg for the wash)
1/4 teaspoon kosher salt
3-5 cups flour, or more (be sure to use the spoon and sweep method for measuring)

Mix all but the flour together in a large bowl with a wooden spoon until well mixed. Add half the flour and mix well then gradually add the rest by small increments until the mixture is hard to stir but all the flour is incorporated. Flour a large clean surface and turn the dough out. Kneed, turn over and pressing across with the palm of your hand several times (adding flour as necessary to keep the dough and/or hands from sticking) until the dough is pliable, cohesive and springy. I know this sounds weird but I know my dough has come together when I can gently yet firmly smush and pat it together into a ball and when I pat it like a baby's butt it stays sort of puffed and proud in that shape.

Oil a clean bowl lightly and place the dough inside turning over to coat. Cover with a slightly damp kitchen towel and place in a warm place (I never have a 'warm' place so I turn my oven on to 350 for 5 minutes then shut it off for 5 minutes before putting the bowl in. If it still feels hot either wait a little longer or leave the door open.) Leave until doubled (though to be honest after 3 hours mine hadn't doubled or even risen significantly so don't fret and press on if that happens to you as mine turned out great.)

Punch down and let rest another 15 minutes. Pinch off pieces of dough that when rolled lightly between your palms are about the size of a medium lemon. Place at least two inches apart on baking sheets lined with parchment paper. Cover with kitchen towels and return to a warm place for 30 minutes or as long as you need until ready to bake.

Preheat your oven to 375. Remove the towels from the crumpets and brush lightly with an egg wash (one egg mixed well with a hefty splash of milk.)

Bake for 15-20 minutes until edges are just light golden brown. Remove and transfer to a cooling rack. These will keep in an airtight container for 3 days. They would probably freeze well too!


Monday, January 12, 2015

Marvelous Zuchinni Muffins. Tops like a sugar cookie, bottoms like a crumb cake.


It's amazing to me that just now, with Sawyer edging towards 17 months, I JUST now feel like I have control of my life again. And that said, now that he's in his second round of teething - that's even debatable most days.

Yet I feel kind of giddy that last Friday evening after a crazy workday, I managed to dream up this recipe and have it turn out as well as it did. It's so classic - I have no less than a couple hundred cookbooks and yet I couldn't find the trusty zuchinni bread recipe I made last. So I wrote down what I thought would work, set out the butter and eggs and went to bed, thinking I'd likely be tossing my experiment the next day. Quite the contrary - I don't think I'll make zuchinni bread or muffins from another recipe for a long time to come.

You can dress these up for winter with a hit of orange zest (or a grating of fresh ginger) or for summer with some lemon zest or just make them exactly as is. I do have to tell you, they are more of an adult muffin recipe as they have a nice mildly salty bite to them. Kris and I love a little salt in our sweets and in my opinion, the flavor balance here is perfect. But it gives them a more complex taste than most super sweet muffins - not that this bothered Sawyer Lee in the least. He LOVES them and to say he is picky is an understatement.

I hope you make them. The crust gets this amazing sugar cookie/oatmeal cookie texture while the center is dreamy and fluffy and soft. Eat them warm (micro the leftovers) with a pat of butter.

Marvelous Zuchinni Muffins
If you set out the butter and eggs the night before so you can literally whip this up in the morning in a half an hour. I was too lazy to get out my electric hand held mixer so I just whipped the butter an oil together by hand with a whisk. Totally worked but no doubt the hand held would be faster.

Ingredients:
1 stick salted butter, room temp (leave out the night before morning of baking)
1/2 cup oil (I use Spectrum Canola/Coconut blend) though vegetable or canola would work
1 1/4 cups sugar
2 cups flour
1/2 teaspoon baking soda
1 teaspoon kosher salt (if using table salt, 1/2 teaspoon)
2 eggs, room temp and beaten
1 teaspoon apple cider vinegar
1 cup grated zuchinni, pressed with a towel to remove excess moisture
1/2 cup chopped pecans
20-24 muffin liners, optional, or baking/nonstick spray

Directions:
In a large bowl, cream the softened butter and oil with a handheld mixer until smooth. Add in the sugar and cream again until well blended.

In a separate (smaller) bowl, whisk together the flour, baking soda and salt. Fold into the sugar/oil/butter mixture in three additions until combined. Stir in the eggs then vinegar, zuchinni and pecans.

Fill prepared muffin tins (either lined with muffin cups or sprayed with nonstick spray, number depending on size of your muffins tins but usually between 20-24) 3/4 the way full and bake at 375 for 15-17 minutes, just until tops are very light gold and cake tester comes out clean/with crumbs rather than wet batter when poked down the center.

Serve right away with butter or let cool completely and store in an airtight container up to 3 days.


Sunday, July 6, 2014

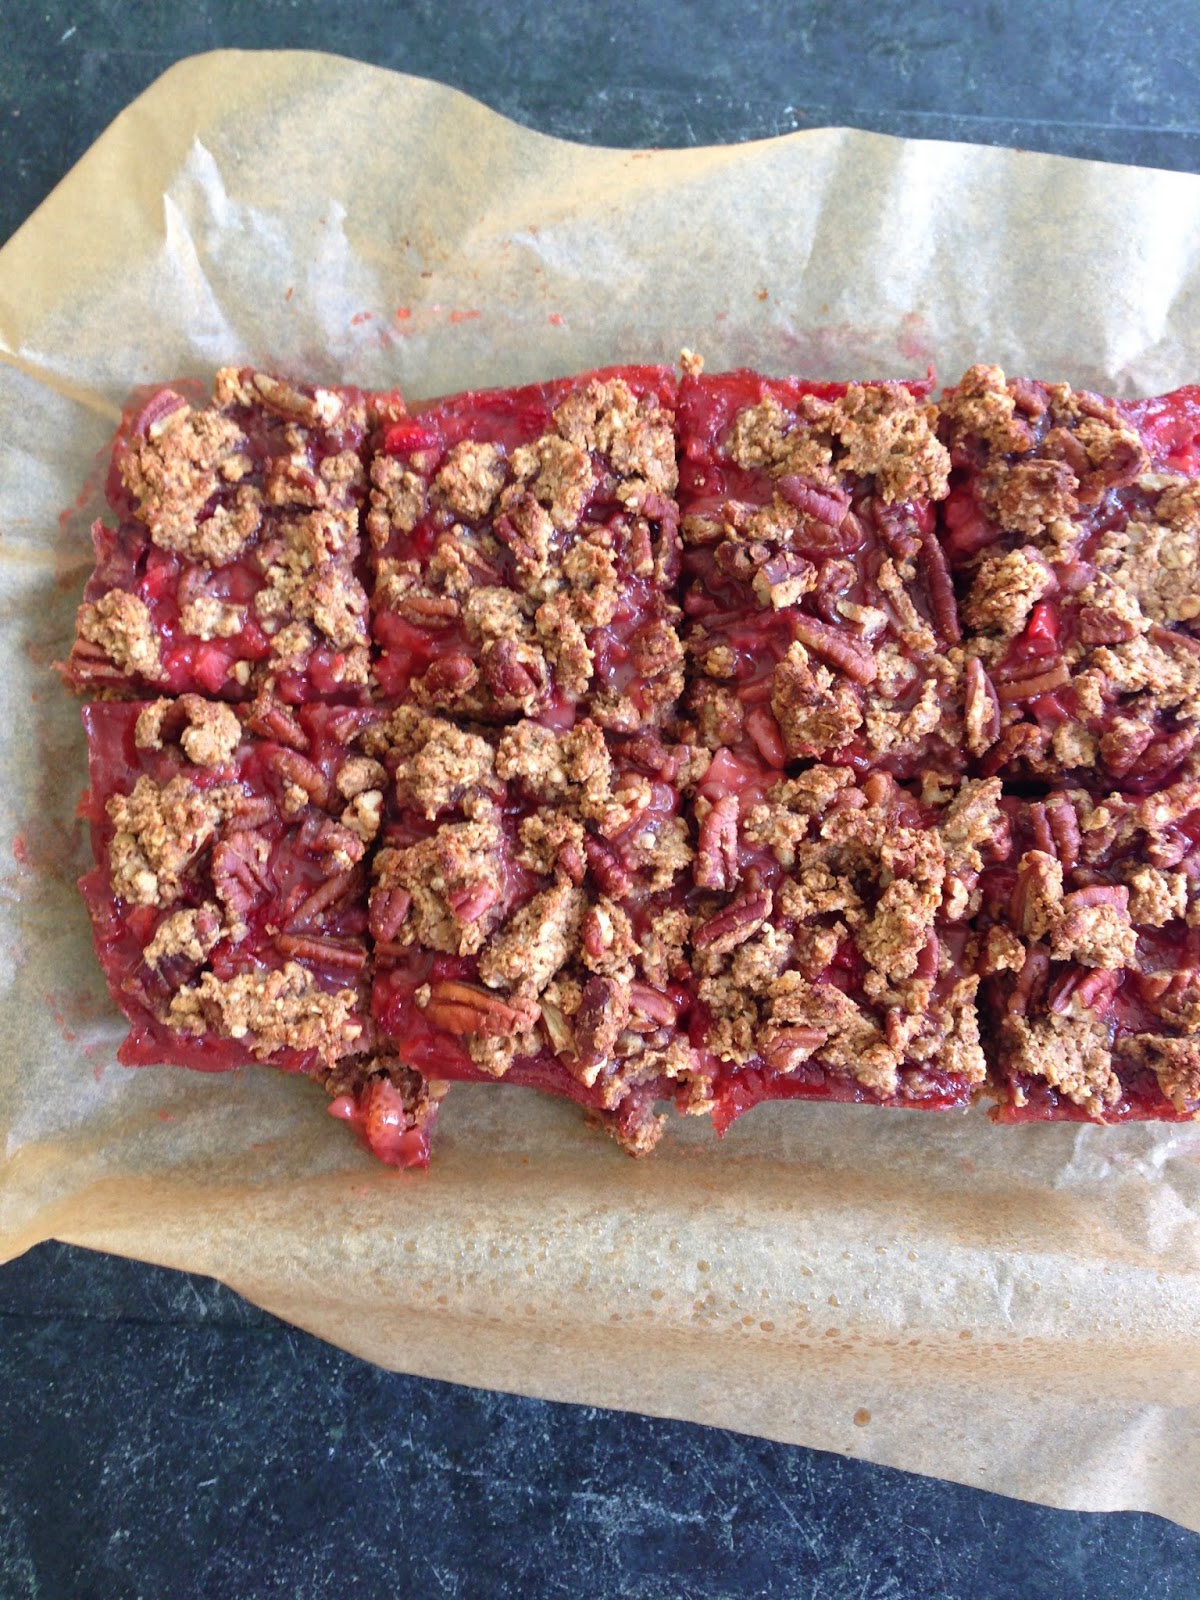
Healthy Strawberry Oatmeal Bars - Gluten Free


I discovered a new (to me) blog - Sally's Baking Addiction. Oops. This could have been a really bad thing but luckily Sally posts some healthy recipes now and then to fuel her marathon training. These bars were fantastic however I did make a few tweaks.

As with a lot of gluten free/Paleo-ish recipes, these were not sweet in the slightest. I suspect part of it was the fact my almond butter has zero sugar in it but just to be sure I could also serve these to people NOT worried about their calories I upped the sugar a hair. There was already one tablespoon in the recipe (the rest of the sweetness comes from maple syrup) so I threw caution to the wind by doubling it and also sprinkling a little over the top before baking.

They're still not what I would call a dessert bar or a 'sweet' but they're absolutely perfect for breakfast or as a snack IMO. Particularly with some Greek yogurt. And a latte. Or five.

Sally asks that you link back to her recipe rather than copy it so I'll just include my tweaks below that you can apply if you wish. I also added vanilla extract because I'm suspicious of any baked good that leaves it out. And salt for the same reason.

Enjoy!

Alisa's Tweaks to the filling:

Use 2 tablespoons sugar in the strawberry filling. If you want a more dessert like bar versus say a breakfast or 'snack' bar, I suggest 1/4 cup.

Add in the zest of one lemon to the boiled strawberry mixture along with the cornstarch mixture as well as 1 teaspoon vanilla extract and a pinch of kosher salt. I suspect orange zest would be equally amazing.

Alisa's Tweaks to the 'topping':

Add a pinch of salt into the mixture along with 1/2 teaspoon vanilla extract. I often use chopped pecans instead of sliced almonds.

Before baking, sprinkle 1 teaspoon granulated sugar evenly over the top.


Monday, April 7, 2014

Juicy Blackberry Pecan Muffins. Hello Spring, nice to see you.


So gluten free, dairy free, soy free baking is a little tricky. Coconut oil works wonders as a butter substitute but often times imparts its signature flavor. Coconut milk is also a miraculous substitute for milk or heavy cream but same issue. And if you're religiously doing Paleo, almond flour technically works but so far everything I've made has a spongy/wet quality after cooling which isn't so great for things like quick breads or muffins.

So this time I tried modifying a Martha Stewart recipe with Bob's Red Mill Gluten Free All Purpose Baking Flour and hooray! Muffins that act and eat like muffins and don't get soggy or weird when left out over night!

Like I said with my baby's allergies I got all hippie on you and made these gluten free and dairy free and with coconut sugar. But don't worry. My husband who is literally the pickiest eater when it comes to baked goods on the planet didn't notice the difference. In fact I have a hunch the coconut milk might have made them even richer but if you don't have the need to avoid dairy or gluten feel free to use regular 'ol butter and flour and sugar and cow's milk. I'm sure they'd be mighty fine.

Juicy Blackberry Pecan Muffins 
*Adapted from Martha Stewart
*Modifications for gluten free/dairy free below
*Coconut palm sugar imparts a dark golden color onto these muffins so don't be shocked if yours are lighter if using regular granulated sugar

Ingredients:
*2 cups AP flour or Bob's Red Mill Gluten Free All Purpose Baking Flour
1 1/2 teaspoons baking powder
1/2 teaspoon kosher salt
1/2 teaspoon cinnamon
2 cups fresh blackberries
*1/2 cup (1 stick) butter or Earth Balance Soy Free, Dairy Free Buttery Spread, at room temp
1 cup sugar (or coconut palm sugar)
2 eggs, room temp
zest of a small lemon
2 teaspoons vanilla extract
*1/2 cup whole milk or coconut milk at room temp
1/2 to 3/4 cup chopped pecans or walnuts

Directions:
Preheat oven to 375. Line a 12 standard muffin cup pan with paper liners or alternatively spray with either nonstick spray or brush lightly with melted coconut oil (if you need to avoid soy found in many sprays.) If not using liners, lightly sprinkle the greased cups with a little flour then tap out excess.

In a medium bowl, whisk together the flour, baking powder, salt, and cinnamon. Take a heaping tablespoon of this mixture and sprinkle it over the blackberries in another medium bowl. Give a gentle toss to lightly coat all the berries and set aside.

Meanwhile, in a standing food mixer or large bowl with hand held mixer, blend the butter and sugar for 3 minutes until fully mixed, pausing midway to scrape the bottom and the sides.

Add the eggs in one at a time, blending well each time. Add in the zest and vanilla extract and mix until incorporated. Add the milk and blend just until incorporated.

Carefully add in the flour mixture in two additions, blending just until incorporated each time. Use a spatula to fold in the blueberries and nuts.

Use an ice cream scoop to divide the batter into your 12 cups. The cups will be full but don't worry - these muffins rise very well and don't spill over (though a baking sheet underneath is always good insurance.)

Bake for 25-30 minutes until golden on top and a toothpick inserted comes out clean.

Enjoy warm or store in an airtight container for 2 days.

Tuesday, October 29, 2013

Pumpkin Chocolate Chip Coffee Cake


I am a sucker for Halloween themed cookbooks. Most of these impulse purchases end in disappointment, the books full of gimmicks and fluff. All filler and no substance.

But over the summer I came across 'Ghoulish Goodies' by Sharon Bowers at Half Price Books and have been happily surprised recipe by recipe. These Chocolate Chip Pumpkin Bars, which I baked in an 8x8 inch ceramic dish to make them more cake-like, are honest to God delicious.

She sells them as being adult oriented with the whole wheat flour and spices. I sell them as one of the best coffee cakes I've ever had. Even my husband who is VERY annoyingly picky when it comes to baked goods has eaten them like they were running away from him.

So tis the season for pumpkin and things that go bump in the night and baked goods that help you get through a 3 am feeding followed by another at 4 am and 5:30 am. Did I mention my baby is a vampire?

One last thing. I added toasted walnut pieces which I think turned these up to 11. You know you're getting old when you're tempted to add nuts to about every baked good. I can remember being little and wishing like hell my mom had left them out!

Pumpkin Chocolate-Chip Bars (or Coffee Cake)

Ingredients:
1 1/2 cups all purpose flour
1/2 cup whole wheat flour
1 teaspoon baking soda
1 teaspoon kosher salt
2 teaspoons ground cinnamon
1 teaspoon ground ginger
1/4 teaspoon ground nutmeg
1/4 teaspoon ground cloves (I was out so used more nutmeg)
1 cup (2 sticks) salted butter, at room temp
1 cup granulated sugar
1/2 cup firmly packed brown sugar
1 egg, room temp
2 teaspoons vanilla extract
1 cup canned pumpkin puree (not pie filling)
1 (12 oz) package (2 cups) semi sweet chocolate chips
3/4 cup to 1 cup lightly toasted walnut pieces, if desired

Directions:
Preheat oven to 350. For bars, grease a 9x13 baking pan and set aside. For coffee cake, grease an 8x8 ceramic pan with nonstick spray and see my tip below.

Combine the all purpose flour, whole wheat flour, baking soda, salt, cinnamon, ginger, nutmeg and cloves in a medium bowl.

Beat the butter, two sugars, egg, and vanilla in a large bowl with an electric mixer until smooth. Mix in the pumpkin puree until well combined, then add in the flour mixture in about 3 parts, beating each time until just combined. Use a wooden spoon to fold in the chocolate chips and walnuts then spread the batter which will be a bit on the thick and dry side evenly into the pan.

Bake for 35 minutes, until lightly golden and set.

Alisa's Tip:

For a cake like consistency instead of bars, Bake in a well greased 8x8 ceramic or glass pan at 350 for 20 minutes. Reduce heat to 325 and bake another 10-15 until the sides begin to turn dark but the middle is still quivery. Reduce heat to 300 and bake another 15 or until middle is set, entire 'cake' has risen and a cake tester comes out clean. 

Wednesday, February 20, 2013

Maple Cinnamon Granola via #CooksNetwork


I've been invited by the lovely folks at Williams Sonoma's Cooks Network to share a favorite February recipe with my readers and this granola is it! For me granola has to have texture, variety, and a touch of cinnamon without being too sweet. Many granola recipes use so much oil and/or sugar that it defies the 'health' factor completely. Here the light sweetness comes from real maple syrup infused with fresh blueberries... Yum.

This granola is right up there with my favorites of all time - Urth Caffe's in LA and Jo's in Austin. What's your favorite granola?

Maple Cinnamon Granola
* Makes a large amount but will last for a month in a tightly sealed container and/or can be frozen.

4 cups old fashioned oats
2 teaspoons flax seeds
4 teaspoons wheat germ
1 1/12 teaspoons cinnamon
3/4 teaspoon kosher salt
1 cup sliced almonds
1 cup chopped pecans
1 cup shredded sweetened coconut
3/4-1 cup dried cranberries
1 cup blueberry maple syrup (gently heat 1 cup of real maple syrup with 1/2 cup of blueberries in a small pan over a low flame on the stove for 12 minutes or until blueberries have begun to burst and turn the syrup a blue tint)
2 teaspoons vanilla extract
3 tablespoons olive oil

Preheat oven to 300. Mix all ingredients together in a large bowl until well combined. Make sure there are no big clumps of coconut.

Spread out onto two large oiled baking sheets. Bake the granola - one sheet at a time (trust me on this - otherwise one will burn) on the middle rack turning the granola every ten minutes until granola is just very lightly toasted - about 30 minutes total. You don't want it to get too golden brown or the blueberries will become like rocks once it cools.

Let cool completely before transferring to an airtight container.

* This post is a collaboration with Williams-Sonoma, but all words and opinions are my own.


Monday, February 27, 2012

Savory Bacon, Tomato and Cheddar Bake


Some call it a strata. Some call it a bread pudding. Some even call it a casserole.

Food and Wine calls it a Savory Bacon, Tomato and Cheddar Bake.

I don't care what you call it as long as I can eat it. This is a labor of love and makes enough for an army but the upside is, you can freeze the leftovers as individual portions and heat them up later when you have an emergency comfort food craving. I've even done this with the eggs intact, but if you're picky you can discard the eggs from the top before freezing and just put a pan fried one over the top after it bakes. Disco.

Bacon, Tomato and Cheddar Breakfast Bake

Ingredients:
1 pound bakery white bread, cut into 1-inch cubes (16 cups)
1/4 cup extra-virgin olive oil
1 pound sliced applewood-smoked bacon, cut into 1/2-inch pieces
1 large onion, halved and thinly sliced
One 28-ounce can whole Italian tomatoes—drained, chopped and patted dry
1/2 teaspoon crushed red pepper
1/2 pound extra-sharp cheddar, shredded (about 2 cups)
1/2 pound Monterey Jack cheese, shredded (about 2 cups)
2 tablespoons snipped chives
Big handful minced flat leaf parsley, plus extra for garnish
1 3/4 cups low-sodium chicken broth
Salt
8 large eggs
Hot sauce, for serving

Directions:
Preheat the oven to 350°. Lightly oil a 9-by-13-inch glass baking dish. In a large bowl, toss the bread with the olive oil and spread on a large rimmed baking sheet. Bake for about 20 minutes, tossing once or twice, until the bread is golden and lightly crisp.
Meanwhile, in a large skillet, cook the bacon over moderately high heat, stirring occasionally, until crisp, about 8 minutes. Transfer the bacon to paper towels to drain; reserve 2 tablespoons of the fat in the skillet.
Add the onion to the skillet and cook over moderate heat, stirring occasionally, until softened, about 5 minutes. Add the tomatoes and crushed red pepper and cook until any liquid is evaporated, about 3 minutes.
Return the toasted bread cubes to the bowl. Add the contents of the skillet, along with the bacon, shredded cheeses, chives, parsley and broth. Stir until the bread is evenly moistened. Season with salt. Spread the mixture in the baking dish and cover with lightly oiled foil.
Bake the bread mixture in the center of the oven for 30 minutes. Remove the foil and bake until the top is crispy, about 15 minutes longer. Carefully remove the baking dish from the oven and, using a ladle, press 8 indentations into the bread mixture. Crack an egg into each indentation. Return the dish to the oven and bake for about 15 minutes, until the egg whites are set but the yolks are still runny. Garnish with additional parsley and serve right away with hot sauce.

MAKE AHEAD The recipe can be prepared through Step 4 and refrigerated overnight.

Wednesday, January 4, 2012

Croque Madame Pizza with Spinach and Prosciutto


All the loveliness of a croque madam sandwich only better. Because it's pizza y'all.

If you've never had a croque madam, let me tell you what you're missing. Take the best ham and cheese sandwich ever assembled, smother it in a gooey, cheesy beschemal sauce, then broil it until the top is perfectly golden, yet molten and bubbling underneath THEN top the whole thing off with a perfectly fried egg so that when you cut into it, the golden yolk dribbles down over the whole thing, uniting the creamy cheese, salty ham, and slightly sweet bread as one celestial being.

Croque Madames are the single reason you can drink until 7 in the morning in Cannes, then get up at noon and do it all over again. The key is to get one from the Gutter Bar (actually a Croque Monsieur, sans egg) right before you pass out.

Anyway, this pizza captures all of the love and lust of a great croque in pizza form. Instead of slaving over a beschemal sauce on the stove, a similar flavor and texture is achieved through combining goat cheese, parmesan and sour cream (or creme fraiche) together as a spread in addition to fresh chopped spinach which turns it a whimsical, Emerald Isle color.

Of course this pizza would be delicious even without the egg and prosciutto, but if you're going to go to France for the evening, why not live a little?

Ingredients:
1 round homemade or store bought fresh pizza dough
1 cup (packed) finely chopped fresh spinach
4 oz goat cheese, softened
1/4 teaspoon kosher salt
zest of 1/2 lemon
lots of fresh grated nutmeg (scant 1/4 teaspoon)
1/3 cup parmesan, plus extra for garnish
3 tablespoons sour cream (or ricotta or creme fraiche)
pinch red pepper flakes
black pepper

olive oil, for drizzling over cheese spread
2 eggs, set out for 10 minutes
4-6 slices of prosciutto, or as much as you like

How To:
Divide the dough in half (you don't have to - but it looks cuter when each pizza gets its own egg in the center versus 2 eggs on 1 larger pizza.)

Roll each pizza out to your desired thickness and transfer to an aluminum lined, non stick sprayed baking sheet (2 if necessary.)

Preheat oven to 425.

In a medium bowl, combine the chopped spinach, goat cheese, salt, lemon zest, nutmeg, parmesan, sour cream, and peppers until well blended. You can do this earlier in the day if you like and keep the mixture covered in the fridge until you're ready to assemble.

Spread the mixture out onto your prepared dough, either with a butter knife or using your fingers - whatever works for you. Try to get it as evenly across the dough as possible but don't worry if it clumps up in places as long as some of it is anointing the entire dough.

Bake at 425 for 5-6 minutes, JUST until the edge of the crust begins to set (whiten) but not yet becoming golden or crispy. Remove the pizzas and whop up the heat to broil (500). meanwhile, working quickly but carefully, crack an egg right over the center of each, then carefully (slowly so you don't sling the egg off) but immediately return to the oven now set on broil on a high shelf. Cook for another 3-4 minutes, until the edges are golden and the egg has 'set' (is no longer a wobbly mess when you lightly shake the pan. It's okay for the yoke still to be a little runny - in fact that's the goal - but you want the whites cooked and the crust and cheese to be nice and golden.

Remove and immediately cover with a bit more parmesan cheese and little strips of prosciutto torn up with your fingers - as much as you like.

Let sit another minute to finish setting the yolk, then slice and serve. Voila!

Monday, December 26, 2011

Pioneer Woman's Cinnamon Rolls. The end all. Be all. Amen.


Merry Christmas darlings! Was Santa good to you? Did you get the brand new Red Ryder Carbine-action BB Gun you were dreaming of, or your own personal equivalent?

I had a wonderful Christmas. Great food. Great gifts. Great family time. And as usual, I'm a little flattened that it's already gone. So today I'm trying to stay upbeat and reflect on what I loved about this year and how to make it last longer next year. These cinnamon rolls are a new tradition. I used to be a 'bread' person - making quick breads to give to friends and neighbors. But thanks to the Pioneer Woman - I'm now a cinnamon roll person.

I gave these away to my family when they came over Christmas Eve for them to eat on Christmas morning. There is nothing like them on this earth. As you eat them, you will wonder how the hell you made something as ridiculously delicious and amazing as these. And here's the kicker - it was easy. Time consuming, sure, but easy. And this is coming from someone who still hasn't mastered the art of pie crusts so trust me when I say I'm not a naturally gifted baker.

Just like her pizza dough, this is a semi fool proof dough. Very forgiving. Very laid back. All you need is a ton of clean counter space and a pair of blinders to distract you from how much butter goes into the recipe. But then again, I only make these at Christmas, so I say bring it on!

One of the thousands of reasons I love these is you can make them in stages, starting with the simple process of whipping the base together in a large lidded pot on the stove top. Once risen later on, you can just stick the top on and keep the dough in the fridge for up to 3 days until you have another chunk of free time to roll them out. The only trick is you CAN'T forget to check on the dough every couple of hours that first day in case it's risen up enough to lift off the lid. All you have to do is punch it down again and put the top back on - but if left it to its own devices for too long it just might take over your refrigerator. Dough is a little science fiction-y that way.

And even later, when you roll it out and assembled the rolls, you can refrigerate them again for a couple of days before you bake them off and ice them (just cover them well and be sure to set them out 15 minutes before baking so they can rise slightly in that final stage.)

Anyway - the fact that you can split up the process this way makes these much more manageable than the forthcoming recipe makes them appear. Here are couple more tips for this too good to be true recipe - and in the meantime - Merry Christmas and Happy New Year Y'all!

* Don't be tempted to substitute a simpler icing for her recipe here. As great as the dough part is, the icing is the gilding of the lily. I could eat it out of an old shoe and be happy for it.
* I serve these with spicy sausage kolaches, you know, for a well rounded meal on Christmas morning. That recipe coming in the next post.
* You can add any variations you like to the filling - dried cranberries or cherries, pecans, etc. I think I prefer them plain as listed below with just cinnamon, sugar and butter.
* She has different amounts of butter in her online recipe for the icing than her book. I go by the book, as reflected here (mo butter mo better.)
* She says to not crowd the pan when putting these in the tins. This year I ignored her and found they came out doughier/softer when all pushed together versus having their own space. We like them this way (my husband always wants 'the middle' one) but if you like more a crust around the rolls then by all means space them out a little more, only giving 4 to 5 to each pan.

Pioneer Woman's Cinnamon Rolls
Prep Time: 2 Hours | Cook Time: 30 Minutes | Difficulty: Easy | Servings: 5-7 round pans full (a lot of people!)

Dough Ingredients:
1 quart Whole Milk
1 cup Vegetable Oil
1 cup Sugar
2 packages Active Dry Yeast, 0.25 Ounce Packets (4 1/2 teaspoons)
8 cups (Plus 1 Extra Cup, Separate) All-purpose Flour
1 teaspoon (heaping) Baking Powder
1 teaspoon (scant) Baking Soda
1 Tablespoon (heaping) Salt
Plenty Of Melted Butter - I use 1 1/2 cups, PW uses 2 cups
2 cups Sugar
Cinnamon, about 1/4 cup or enough to coat entire surface of rolled out dough
Several disposable round tins and plastic wrap to cover them with
_____
MAPLE FROSTING:
1 (2 pound) bag Powdered Sugar
1 tablespoon Maple Flavoring or Extract
1/2 cup Whole Milk
3/4 cup Melted Butter (6 tablespoons)
1/4 cup Brewed Coffee
1/8 teaspoon Salt

Instructions:
For the dough, heat the milk, vegetable oil, and sugar in a large lidded pan/dutch oven over medium heat to just below a simmer (DO NOT ALLOW TO BOIL.) Set aside and cool to lukewarm. Sprinkle the yeast on top and let it sit on the milk for 1 minute.
Add 8 cups of the flour. Stir until just combined, then cover with a clean kitchen towel, and set aside in a relatively warm place for 1 hour. After 1 hour, remove the towel and add the baking powder, baking soda, salt, and the remaining 1 cup flour. Stir thoroughly to combine.

Use the dough right away, or place the lid on it and refrigerate for up to 3 days, punching down the dough if it rises to the top of the bowl. (Note: dough is easier to work with if it’s been chilled for at least an hour or so beforehand.)

When ready to make the rolls, preheat the oven to 375°F.

To assemble the rolls, remove half the dough from the pan/bowl. On a floured baking surface, roll the dough into a large rectangle, about 30 x 10 inches (I live on the edge and do it all at once, rolling it into a 60 x 10 inch rectangle, but recommend splitting in half the first time you make these.) The dough should be rolled fairly thin.

To make the filling, pour 3/4 cup to 1 cup of the melted butter over the surface of the dough. Use your fingers to spread the butter evenly, or a pastry brush. Generously sprinkle half of the ground cinnamon and 1 cup of the sugar over the butter. Don’t be afraid to drizzle on more butter or more sugar! Gooey is the goal.

Now, beginning at the end farthest from you, roll the rectangle tightly towards you. Use both hands and work slowly, being careful to keep the roll tight. Don’t worry if the filling oozes as you work; that just means the rolls are going to be divine. When you reach the end, pinch the seam together and flip the roll so that the seam is face down. When you’re finished, you’ll wind up with one long buttery, cinnamony, sugary, gooey log.

Slip a cutting board underneath the roll and with a sharp knife, make 1-inch slices. Pour a couple of teaspoons of melted butter into disposable foil cake pans and swirl to coat. Place the sliced rolls in the pans, being careful not to overcrowd (I overcrowd but I like them 'doughier.')

Repeat the rolling/sugar/butter process with the other half of the dough and more pans. Cover all the pans with a kitchen towel and set aside to rise on the countertop for at least 20 minutes before baking. Remove the towel and bake for 15 to 18 minutes, until just light golden brown. Don’t allow the rolls to become overly brown.

While the rolls are baking, make the maple icing: In a large bowl, whisk together the powdered sugar, milk, butter, coffee, and salt. Splash in the maple flavoring. Whisk until very smooth. Taste and add in more maple, sugar, butter, or other ingredients as needed until the icing reaches the desired consistency. The icing should be somewhat thick but still very pourable.

Remove pans from the oven. Immediately drizzle icing generously over the top. Be sure to get it all around the edges and over the top. As they sit, the rolls will absorb some of the icing’s moisture and flavor. They only get better with time… not that they last for more than a few seconds. Make them for a friend today! It’ll seal the relationship for life. I promise. - PW

Friday, November 18, 2011

Merry...Thanksgiving?


Making dinner the other night I was flipping through the channels when I saw Wheel of Fortune hosting from...the North Pole. I had to check my wine for poison and then my calendar. It was a full week and a half before Thanksgiving let alone Christmas. What happened to decorating with pumpkins and fall leaves or even a ceramic turkey?

But Vanna and Pat weren't the only ones. It seemed the Christmas (PC term - Festivas?) fever had already spread beyond the point of me worrying about it. The grocery store was all decked in holly with Karen Carpenter blasting from the speakers, the ghost decorators had already begun bedazzling the Cedar trees on 360 in red and gold, and truth be told - I was glad for it. It just goes by too fast y'all. (Though I do feel bad for Thanksgiving - will it soon be renamed Christmas, Part 1?)

Anyways sorry to jump on the 'skipping ahead to Christmas' bandwagon but my Thanksgiving recipes are all going to be pretty standard this year aside from doing the turkey on the Big Green Egg which I'll share with you later so I thought I'd post The Homesick Texan's Strawberry Guajillo Jam. This jam would make a fantastic gift or stocking stuffer. And if you're leery of making homemade jam like I was - don't be. Easy as pie y'all. Just make sure you put hot jam in a hot, just sterilized jar (you can do it in the dishwasher) and that's all there is to it.

This jam is lovely - the only kind Kris will eat now - not spicy but with just enough kick to be interesting. Come to think of it - it'd be fantastic on a leftover turkey sandwich instead of the usual cranberry sauce!

Strawberry Guajillo Jam, from The Homesick Texan
Yields 2 pints.
* Very easy but allow for 4 hours of letting the strawberries to sit before making.

Ingredients:
2 pounds fresh strawberries, hulled and quartered
2 cups granulated sugar
1 dried guajillo chile, stem and seeds removed OR 1/4 teaspoon dried guajillo powder
1/2 cup lime juice
pinch kosher salt

Equipment:
2 pint-size jars or 4 half-pint size jars with lids and bands

Directions:
Toss the strawberries in a pot with the sugar and let stand for 4 hours until soft and juicy.

Place a plate in the freezer. Dice the dried guajillo and add it to the strawberry pot (or powder) along with the lime juice, salt and 1/4 cup of water. Bring the pot to a boil and then turn the heat down to low and simmer for 30 minutes, stirring occasionally. Meanwhile, sterilize the jars and lids in either a pot of boiling water or dishwasher (just don't do this too early or the jars will become too cool - you want them still hot when you put the jam into them.)

After 30 minutes, take the plate out of the freezer and place a spoonful of the jam on the plate. After a minute, tilt the plate, and if the jam doesn't run then it's ready. If it does run, cook it for 5 more minutes and test again. Continue to test until it doesn't run.

Pour jam into hot jars, leaving a bit of headspace. Cover with lids and fasten with rings. Allow to cool and then refrigerate. I find that it can last for a few months in the refrigerator.

PS - I already might have already started decorating...

Saturday, April 23, 2011

Whole Lemon Muffins with Dried Cherries


Sometimes I think my taste buds have split personality. For example when I made these muffins last October (lured in by a recipe involving pulverizing an entire lemon - skin, pith and all. Woo hoo!) I remember being completely let down by them when they came out of the oven. I'm not much of a baker so after spending the morning dusting my kitchen with flour, I just wanted to throw the whole batch away. BUT because I'm also a serious food hoarder (seeking therapy), I decided to freeze them just in case the aliens should attack or something and we were in a real bind for breakfast.

Cut to six months later. This morning to be exact. We were working (the advertising industry doesn't believe in Easter - or in holidays in general) and I was too busy to make anything. I checked the freezer and found these muffins. Of course I didn't have much hope since I didn't like them the first go around and they'd been in the freezer longer than any sperm on record in a sperm bank. But I thew them on a pan and put them in a 325 oven anyway.

And thank God. They were delicious. In fact I wished I could rewind time and taste them again that first fateful day when I considered throwing them out. What was wrong with me? Was it the weather? The hormones? We'll never know. All I know now is that I love them. Now and forever. Amen.

By the way - Happy Easter to those lucky enough to enjoy it with your families - and to those having to celebrate without them!!!

Whole Lemon Muffins, adapted slightly from Rebecca Rather

Ingredients:
1 medium lemon (preferably unwaxed, organic)
1 cup unsalted butter/2 sticks (at room temperature)
1 1/4 cups sugar plus 2 tablespoons (Rebecca uses 1 1/2 cups)
3 large eggs
2 teaspoons vanilla extract
Generous grating of fresh nutmeg, or 1/4 teaspoon from a spice jar (Rebecca doesn't add this)
2 3/4 cups flour
1 teaspoon baking soda
1 tablespoon baking powder
1 teaspoon salt
1 2/3 cups plain whole or reduced fat plain yogurt
1 cup dried tart cherries (Rebecca uses walnuts)

GLAZE, optional (Rebecca uses but I don't)
1 cup powdered sugar
2 freshly squeezed lemons, juice of
1/2 teaspoon vanilla extract

Directions:
Prep Time: 20 mins
Total Time: 55 mins

1 Preheat the oven to 350°F Grease 12 texas size muffin cups with butter or cooking spray or line with paper muffin wrappers.
2 Wash and dry the lemon. Cut into quarters and remove the seeds. Process the quartered lemon (all of it!) in a food processor fitted with a metal blade for 1 minute or more, until it is completely ground up. Scrape the lemon into a bowl.
3 Using a mixer fitted with a paddle attachment, cream the butter in a large bowl on medium high speed for 1 minute. Scrape down the sides of the bowl. Add the sugar and beat on medium high until light and fluffy. Add the eggs all at once and beat on medium speed for 1 minute. Add the vanilla and nutmeg and beat for about 30 seconds. Mix together the dry ingredients. Beat one third of it into the creamed mixture just until incorporated. Add half the yoghurt and do the same. Repeat, ending with dry ingredients. Gently stir in the lemon mixture then use a spatula to hand fold the dried cherries into the batter.
4 Spoon batter into prepared muffin tins. Bake for 30 to 35 minutes (mine took longer) until they are slightly browned and a toothpick inserted in the center comes out clean. Let cool in the pans for 5 minutes, then remove to a wire rack.
5 Combine glaze ingredients and drizzle over the warm muffins. Glaze will harden in about 15 minutes.
6 These are at their very best served warm, but if wrapped tightly in plastic wrap once cooled, they will still taste great for up to 3 days. They can be frozen for up to 3 weeks (or if you're me - 6 months!!)

Wednesday, April 20, 2011

Molly Wizenberg's British FlapJacks (Granola Wedges)


Confession. Remember when I told you I attended a blogger conference at SWSW where famed Orangette blogger Molly Wizenberg was a panelist? Well, while I'm a huge fan of her blog and even own her first book, A Homemade Life, I'd never actually made one of her recipes before. Talk about a poser.

I've redeemed myself by making this delicious recipe of hers - a genius spin on granola bars. Not sure where the British or flapjack part comes in but it makes it more fun to say at least. These are dangerously easy to make and even easier to eat. I'll even go as far as to call them life saving. (When we were in Houston for the Final Four, we got back to our hotel room late to find out they didn't have room service after 10:00. Seriously. We were too tired to run out so we feasted on some of these bars I had brought along on a whim. Boom. Starvation averted!)

Another confession. I have yet to open her book that I bought over a year ago. It's on my list of things to do along with shaving my legs more often and sending thank you cards. Wish me luck with that.

British FlapJacks
Bon AppƩtit | March 2010
by Molly Wizenberg, additions in italics are mine and I used salted butter.

Ingredients:
1/2 cup (1 stick) unsalted butter, cut into 8 pieces
1/2 cup (packed) golden brown sugar
1/4 cup golden syrup*
2 1/3 cups quick-cooking oats (not instant or old-fashioned)
Pinch of salt
1/4 cup dried cranberries
1/2 teaspoon cinnamon


Directions:
Preheat oven to 350°F. Butter 8 x 8 x 2-inch metal baking pan. Combine first 3 ingredients in heavy medium saucepan. Stir constantly over medium-low heat until butter melts, sugar dissolves, and mixture is smooth. Remove from heat. Add oats and salt; stir until coated. Fold in cinnamon and cranberries if adding. Transfer mixture to prepared pan and spread out in even layer.

Bake until top is golden (edges will be darker), about 25 minutes. Cool in pan on rack 5 minutes. Cut into 4 squares; cut each into 4 triangles (mixture will still be soft). Cool completely in pan before serving.
* A type of syrup popular in Great Britain; available at some supermarkets, specialty foods stores, and British import shops.

Sunday, March 27, 2011

The New York Madame (New York Strip with a Fried Egg and Goat Cheese)


This is what happens when I skip lunch. I didn't intend to skip lunch (after all, this is me we're talking about.) It just happened. We went out to run a few errands and ended up staying out all day. I kept thinking we'd make it back in time for me to heat up some roasted tomato soup but by the time we got home it was dinner. And I was starving.

Now that I've justified this somewhat over-the-top-man-feast, I feel slightly better. Oh wait - did I mention I served it with fried onion rings and garlicky sauteed collard greens? Hmm. I should really go and exercise. But not before I tell you that my husband declared this his favorite meal of all time. I also have to mention that I can't help eating it without singing the lyrics to "Big Poppa" - "A t-bone steak, cheese, eggs and Welch's Grape..."

Forgive me - I'm a child of the 90's. RIP Biggie!

The New York Madame (New York Strips with a Fried Egg and Goat Cheese)
* Heavily inspired by/subconsciously lifted from Giada DeLaurentiis.
* Serves 2 very hungry people who may or may not have skipped lunch.

Ingredients:
2 NY strips with plenty of marbling around the edges
mustard powder
fennel seeds
fresh thyme
ground nutmeg
salt and pepper
2 eggs
2 oz goat cheese, divided
fresh chopped herbs - cilantro and basil, or flat leaf parsley

Instructions:
Pull your steaks out a half hour before you're ready to grill them. Season them on both sides with liberal amounts of mustard powder, fennel seeds, fresh thyme leaves, and just a teensy pinch of nutmeg. Cover with plastic wrap and let come to room temp for about 20-25 minutes.

Preheat the oven to 400. Add about a teaspoon of olive oil to a large rimmed skillet and put over medium high heat, letting heat through and tilting to coat the bottom of the pan (you just need a thin layer.)

Season the steaks on both sides with fresh cracked pepper and kosher or sea salt. Add to the pan and let sear - not touching them - for 3-4 minutes until you have good browning and the steaks lift easily (release from the pan) when you try and pick them up with tongs. Flip and cook another 3 minutes or until you have equally grand bronzing, then carefully and quickly transfer to a greased rimmed baking sheet. Bake in the oven for 6-8 minutes (less for medium rare, longer for medium well, depending on the thickness of your steaks.)

While the steaks bake in the oven, remove the goat cheese from the fridge and set aside. Pour off all the excess oil from the pan you seared the steaks in but enough to leave a thin coat and put back over medium heat (you can also give a spritz of nonstick spray to ensure the eggs don't stick.) Carefully crack the eggs into the pan, giving each its own space, and fry for about 2-3 minutes, until just sunny side up and fried only on the bottom. You want to cook the eggs less than you would for your usual sunny side up eggs, only because you're going to put them on top of hot steaks and they'll continue to cook because of this. Also you want your yolks runny here - that's the beauty of it - and once they're cooked - there's no more golden liquid to be had.

Take the pan off the heat and set the eggs aside while you retrieve the steaks.

Pull the steaks from the oven, cover loosely with foil, and let rest for 5 minutes. Remove the foil and smear with goat cheese - about an ounce per steak or to taste, then cover each with a sunny side up egg. Sprinkle the egg with salt and pepper, then top the entire 'madame' with fresh minced herbs - any kind you like. Basil, parsley, and/or cilantro are wonderful here.

Eat up!

Sunday, December 19, 2010

Cinnamon Sugar Banana Bread


Nothing makes me happier than stumbling onto a recipe for something so good, I know I'll never need to try any other version. There may be 101 ways to make banana bread for the holidays, but in my humble opinion, this is THE recipe. The smell as it bakes is every fond memory you had of the holidays growing up wrapped into one wafting cloud of cinnamon and sugar.

Cinnamon Sugar Banana Bread
* Makes 7-8 mini loaves that freeze well.
* Adapted from All Recipes - thank you Esther Nelson!

Ingredients:
1/4 cup white sugar mixed with 1 teaspoon ground cinnamon, for dusting pans
Butter or nonstick spray, for pans

3/4 cup butter at room temp
2 1/4 cups white sugar
3 eggs
4 very ripe smallish bananas, mashed well with a fork
1 cup apple butter
1 (16 oz) container sour cream (you can use light if desired)
2 teaspoons vanilla extract
2 teaspoons ground cinnamon
Good grating fresh nutmeg
1/2 teaspoon table salt
3 teaspoons baking soda
4 1/2 cups all-purpose flour (please 'lighten' the flour by fluffing it gently with a spoon and then use a spoon to gently fill your measuring cups - this is easier than sifting and will ensure you don't use too much flour and end up with cement)
1 cup chopped toasted walnuts or pecans, optional

Directions:
Preheat oven to 300 (yes this is correct! 300!)

Grease or butter your loaf pans then dust lightly and all around with the cinnamon sugar mixture. Set aside.

In a large bowl, cream butter and 2 1/4 cups sugar until light and fluffy. Mix in eggs, mashed bananas, apple butter, sour cream, vanilla, cinnamon and nutmeg until just incorporated. Mix in salt, baking soda, and flour until just mixed. Fold in nuts then divide the batter evenly between the pans.

Bake for one hour, rotating pans halfway through, until a toothpick inserted in the center comes out clean.

Let cool in the pans for 30 minutes, then carefully invert onto a cooling rack to finish cooling (you may need to run a bread knife around the edges to help them let go.)

Thursday, November 18, 2010

Nigella's Chocolate Chocolate-Chip Muffins


I'm on a Nigella kick and may be for a while. She rarely lets you down in the kitchen (we just won't mention her plastic lime phase, okay?) And with all the cooking I'm doing this time of year, I like to pretend she's actually in the kitchen with me. I suppose you could say it's my culinary version of singing in the shower, though possibly weirder and more disturbing. Hopefully none of my readers are psychologists.

Anyway my sweet mother in law is coming for a visit today so I made these to have on hand for an easy breakfast or snack. If there are any more diehard chocoholics out there than she and my husband, I'd like to meet them and possibly have them studied for scientific purposes. The funny thing about chocolate is, even as a person who often thinks it's over-rated and over-hyped, I usually end up being the one to finish up the last piece of chocolate cake, or in this case, muffin.

Wow, in just one post I've revealed that I'm not only somewhat delusional but that I sometimes cook with imaginary friends. I'll stop writing now.

Nigella's Chocolate Chocolate-Chip Muffins

Ingredients:
1 ¾ cups all-purpose flour
2 teaspoons baking powder
½ teaspoon baking soda
2 tablespoons unsweetened cocoa
1 large egg
¾ cup semisweet chocolate chips plus more for sprinkling on top
1 cup milk (whole or 2%)
1/3 cup plus 2 teaspoons vegetable oil
¾ cup sugar
1 teaspoon vanilla extract

Instructions:
Preheat the oven to 400. Spray a 12-cup muffin tin with nonstick spray (or fill with paper cups.) Set aside.

Measure the dry ingredients into a large bowl and mix well with a whisk. Measure the wet ingredients into a large measuring cup or medium bowl, whisking or stirring well to break up the egg. Make a well in the dry ingredient bowl, then add about half the wet mixing with a spatula or spoon just until blended (don't over mix or you'll have chocolate bricks instead of muffins.)

Add the rest of the wet and mix again, JUST until mixed. Divide the batter evenly between the cups and sprinkle over the additional chocolate chips.

Bake for 16-20 minutes until the muffins have risen and become firm and springy. Let sit in the tins for a few minutes to finish setting before removing to a wire rack (though to be honest I often forget to remove them for a couple of hours and all ends well.)

Store in an air tight container for up to 3 days or freeze.

Monday, October 25, 2010

An Alternative to the Great Pumpkin - Persimmon Spice Bread


I am lucky enough to have a persimmon tree in my front yard. Persimmons are strange little fruit that take FOREVER to ripen. If you pluck a green one from the tree early in the summer and bite into it, it will suck all the saliva from your soul. Seriously. But if you wait for them to turn orange then more and more orange until the skin begins to take on the transparency and delicacy of a tomato then you are in for a treat. Like I said they are a strange little fruit, tomato-y in texture but with the sweet, mellow flavor of a fig crossed with a pear (at least in my opinion.)

They make lovely bread and muffins and even martinis as recently featured on the wonderful blog Lisa is Cooking. It was a little too early in the day (10 am) for me to make martinis with mine so I chose a quick bread recipe from All Recipes, added some orange zest and ground cloves, and ate a warm slice covered in butter.

Persimmon Spice Bread
* Adapted from All Recipes
* This bread does get a little dark around the edges. Don't fear - this is normal, yet be sure to not over bake.
* You could probably substitute pumpkin for the persimmons if they are not available to you.

Ingredients:
2 eggs
1 1/2 cups all-purpose flour
3/4 cup white sugar
1/2 teaspoon salt
1/2 cup vegetable oil
1 teaspoon ground cinnamon
1/8 teaspoon cloves
1 cup persimmon pulp (skin and seeds removed)
1/2 cup chopped walnuts
1 teaspoon baking soda
1/2 cup dried cranberries
zest of 1 orange

Directions:
Preheat oven to 325 degrees F (165 degrees C). Spray a 9 x 4 inch pan with cooking spray and set aside.

In a small bowl, combine flour, cinnamon, cloves, salt, nuts, and cranberries.

In a large bowl, blend eggs, sugar, and oil. Mix baking soda into pulp, and add to sugar mixture. Fold in flour mixture. Finally stir in orange zest being careful to not over mix. Pour batter into prepared pan. Bake 55 minutes then test for doneness by inserting a sharp knife (it should come out free of wet batter.) If not ready, return to the oven for another 10-15 minutes and check again.

Sunday, October 10, 2010

Homemade Granola with Dried Cranberries and Cinnamon


There are two types of people in the world - granola heads and non granola heads. I am a card carrying member of the granola heads (though not in the hippie sense of the word as I shower daily and shave my armpits most of those days, thank you.)

Fellow granola heads know what I mean. We crave this crunchy, lightly sweet rubble the way others crave brownies or ice cream and we can tell you who has the best in our hometowns or even in other cities (Urth Caffe in LA, Bryant Lake Bowl in Minneapolis, and Joe's Coffee in Austin.)

As a granola head, the biggest insult in the world is to go to breakfast somewhere anticipating a bowl of crunchy homemade granola and fresh fruit only to be served a broken up, store bought granola bar with a limp bunch of greenish gray grapes next to it (Cafeteria in NYC...for shame.) This is like being slapped in the face with a wet fish before you've even had your coffee. Of course even minor personal offenses take on catastraphoic proportion in the vulnerable pre-coffee time of morning but you get my drift.

Now that I know how easy granola is to make at home, I can rest easy. This may not be the most impressive recipe I've ever made but as a granola head, it may be my most treasured.

Homemade Granola with Dried Cranberries and Cinnamon
Adapted from Everyday Foods

3 cups quick (rolled) oats
3 tablespoons melted butter
1/3 cup honey
4 teaspoons sesame seeds
3/4 cup walnuts or pecan pieces
1/2 cup dried cranberries or cherries
scant 1/2 teaspoon cinnamon
couple gratings of fresh nutmeg, or a dash from a bottle of dried
1/2 teaspoon kosher or sea salt
non stick spray

Preheat oven to 300. In a large bowl, thoroughly mix the oats, butter, honey, sesame seeds, nuts, and dried fruit with a rubber spatula. Sprinkle over the cinnamon, nutmeg, and salt and mix again until well combined.

Line a large rimmed baking sheet with aluminum foil or parchment and spray lightly with non stick spray. Carefully spread out the granola mixture letting it go to the corners to make a nice level layer and patting down any mounds or lumps for even baking.

Bake for 20 minutes and check for color. I like mine to become a little more bronze/toasted than most granolas but a light golden is what most consider ideal. I keep mine in for half an hour, but this is very individual and ovens vary so check every few minutes after the 20 minute mark up to 30 minutes. Once evenly golden, remove and turn the granola over gently with a spatula. Leave to completely cool in the pan (about an hour or so) and once cool transfer to a large ziploc or air tight container where it should keep for up to 3 weeks.

Serve with yogurt and honey, with milk as cereal, or even as a crumbly topping for baked fruit (just bake the fruit before adding granola over as it is already baked and will burn if cooked more.)

Friday, March 19, 2010

In memory of a horse named Socks.


At the age of 9, most kids are obsessing over a new bike or the latest video game. I was on a mission to find a horse. To be fair, the mission had begun in infancy when I'd first laid eyes on one. I drew them, talked about them, took meticulous care of a stable of imaginary ones that fit nicely in our backyard in Houston while my parents waited patiently (and desperately) for the phase to pass.

It didn't. The obsession grew and the fantasies were getting a little eccentric which led to the purchase of two pygmy goats in a bold move on my parents part in the never ending game of parent/child negotiation. 'Once she learns how difficult raising a goat can be, she'll forget all about wanting a horse,' was no doubt the logic. I carried the goats, Dr. Pepper and Willy Joe, around like infants and bottle fed them with a hidden agenda of my own. As soon as they were full grown, I tried to ride them, fashioning a bridle out of a stick and some shoe leather.

If the 12 seconds on the back of a goat taught me anything, it was that 12 seconds on a horse must really be something. The obsession was gaining momentum. I wrote essays on horse management. I groomed Midnight, my Barbie horse, until the plastic lost its shine. And I begged to the point where even my loving parents were embarrassed by my lack of dignity. But it worked.

Either the planets aligned or I wore them down or I caught them on a margarita night, because the 13,474th time I asked if I could get a horse - the word 'no' didn't immediately follow. I opened the Houston classifieds and read a short but efficient ad for a pony - something to the effect of 'golden colored and loves kids.'

I didn't want to seem overzealous or anything, but could there be more of a sign? I mean I was a kid and my hair could be considered golden colored. The next evening we were on our way to the suburbs to look at this miraculous creature. We got lost and by the time we arrived, it was dark. No matter, the pony's shiny coat practically glowed under the front porch lights. (It was too dark to notice how the whites around her eyes hinted at a demon trapped inside trying to get out.) My mom and I looked at the pony's hair - then at my own. It matched! I mean, what more could you possibly want in a pony? Besides, the 5 minute test ride which the gentleman led me on went swimmingly. At this rate, I'd be in the Olympics by summer.

We bought the pony, Bess, and then the real test came. Bess was anything but the perfect pony, though in an ironic way she was a Godsend. Bess didn't like to be saddled, much less ridden, and she had a funny quirk of cow kicking you when you weren't looking. "A horse can kick sideways?" we marveled, until she got me in the butt when I was bending over to retrieve a brush knocking me down. Ah the tenacity of childhood - if that happened to me now, I'd have sent the pony packing and taken up knitting. But I was 8. I simply picked up a 2x4 and hit her back. She and I had a few rounds of this game until she decided it was far less work to just stand there while being brushed.

Fast forward another year. Bess had taught me how to stay on no matter how badly the animal underneath you didn't want you to. She'd taught me to be patient. And then in an unplanned lesson, she taught me to jump. We'd go flying over fallen trees, old railroad ties - anything you put in front of us. And with my legs getting longer everyday, I began instigating 'project upgrade.' Don't ask me why, but begging for the second horse was much easier, and before I knew it, my parents and I were scouring the entire span of central Texas for horse number two. And we were no green city folk this time around - nope. On these scouting trips, we made sure we saw the horses in daylight.

No shorter than 34 or so failed horse shopping trips later (the subject of another book, I mean post) we pulled up to yet another barn in the outskirts of town. It was a Sunday. Valentine's Day. And Lord Heaven all mighty there he was.

The most striking gelding I'd ever laid eyes on - so brown he looked black when a cloud passed by but under the full wattage of the sun, the color of a chocolate-dipped espresso bean with a white blaze and four white socks. His mane and tail were the stuff of dreams, so long and full he made my exaggerated Barbie horse look homely.

Gail, the nice woman who owned him, was selling him because she wanted a new barrel horse. I got on him, pointed him to the nearest field, and off we went. It was like riding a feather he moved so smoothly, only a feather in a hurry. This horse liked to go. I was three quarters head over heels in love, one quarter terrified as we headed back to my parents. I kept the terrified part to myself - I wasn't about to blow the chance of owning the most magnificent horse in the world.

We chatted some more as Gail showed us how Socks automatically lifted his feet to be picked without even having to touch them and said that of all the horses she'd had over the years, Socks had the best ground manners by far. She was right. When we asked how old he was (something else we'd learned to cover in our meticulous sleuthing), Gail replied about 8. He wasn't registered so she couldn't be 100% accurate, but that was definitely the ballpark given how long she'd owned him.

It was all settled. This gleaming, proud-necked half Morgan half mystery was to be mine. And then a couple of days later, my mom got a phone call from a crying Gail. She felt so badly, but her husband just couldn't let Gail part with Socks. He was his favorite horse. Gail may have shed a few tears but I created my own tsunami. I'd already written 'Socks' on everything I owned and even things I didn't (my school desk) and the news was devastating. We truly had looked at dozens of frogs to find this prince and now he was gone.

My tears finally stopped and we kept looking. Oh did we look. There was 'Morlaugh' the Arabian who sat down when you tried to saddle him, a show pony who broke off its lunge line, jumped a fence and disappeared into a suburb, and a pair of Tennessee Walkers that ate wood the way other horses eat grass.

Then, on Easter Sunday, a miracle. Gail called to ask if we'd found another horse yet. Apparently she'd found her a barrel horse, and in some crafty negotiating of her own, she'd convinced her husband to sell Socks. To this day I'll never forget that phone call. As a writer I should be able to capture that feeling for you but I'm sorry I just can't.

Socks was transferred from one Houston suburb to another where I took lessons on him twice a week. He was the reason I got up every morning. But despite how wonderful I thought he was, my trainer, a lovely woman by the name of Cathy Strobel, probably felt differently though she never said so. Being half Morgan, Socks was what they call 'gaited' and moved in an amble so smooth, you could put an egg on his back and it wouldn't fall off. Which was fantastic, only I'd made the decision to show in hunter/jumper classes where gaiting was not allowed (see what I mean about us getting savvier all the time?)

Instead of telling us it would never work, Cathy began teaching Socks via me, how to erase a natural, God given way of movement he'd had his whole life. Talk about teaching an old dog new tricks. And in the interim, we learned we were dealing with an older dog than we realized. On a vaccination visit, the vet looked at Socks' teeth and said, 'He looks pretty good for a middle aged gent.'

'Middle aged?' we retorted? 'What are you talking about - he's 8!' Nope, by the angle and length of his teeth, he was at least 13 the vet said. Teeth don't lie. Of course we don't think Gail lied either, but when a horse isn't registered and you haven't owned it all of your life it can be hard to keep track.

Anyway, Cathy and I worked and worked and worked and one day, Socks broke out of that smooth amble into a bumpy, two-beat gait. I think the whole stable cheered. From there we went to our first show where we won reserve grand champion. That feeling I can describe - one part Janis Joplin and two parts strawberry ice cream.

But it wasn't all perfect. One time while warming up on the race track behind the stables, Socks took the bit in his mouth and ran away with me, circling the whole track at a hundred miles an hour before breaking for the tiny opening in the fence between the track and the stables, nearly snapping my legs off. To this day I've never been so scared, and as soon as I realized where I was (right in front of his stall - where else do horse's want to go?) I jumped off him, grabbed a riding crop, and went to town on him until somebody stopped me.

And God love him, he truly hated to jump and sent me over many a fence, often times right in front of the judging box.

But for the most part, he was a gentleman. And kind. And patient. He was the only horse that would stay clean in his stall before a competition. He didn't even like to use the restroom at a show! And on trail rides, he was the fastest thing on wheels in a short pasture. Nobody could touch me - not even horses twice his size or leggy Thoroughbreds.

I eventually got other horses, got into high school, and started riding less and less. After college, a career in advertising took me far away from home for far too many years. Socks stayed back with my dad, still trucking along even though his thick black mane eventually faded and thinned to a few dull wisps. Age isn't kind to any of us.

But as long as he was there, back home, I was happy. We had gotten Socks when I was 9 years old. And as I got older and older, the horse who was supposed to be my age who turned out to be much older just kept on living despite what the vets predicted. By now I was now in my thirties and had come to think that maybe he'd never die. I kind of had this little thing in my head where as long as he was there, back home, then a part of me must be too. And maybe, just maybe I hadn't really grown up after all despite all evidence to the contrary.

Socks passed away on Christmas Eve. I guess that means I'm all grown up now.

I have had some wonderful horses in my life and some out right nightmares, but Socks was in his own league. He learned how to trot after a lifetime of not trotting. He learned how to jump when he'd rather have done anything else, probably even barrel race. He became the leader of his own herd after years as a city horse. And as an old man, he led my young nephews around with the patience of a saint. And now he's gone.

I wish so badly that I could give him a treat right now and pet his longer than logical forelock one last time. But I can't. Instead, I'll make this bread for him in remembrance. Socks had a sweet tooth and a policy of eating anything you put in front of him out of politeness. He would have loved it.

Zucchini Oatmeal Bread, for Socks

Ingredients:
2 cups wheat flour
1 cup all purpose flour
3/4 cup cooking oats
1 1/2 cups sugar
1 tablespoon cinnamon plus 1/4 teaspoon
1/4 teaspoon nutmeg
1/4 teaspoon baking powder
1 teaspoon baking soda
1/4 teaspoon allspice

1/2 cup unsweetened applesauce plus 2 tablespoons
1/4 cup oil
1/3 cup buttermilk
1 tablespoon honey
2 tablespoons vanilla
zest of 1 orange
3 cups shredded zucchini
2 eggs

Instructions:
Preheat oven to 350 (325 if using convection.) Grease two loaf pans with nonstick spray then dust with flour. Set onto a rimmed baking sheet and set aside.

Meanwhile put all of the dry ingredients into a large bowl or stand mixer. Mix until well blended, then form a little well in the center and pour in the applesauce, oil, buttermilk, honey, vanilla, and orange zest. Mix until just blended, scraping the bottom with a spatula if using a stand mixture to be sure nothing's holding out on you. Add in the zucchini stirring just until mixed, then the eggs one by one, again stirring until just incorporated.

Divide the batter evenly between the two pans and bake for 45-50 minutes, until golden and cooked through (knife or dried spaghetti should come out clean when inserted.)

Let cool in the pan for 10 minutes before carefully inverting onto a baking rack to cool all the way down.

Slice, slather in salted butter, and eat warm while remembering someone you love.

* By the way, Cathy is still teaching in the Houston area. You can find her at: http://www.sbreeze.com

Saturday, March 13, 2010

Something to Brunch On


A nice little egg dish for brunch (or dinner) that won't leave you doing the walk of shame afterwards. Because as it turns out, winter might actually leave us, and I cancelled my gym membership in February... Of course you can go whole hog and use egg whites, but the entire reason I make this is to be able to stab those round, yellow yolks and watch their buttery ribbons ooze into the veggies. It's better than popping bubble wrap.

Sunnies over Sauteed Asparagus, Mushrooms, and Peppers with Parmesan and Chives
* Serves 2.

Ingredients:
1/2 tablespoon butter
2 teaspoons olive oil, divided
2 portabello mushrooms, cut into 1 inch chunks
1 bunch asparagus, tough ends removed and cut into 1 inch pieces
1/2 yellow bell pepper, diced
kosher salt and fresh cracked pepper for seasoning
good grating of fresh nutmeg
pinch red pepper flakes, optional

1/2 tablespoon butter
1 teaspoon of olive oil
4 eggs
sea salt
fresh cracked pepper
1/4 cup Parmesan, or to taste
1/4 cup freshly chopped green onions or chives

Instructions:
Heat 1/2 tablespoon of butter along with 2 teaspoons olive oil in your largest saute pan, preferably nonstick, over medium heat. Add the portabellos, season with salt and pepper, and cook for 3 minutes, stirring occasionally. Add in the asparagus and diced pepper along with another small pinch of salt. Cook the veggies to your liking - I like mine to get a little carmelized but not to the point of being mushy which usually takes about 7 minutes. Season with a good grating of freshly ground nutmeg and red pepper flakes if you like the addition of heat. Leave on low heat while you cook your eggs (or even better - start the eggs in another pan when you add in the asparagus for perfect timing.)

In another medium skillet, heat the butter and olive oil over medium heat until the bottom of the pan is coated. Carefully crack the eggs and add them spacing them out evenly in the pan. Cook for about 7 minutes for sunny side up, or longer to your liking, watching the heat so that you can turn it down if the edges brown too quickly. If you like yours really cooked - you can run the pan under a hot broiler afterwards. Season lightly with sea or kosher salt and pepper.

To plate, divide the veggies between two wide-rimmed bowls. Put two eggs over each pile, then sprinkle the Parmesan and chives over and around the eggs. Serve hot.

Thursday, February 25, 2010

Good Morning, Muffin.


I love the idea of getting up on the weekend and whipping together a fancy breakfast. But as you can see from the number of breakfast recipes on this blog, morning and I don't get along that well. I can't hold a conversation before I've had my coffee, much less measure out flour.

This recipe is a blessed exception, in no small part to Bisquick which cuts out a lot of the measuring I was just referring to. Also a blessing is the fact that the cream cheese can come straight from the fridge, erasing any forethought on my part as to letting it soften ahead of time. This way it doesn't melt into the batter but stays in little chunks throughout, adding to the delight of the muffin. You'll notice I omit the addition of salt because Bisquick has it in there, but if you're a devout believer in its flavor enhancing ability you can add in a tiny pinch to the batter. (I do, but then again I'm not on the cover of Health magazine, either.)

And of course, you can fitz and futz with this recipe until the cows come home with creative additions and variations (some of which are at the bottom of this post) but what I was going for here was a good, quick muffin whose prep bowl and utensils I could wash up long before they even come out of the oven. That way, my inner ice queen stays dormant, and I can actually tell my dear husband when I hand him a hot muffin, 'Good Morning.' And mean it.

Strawberry, Granola and Cream Cheese Muffins
Ingredients:
2 cups Bisquick
1/3 cup sugar plus 1 tablespoon
2/3 cup granola - your favorite brand (I like vanilla and dried cherry)
1/2 teaspoon cinnamon
1/8 teaspoon nutmeg
1 egg, lightly beaten
2/3 cup milk (not skim)
2 tablespoons vegetable oil
1 teaspoon vanilla
1 cup fresh or frozen strawberries, chopped
2 oz cream cheese, broken into little bits with your fingers (if you really want that creamy tang in every bite - double this)

Instructions:
Preheat your oven to 350 if it's convection, 375 if it's not convection. Grease a 12 cup muffin pan well with nonstick spray, set onto a good quality baking sheet, and set aside.

Meanwhile, place the Bisquick, sugar, granola, cinnamon, and nutmeg into a large mixing bowl and stir well with a spoon. Make a well in the center, then pour in the egg, milk, oil, and vanilla. Stir just until the mixture is moistened and there are no lumps, then gently stir in the fruit mixing lightly, then the cream cheese. Use an ice cream scoop to divy the batter between your muffin cups making the additions as even as possible, and bake for 15-18 minutes, JUST until the tops are a light golden color. Let cool in the pan for 3 minutes, then carefully invert onto a cooling rack. Serve warm with either a pat of butter, cream cheese, or jam.

Meat and Potatoes Addition Options/Variations:
* add a pinch of lemon or orange zest
* sub chopped fresh mango for the strawberries, or a combination
* add 3/4 cup chopped pecans or walnuts