Showing posts with label Halloween. Show all posts
Friday, November 21, 2014
Corn, Sausage & Leek Chowder. A warm hug in a bowl.
If I was one of those organized people who hosted holiday open houses with Vince Guaraldi playing in every room and Mistletoe hanging above the doorway, I'd serve this soup. Comforting yet not too rich with its brothy stock laden with all kinds of textures, it has everything going for it. And that's before you add toppings!
You can use sweet sausage instead of spicy but I love a little heat against the sweet corn. And if you want it 'meatier' feel free to up the sausage to one pound. I find the ratio below makes this a perfect guys and gals soup though. The dudes feel like they're eating a hearty meal and us gals can still hold our head up and say we had soup for dinner. But if you're in the camp of 'mo sausage, mo betta' cheers to that.
Maybe one year I'll be organized enough to actually host that holiday party of my dreams. Until then I'm just happy knowing I already have the perfect recipe.
Corn, Sausage and Leek Soup
* This soup is great to make ahead and tastes amazing reheated.
* I can't stress rinsing your leeks thoroughly enough. This is best to do once you've halved them lengthwise so you can get the water in between the leaves where fine grit hides.
* Serves 6.
Ingredients:
3/4 pound spicy Italian sausage, loose
2 tablespoons salted butter
1 tablespoon olive oil
1 med sweet onion, chopped
3 leeks, white and light green (not tough) parts only, well rinsed, halved lengthwise then chopped into thin strips crosswise
3/4 teaspoon ground coriander
1/4 teaspoon salt, plus extra to taste
pinch pepper
10 oz frozen corn
32 oz low sodium chicken stock
1/2 cup half and half
Shredded cheddar cheese, for serving
Chopped Fresh cilantro, for serving
Tortilla chips, crushed up, for serving
Directions:
In a large dutch oven, break up the sausage with a wooden spoon and cook over medium heat until cooked through and some bits have become nice and brown and crispy, about 8 minutes. Remove sausage with a wooden spoon and set aside.
To the dutch oven, add 2 tablespoons salted butter and a tablespoon of olive oil. Allow the butter to melt then add the onion. Cook stirring often for 3 minutes then add the leaks. Season with coriander, salt and pepper and continue cooking and stirring over medium heat until the onion is translucent and the leeks are super soft, about 10-12 minutes.
Stir in the corn, chicken stock, and cooked sausage and raise heat slightly so the soup comes to a simmer. Simmer for a few minutes, then reduce heat to low and stir in the half and half. Taste for seasoning. If it's not the most delicious thing you've ever eaten, it needs more salt so make gradual adjustments until it is.
Serve with chopped fresh cilantro, crushed tortilla chips and shredded cheddar and or/any other toppings you see fit.
Labels:
#glutenfree,
Alisa's All Stars,
all in one meal,
cheese,
Christmas,
corn,
easy,
granola,
Halloween,
Make Ahead,
one pot meal,
sausage,
soup
Tuesday, November 12, 2013
Chocolate Hug Cookies
When you live in Texas and it gets cold enough to turn your heater on and that heater smell of toasting lint (is that what it is?) wafts through your house it feels like Christmas. Or at least it does to me.
So here we go with my first Christmas cookie post of the season. Hooray commercialism! And malls! And sugar!
My hands down favorite cookie at the holidays (AT the holidays? Southern much?) are peanut blossoms. AKA chocolate kiss cookies or Hershey Kiss peanut butter cookies. My mom made them for us growing up and for me they are edible childhood. I honestly can't be trusted with them. An entire batch will disappear into thin air David Blaine-style.
The only problem is my husband isn't a fan. I try not to let this change my deep endearing love for him but it's tough. Who doesn't like peanut blossoms? WHO???
Anyway I recently had an idea to try and appease his tastes while keeping with my own traditions, now that we have a kid and all. He is a bonafide chocoholic so when I saw a few recipes for Nutella Kisses I thought - SCORE!
Well it was a score alright but of course there was a minor drawback. They didn't taste so much of Nutella as they did chocolate. Personally I thought this was a bonus given the fact a lot of people don't like Nutella. So I changed the name to something that reflected their intensely chocolate, chewily rewarding, chocolate-studded chocolate-kiss topped vibe.
Will they replace my personal favorite in the holiday lineup? We'll see. Actually the tie breaker will be when my son is old enough to taste between the two of them and choose. Though if his tastes are as similar to his father's as his looks are, I'm screwed.
Thankfully I like the alternative almost as much...
* As the picture indicates I made these for Halloween and rolled them in orange sugar before baking. If making for the holidays simply choose another color if desired.
Chocolate Hug Cookies
Adapted from All Recipes
Ingredients:
2 1/2 cups all-purpose flour
1/4 cup unsweetened cocoa powder
1 teaspoon baking soda
1 teaspoon kosher salt
1/4 teaspoon instant espresso powder
1 cup salted butter, at room temp
3/4 cup packed brown sugar
3/4 cup white sugar
2 large eggs, room temp
2 tablespoons vanilla extract
1/2 cup Nutella (chocolate hazelnut spread)
2 cups chocolate chips
2 packages dark chocolate Hershey kisses
colored sanding sugar, optional
Directions:
- Preheat oven to 350 degrees F (175 degrees C). Grease a baking sheet or line it with parchment paper.
- Combine flour, cocoa powder, baking soda, salt and espresso powder in a bowl. Mix with a whisk to break up any lumps.
- Beat butter, brown sugar, and white sugar with an electric mixer in a large bowl until smooth. Beat in eggs one at a time until completely incorporated. Mix in vanilla and chocolate-hazelnut spread.
- Slowly add in flour mixture and stir just until combined. Fold in chocolate chips. Use a small cookie scoop to keep the cookies a uniform size and roll each scoop of dough between your hands to form a ball. Roll the ball in sugar, if desired.
- Bake in preheated oven until edges look dry and cookies are fragrant, about 8-9 minutes. Press a chocolate kiss in the center and let cool slightly on the sheet before transferring to a wire rack to cool completely.
Tuesday, October 29, 2013
Pumpkin Chocolate Chip Coffee Cake
I am a sucker for Halloween themed cookbooks. Most of these impulse purchases end in disappointment, the books full of gimmicks and fluff. All filler and no substance.
But over the summer I came across 'Ghoulish Goodies' by Sharon Bowers at Half Price Books and have been happily surprised recipe by recipe. These Chocolate Chip Pumpkin Bars, which I baked in an 8x8 inch ceramic dish to make them more cake-like, are honest to God delicious.
She sells them as being adult oriented with the whole wheat flour and spices. I sell them as one of the best coffee cakes I've ever had. Even my husband who is VERY
So tis the season for pumpkin and things that go bump in the night and baked goods that help you get through a 3 am feeding followed by another at 4 am and 5:30 am. Did I mention my baby is a vampire?
One last thing. I added toasted walnut pieces which I think turned these up to 11. You know you're getting old when you're tempted to add nuts to about every baked good. I can remember being little and wishing like hell my mom had left them out!
Pumpkin Chocolate-Chip Bars (or Coffee Cake)
Ingredients:
1 1/2 cups all purpose flour
1/2 cup whole wheat flour
1 teaspoon baking soda
1 teaspoon kosher salt
2 teaspoons ground cinnamon
1 teaspoon ground ginger
1/4 teaspoon ground nutmeg
1/4 teaspoon ground cloves (I was out so used more nutmeg)
1 cup (2 sticks) salted butter, at room temp
1 cup granulated sugar
1/2 cup firmly packed brown sugar
1 egg, room temp
2 teaspoons vanilla extract
1 cup canned pumpkin puree (not pie filling)
1 (12 oz) package (2 cups) semi sweet chocolate chips
3/4 cup to 1 cup lightly toasted walnut pieces, if desired
Directions:
Preheat oven to 350. For bars, grease a 9x13 baking pan and set aside. For coffee cake, grease an 8x8 ceramic pan with nonstick spray and see my tip below.
Combine the all purpose flour, whole wheat flour, baking soda, salt, cinnamon, ginger, nutmeg and cloves in a medium bowl.
Beat the butter, two sugars, egg, and vanilla in a large bowl with an electric mixer until smooth. Mix in the pumpkin puree until well combined, then add in the flour mixture in about 3 parts, beating each time until just combined. Use a wooden spoon to fold in the chocolate chips and walnuts then spread the batter which will be a bit on the thick and dry side evenly into the pan.
Bake for 35 minutes, until lightly golden and set.
Alisa's Tip:
For a cake like consistency instead of bars, Bake in a well greased 8x8 ceramic or glass pan at 350 for 20 minutes. Reduce heat to 325 and bake another 10-15 until the sides begin to turn dark but the middle is still quivery. Reduce heat to 300 and bake another 15 or until middle is set, entire 'cake' has risen and a cake tester comes out clean.
Monday, October 28, 2013
Happy Halloween Cake
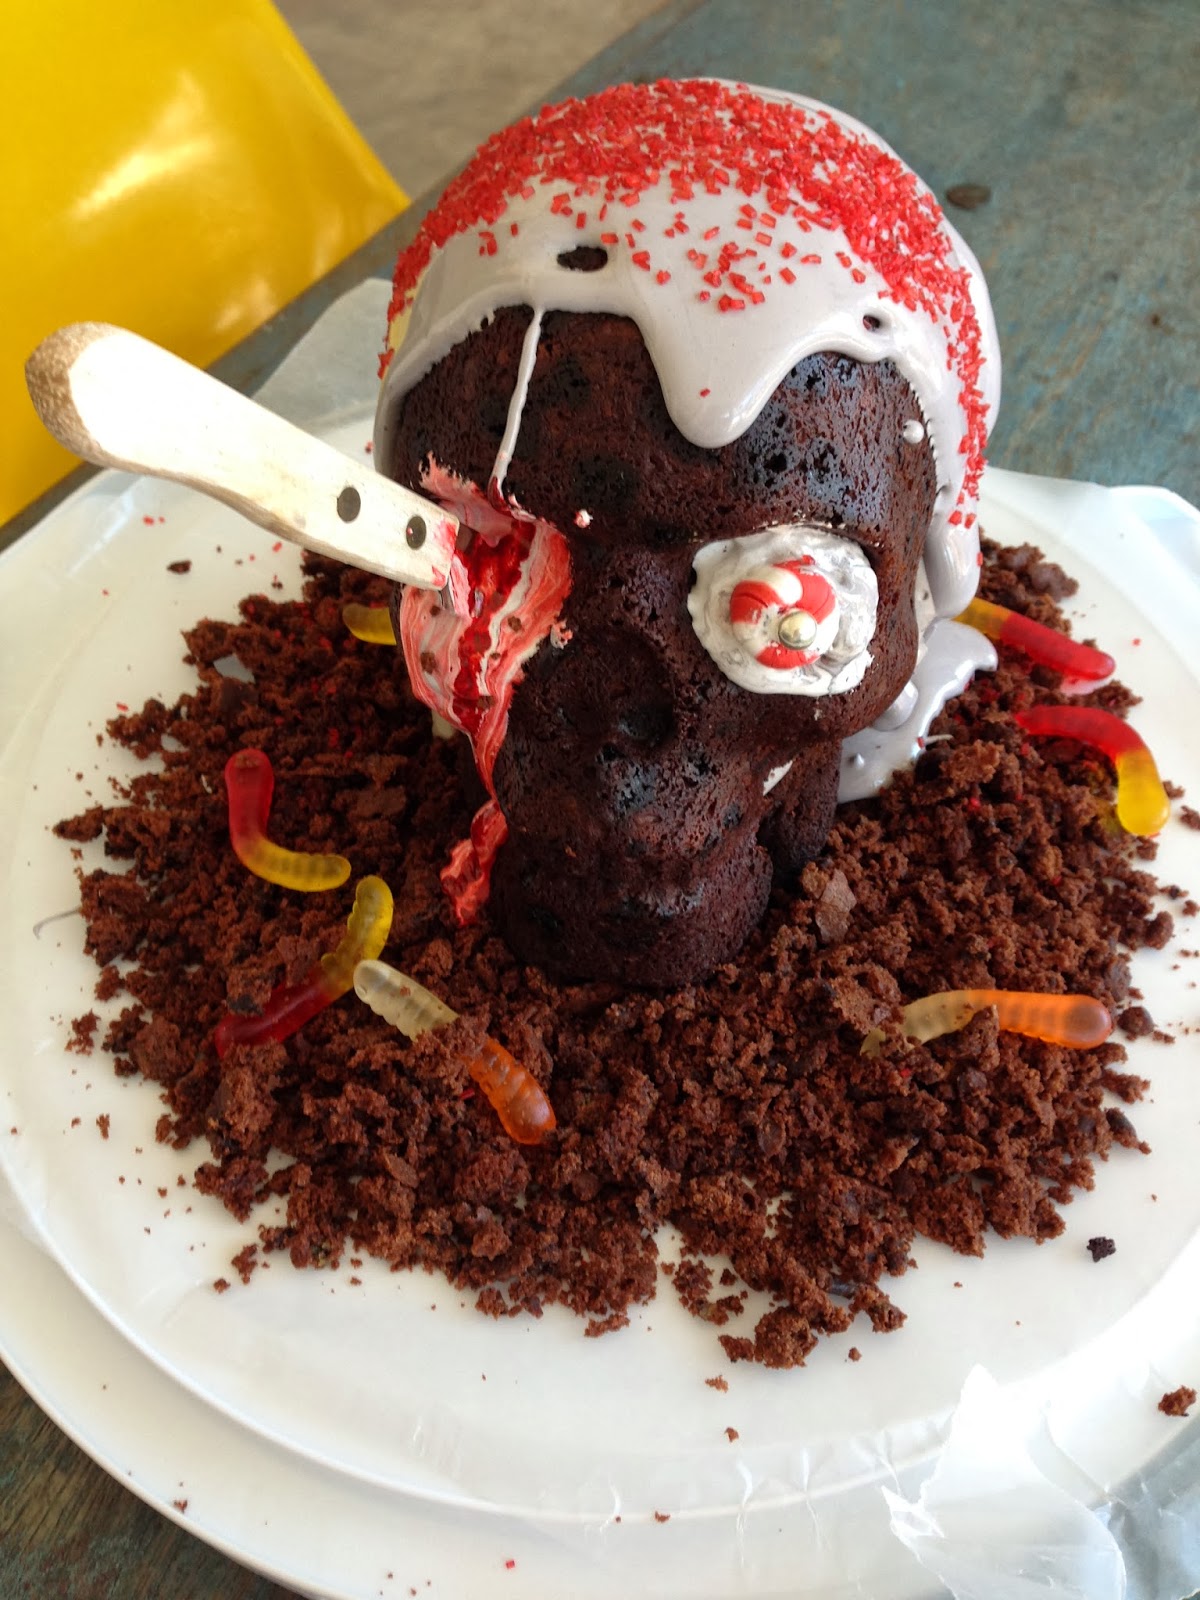
I made this cake for my sister Julie's birthday as she loves Halloween. It was supposed to be a rotting skull buried in dirt with pus oozing out of it. But decorating a cake and 7 week olds don't mix so I ended up over heating the icing which began to ooze instead of hold pustule shapes and before I knew it I had to call it a 'doo-rag' and make him a charred dirty pirate instead.
I used a chocolate cake recipe from Nigella that never fails me. I love it because it breaks every baking rule you've ever learned about keeping the dry and wet ingredients separate and painstakingly adding the wet slowly into the dry. You just dump everything into a food processor, give it a whirl and call it a day.
And it turns out EVERY time - moist and rich yet fluffy and light - and as a bonus it fit the skull pan perfectly. The pan can be found on sale right now at Williams Sonoma by the way and is worth every penny if you're a pan hoarder like myself. I sprayed it with nonstick spray and dusted it with cocoa powder before pouring the batter in and the cake released easy-peasy.
The cool thing is (yes I said cool thing in relation to cake baking - I'm five) is that you'll need to slice the inner halves of the skull after baking and cooling to make them flush and flat (so that when pressed together to make a skull it's not kattywompus.)
But this excess cake isn't wasted. You can crumple this bit of cake up with your fingers to make the 'dirt' for the skull to sit on. I had bought a packet of Oreos to grind up to use and found I didn't need to - I had delicious cake dirt!
The icing is where I took a major shortcut with Marshmallow Creme that actually suited my purposes just fine but I bet Pinterest or any other nerdy site could hook you up with an icing that is more profesh if desired.
Well my baby's up from his nap and ready to eat. Until next time - Happy Halloween y'all!
Halloween Skull Cake (Mint Chocolate Chip Cake)
Altered from a recipe by Recipe by Nigellas Lawson, Nigella's Quadruple Chocolate Loaf Cake
Cake:
1 2/3 cups all-purpose flour
1/2 teaspoon baking soda
1/2 cup cocoa, plus extra for dusting pan
1 1/3 cups sugar
1 1/2 sticks soft unsalted butter (I use SALTED)
2 eggs
1 tablespoon good-quality vanilla extract
1/3 cup sour cream
1/2 cup boiling water
1/2 teaspoon mint extract
1 cup Andes mint chocolate pieces or semisweet chocolate chips or morsels
Glaze for decorating/icing:
1 teaspoon cocoa
1/2 cup water
1/2 cup sugar
1 (7 oz) carton Jet Puffed Kraft Marshmallow Creme
Black food coloring, or other for coloring the pirate's 'doo rag'
Red food coloring, for blood
colored sprinkles for decorating doo rag
1 candy eyeball or a round peppermint candy for an eyeball
1 silver or gold dragee for center of the eye (use a dot of icing for the glue onto the candy eyeball)
An old steak knife, for stabbing through one of the eyes
Gummy worms, for planting in the 'dirt'
Special equipment: Halloween skull pan, found at Williams Sonoma
Directions
Take whatever you need out of the refrigerator so that all ingredients can come room temperature.
Preheat the oven to 325 degrees F, putting in a baking sheet as you do so.
Spray both sides of the skull cake pan well with nonstick spray, then lightly but thoroughly dust with cocoa powder. Place the pan on a sturdy flat cookie sheet for stability.
Put the flour, baking soda, cocoa, sugar, butter, eggs, vanilla, and sour cream into the processor and blitz until a smooth, satiny brown batter. Scrape down with a rubber spatula and process again while pouring the boiling water down the funnel. Blend again, add in peppermint extract and give a final whirl. Switch it off, then remove the lid and the well-scraped double-bladed knife and, still using your rubber spatula, stir in the Andes chocolate pieces or chocolate chips or morsels.
Scrape and pour the batter into the prepared loaf tin and put into the oven for 25 minutes. Carefully rotate the pan to the other side then bake for another 10-15 minutes until the cake has risen all the way and 'puffed' but is no longer jiggly in the center. You want to be careful not to over bake this cake as all the detail in the sides can darken the edges and make them crispy if over baked. Using a cake tester or a strand of spaghetti is good insurance if you're iffy.
Remove the cake and let cool on a wire rack completely then carefully invert onto another greased wire rack. When you're sure the cake has cooled all the way, use a serrated bread knife to 'slice' off the undersides of the skull halves ,making them flat. Save these scraps to crumple into 'dirt' onto whatever plate or cake plate you're constructing the cake on making a nice bed for it.
Meanwhile put the syrup ingredients of cocoa, water and sugar into a small saucepan and boil for about 5 minutes, to give a thick syrup. Stir in the marshmallow creme and food coloring getting it to the color you like for the doo rag. Use about 1/4 of this mixture, a tablespoon at a time, to spread on the flat inner side of one of the skulls. This will be your glue to stick them together so don't use so much that it oozes out (though no big deal if it does) and add a little at a time.
Once the cake is together and the creme has set (should happen quickly, this stuff is like edible crazy glue) carefully set the skull into the center of the dirt.
Use the rest of the icing mixture to create either a doo rag or pus or whatever you like. If you let it cool a bit to where it's not so oozy, you can use a fork to drizzle 'brain matter' in little circles over the head. If the mixture gets too hard, gently heat it up over a low flame and stir again until it's smooth and oozy.
Finish decorating to your liking using a candy for an eyeball, more 'pus' in the other eye with a couple drops of red food coloring, and plant the worms in the dirt. Stab a steak knife in the empty pus filled eye socket if desired.
Labels:
Alisa's All Stars,
cake,
chocolate,
Halloween,
holidays,
sweets,
williams sonoma
Sunday, August 25, 2013
Chambord Margaritas and a Baby Shower
My sweet friend Lauren brought these to my baby shower that she and my friends Claire and Kelly threw for me a couple of Sundays ago. What a day! It was absolutely perfect. They picked a whale theme because the baby's wallpaper features whales (pic at the bottom of this post) but kept things minimal and clean with yellow flowers all around and cute jelly bean-filled vases and cupcakes with the whales on them from the invitations that Kelly designed.
My favorite part though (aside from the margs) was Claire reading the 'guess the baby's birth date and weight cards' that also had a little piece of advice for me from all the lovely ladies - all of whom are moms aside from my niece, Brooke.
This absolutely melted my heart into a giant puddle on the floor. I kid you not - I'm going to keep them on hand for those nights when I feel overwhelmed and confused to keep me going. Such a good idea!
Anyway I realize some of you may be like 'baby schmaybe - I thought this was a food blog' so I'll get to the recipe asap. Lauren made these in individual mason jars and brought them over partially frozen with the lids on so that as people came and went they'd still be nice and cool waiting for them on the counter.
The presentation could NOT have been cuter. I felt like I was living in a Pinterest board. But the flavor - holy guacamole. Not too sweet but not too tart, limey with a little fruity Chambord kick. I got to sip on one with my hubby who stuck around to take pictures for us.
The great thing is you can make them ahead and keep them in the freezer. I imagine they would even stay good for a few days this way. So if you're already thinking about Halloween parties - look no further for your party drink. Toss some frozen lychees stuffed with raspberries in as ice cubes and you're in business!
Chambord Margaritas
Courtesy of Lauren Bayne, cofounder of awesome mom site Meet the MILK
Big Batch - makes enough to fill 24 (8 oz) Mason Jars
Ingredients:
- 32 ounces, fluid Water
- 1-½ Tablespoon Lime Juice
- 12 ounces, fluid Can Of Frozen Limeade
- 12 ounces, fluid Tequila - use the good stuff - not some cheapy you used to drink in college.
- 6 ounces, fluid Triple Sec (I like Paula's Orange)
- 8 ounces, fluid Chambord (or More To Taste)
- Cherries or Raspberries, for Garnish
Instructions:
In a large pot or bowl, mix all ingredients, whisk together until completely combined. Give it a taste and adjust to your liking.
This will make enough to fill 24 8-ounce Mason jars. Fill just shy of the top, place the lid on and store in your freezer until ready to serve. (It needs at least 5 hours to get slushy.)
Give it a stir with spoon, add a straw, a cherry and cheers! But don't drink too many or you'll need one of these:

In a large pot or bowl, mix all ingredients, whisk together until completely combined. Give it a taste and adjust to your liking.
This will make enough to fill 24 8-ounce Mason jars. Fill just shy of the top, place the lid on and store in your freezer until ready to serve. (It needs at least 5 hours to get slushy.)
Give it a stir with spoon, add a straw, a cherry and cheers! But don't drink too many or you'll need one of these:
Labels:
Alisa's All Stars,
Christmas,
drinks,
Halloween,
holidays,
margaritas
Thursday, February 28, 2013
Grasshopper Pie
This pie is perfect for St. Patrick's Day, the holidays or during those times when only pie will do. I'm curious - are you a cake or pie type of person? My husband is strictly pie. He'll eat cake but only if it's drowning in ice cream or even better when it's in an ice cream cake.
I'm not so picky. For me cake satisfies that nostalgic 'I want to relive my fifth birthday' craving while pie is more immediately gratifying and sinful - just a good 'ole down and dirty sugar fix. And the older I get the more types of pie I like which is GREAT news for my figure as I begin the downward spiral called the mid thirties. Take that, metabolism!
But of all the pies out there, this may be the most lethal kind. It is so light and fluffy and cool, disappearing like a snowflake on the tongue, that you might trick yourself into thinking it's just a bunch of calorie-free air. Well just go on and think that sweetheart. I for one won't spoil the fantasy.
By the way I had my reservations about using marshmallow fluff. I worried that it would make the pie taste 'fake' or sickly sweet. I've never been happier to be wrong. I also have to add that this was a 'cover my bases' pie I made for Christmas - an extra dessert just in case we blew through the rest. I even used one of those pre-made graham crusts so my expectations were fairly low. And OH the irony - it was the favorite dessert of the night even over the fancy desserts I actually slaved over.
Grasshopper Pie
This pie is so easy you could make it in your sleep. The other great thing about this pie is you can play artist when adding the green food coloring. Add a little as I did for that classic mint green or go whole hog and make it wake-me-up-before-you-go-go-green.
Ingredients:
1 chocolate graham crust (store bought is fine)
1 jar 'jet puffed' marshmallow creme (7 oz)
1/4 cup creme de cacao blanc
1/2 teaspoon mint extract
1 1/2 cups heavy cream
few drops green food coloring, to color preference
silver dragees or colored sprinkles for decorating, optional
Directions:
In a medium/large bowl, mix together the marshmallow creme, creme de cacao, and mint extract. Set aside while you whip the heavy cream in a standing mixer or in another bowl with a hand held mixer until the cream holds soft peaks. Gently fold the whipped cream into the marshmallow mixture then add a couple drops of food coloring and gently stir to mix. Pour into the prepared pie crust and refrigerate at least 4 hours until firm. Decorate with dragees or sprinkles if desired before serving.
You can also freeze the pie if you like more of a frozen texture or for just a few minutes if it needs firming up before slicing but I personally like it straight from the fridge with that soft as air texture that the fridge gives it.
Labels:
Alisa's All Stars,
Christmas,
Halloween,
Make Ahead,
pie,
St. Patrick's Day,
sweets
Tuesday, January 11, 2011
Nigella's Chocolate Gingerbread Cake
I made this for Christmas and while it was absolutely delicious I feel it got lost in the shuffle with all the other sweets flying around. Next year I'll make it for Halloween because I can't help but feel that that's the holiday it was meant for. After all if this dessert were a Halloween costume, it would be the 'naughty nurse' outfit favored by college girls and cougars.
And while Nigella says the flavors might be too much for children, I disagree. It's basically a super rich chocolate sheet cake with a little something extra you can't quite put your finger on. Not really spicy like you would expect, just unapologetically chocolate-y with a pleasantly damp, squishy crumb.
A word of warning - the cake isn't much to look at after it's baked but don't fret. The pourable icing gives it an instant makeover (not accurately depicted by the above image, taken by me via iPhone while a bit tipsy at a holiday party...and on a paper plate no less.)
Nigella's Chocolate Gingerbread Cake
From Feast by Nigella Lawson
Makes about large 12 slabs, but smaller servings are nice too as its so rich.
Ingredients:
1 1/2 sticks butter
1 cup + 2 T dark brown sugar
2 T granulated sugar
3/4 cup golden syrup (such as Lyle's Golden Syrup) or light corn syrup
3/4 c. molasses
1/4 tsp ground cloves
1 tsp ground cinnamon
2 tsp ground ginger
1 1/4 tsp baking soda
2 T warm water
2 eggs
1 cup milk
2 cups flour
1/3 cup unsweetened powdered cocoa
1 cup (or more) semi sweet chocolate chips
For Frosting:
2 c. powdered sugar
2 T butter
1 T unsweetened cocoa powder
1/4 c. ginger ale (I used Dr. Pepper as it's what I had on hand)
Directions:
Preheat oven to 325. Line a baking pan (10X13 pyrex) with parchment paper (so that you can lift it out later.)
In a large saucepan or dutch oven, melt the butter with the sugars, syrup, molasses, cloves, cinnamon and ginger.
In a separate cup or bowl, dissolve baking soda in warm water.
Take the saucepan off heat and add eggs, milk and soda/water mixture. Stir in flour and cocoa, reserving 2 T or so of the flour.
Toss the chocolate chips in the reserved flour, then fold in floured chocolate chips.
Pour the batter into the parchment lined pan and bake about 50-55 min until risen and firm. The middle should still be a little damp under the set top, and will sink a little. Let cool in the pan.
While the cake is cooling, melt the butter, cocoa and ginger ale for the frosting in a small heavy based saucepan. Whisk in the powdered sugar and remove from the heat.
To frost, either remove the cake from the pan, fold down the paper, and pour frosting evenly over the cake (or you can just leave it in the pan and pour over there, removing it to cut up later.) Let frosting set for a few hours or overnight then cut into large slabs.
Wednesday, October 27, 2010
Sandra Lee's Halloween Episode - a Doozie!!

Please tell me someone else watched Sandra Lee's Halloween Semi Homemade episode. Not only was there a record breaking number of costume changes but she even reprised Cher as a fortune-telling gypsy! I was nearly in tears. I even had to pause and rewind as she showed us cocktail stir sticks with feathers glued on them. Feathers? In a drink? Really?
For the record I have nothing against Sandra Lee and appreciate the fact that she pulled herself up by the bootstraps and made a fortune out of 'tablescapes' and recipes with canned pie filling but I normally don't watch her show or make her recipes.
Her Halloween episodes however are another story. They might very well be on my top ten list of things to look forward to in the calendar year. Anyone who saw her Halloween special with Tyler Florence knows what I'm talking about... She kept calling him honey and warning him not to burn himself as if he was ten years old versus an experienced chef and head of his own cooking empire... Oh Sandy.
Anyway the point to this ramble is that while I was falling out of my chair watching this year's episode she made a chicken marinade I actually thought sounded good. So I made it (with just a minor tweak here and there) and was blown away. Sandra Lee tricked me! She made a good recipe!
Sandra Lee's Poultry Marinade
*Marinade should hold up to 6 small chicken breast cutlets or 4 large.
* Slightly adapted from Sandra Lee
* You can read more on Sandy's Halloween Episode from this year at Food Network Humor.
Ingredients:
1 (6-ounce) can tomato paste
1/4 cup olive oil
1 1/2 cups low sodium chicken broth
1/4 cup Worcestershire sauce
2 tablespoons applewood rub (recommended: McCormick) (I subbed 1 teaspoon cumin and 1 teaspoon dried thyme)
1 tablespoon apple cider vinegar
1 heaping cup roughly chopped onion
1 1/2 tablespoons roughly chopped garlic
1/2 teaspoon kosher salt
1/4 teaspoon fresh cracked black pepper
Instructions:
Mix all ingredients together in a large bowl then carefully pour into a large ziploc bag. Add your chicken turning it over in the marinade to be sure it's well coated, seal and refrigerate overnight. Remove from marinade being sure to scrape off any clinging garlic or onion but do not 'dry' the chicken - you want a good bit of the wet marinade to stay on for flavor while they cook.
Drizzle the chicken lightly with olive oil, season lightly with salt and pepper and either grill over medium heat until cooked through or bake on a greased baking sheet at 400 degrees for 35-40 minutes until cooked through.
Monday, October 25, 2010
An Alternative to the Great Pumpkin - Persimmon Spice Bread
I am lucky enough to have a persimmon tree in my front yard. Persimmons are strange little fruit that take FOREVER to ripen. If you pluck a green one from the tree early in the summer and bite into it, it will suck all the saliva from your soul. Seriously. But if you wait for them to turn orange then more and more orange until the skin begins to take on the transparency and delicacy of a tomato then you are in for a treat. Like I said they are a strange little fruit, tomato-y in texture but with the sweet, mellow flavor of a fig crossed with a pear (at least in my opinion.)
They make lovely bread and muffins and even martinis as recently featured on the wonderful blog Lisa is Cooking. It was a little too early in the day (10 am) for me to make martinis with mine so I chose a quick bread recipe from All Recipes, added some orange zest and ground cloves, and ate a warm slice covered in butter.
Persimmon Spice Bread
* Adapted from All Recipes
* This bread does get a little dark around the edges. Don't fear - this is normal, yet be sure to not over bake.
* You could probably substitute pumpkin for the persimmons if they are not available to you.
Ingredients:
2 eggs
1 1/2 cups all-purpose flour
3/4 cup white sugar
1/2 teaspoon salt
1/2 cup vegetable oil
1 teaspoon ground cinnamon
1/8 teaspoon cloves
1 cup persimmon pulp (skin and seeds removed)
1/2 cup chopped walnuts
1 teaspoon baking soda
1/2 cup dried cranberries
zest of 1 orange
Directions:
Preheat oven to 325 degrees F (165 degrees C). Spray a 9 x 4 inch pan with cooking spray and set aside.
In a small bowl, combine flour, cinnamon, cloves, salt, nuts, and cranberries.
In a large bowl, blend eggs, sugar, and oil. Mix baking soda into pulp, and add to sugar mixture. Fold in flour mixture. Finally stir in orange zest being careful to not over mix. Pour batter into prepared pan. Bake 55 minutes then test for doneness by inserting a sharp knife (it should come out free of wet batter.) If not ready, return to the oven for another 10-15 minutes and check again.
Saturday, October 31, 2009
Halloween Recipe Pairing - Eleanor's (Dough) Nuts for The Haunting


"No one lives any nearer than town. No one will come any nearer than that." - Mrs. Sanderson from The Haunting, 1963.
Happy Halloween, y'all! Today's post is inspired by the 1963 version of The Haunting, and comes from The Noble Pig, a gorgeous food blog you can find in my list of favorite blogs. I changed the flavor of doughnuts from banana to pumpkin for Halloween and nick named them 'Eleanor's 'Nuts' for the character Eleanor in the film. As you can guess, the woman is a few cards shy of a full deck, and the genius of the film is watching her lose what's left of her sanity, scene by scene, inside of a reportedly haunted house. Again I'm talking about the original - the remake was a pile of horse poo.
Switching topics, when I was growing up in Houston, we had a neighbor who made homemade doughnuts for the neighborhood kids every Halloween. As you can imagine, they had a steady line outside of their house from the time the kids got out of school until 10 p.m. And in my memory, you could smell those fried beauties for blocks and blocks - the scent of cinnamon and vanilla tossed up like confetti into the crisp, fall air.
Don't get me wrong - I adore Halloween, even children on Halloween, but I don't think there's enough wine in the whole world to keep me standing over a deep fryer for 8 hours straight. God bless those old neighbors!
Did you have any neighbors when you were growing up who made anything special for trick or treaters?
By the by - this is my 13th post for October...spooky :O
Eleanor's (Dough)Nuts!
(Really baked pumpkin doughnuts from The Noble Pig), Adapted from Bake Sale Recipes.
8 oz pumpkin puree
2 egg whites
1 Tablespoon vegetable oil
1 cup packed brown sugar
1-3/4 cups all purpose flour
1/2 cup whole wheat flour
2 teaspoons baking powder
1/2 teaspoon baking soda
1/4 teaspoon pumpkin pie spice
1 Tablespoon granulated sugar
2 Tablespoons chopped walnuts
Beat pumpkin, egg whites, oil and brown sugar in a large bowl. Add flours, baking powder, baking soda and pumpkin pie spice. Mix until well blended. Let stand for five minutes for dough to rise. Scoop out heaping tablespoonfuls of dough onto a greased baking sheet.
With the tip of a butter knife round out the doughnut holes in the center of the dough. Then use the butter knife to smooth outside edges of dough into round doughnut shape. Repeat until all dough is used.
Sprinkle with granulated sugar and walnuts. Bake 6 to 10 minutes (mine took 8) in a 425 degree oven or until tops are golden.
Remove from pan and place on a wire rack to cool.
* Noble Pig says - I decided to drizzle some icing on them as well. It was the perfect addition. I used a 1/3 cup powdered sugar and 2 Tablespoons of milk.
Labels:
breakfast,
Halloween,
movie themed,
sweets
Monday, October 26, 2009
Halloween Recipe Pairing - Seventh Sin Pie and Dragonwyck
In the 1946 classic movie Dragonwyck, Vincent Price plays an eccentric land owner in upstate New York who begins courting his own cousin while still married to his gluttonous wife. (SPOILER ALERT!) In fact, in an effort to speed up the process of this courtship, he feeds his wife a piece of poisoned cake. "More cake, Johanna?..." Twisted yes, but if you like old films and even historic films I recommend this one. I think it's one of Vincent's best (as a side bar - Vincent was quite the gourmand himself having published two cookbooks and hosting his own cooking show...)
The movie directly triggered the invention of this pie. I wanted to make something so over the top and decadent that it could lure even the most sweet resistant person to their downfall. I call it Seventh Sin Pie. And since the topic is already morbid, I'll go ahead and say I'm taking it to the grave as one of my most proud accomplishments along with my pork enchilada recipe and my ability to chew gum imperceptibly during meetings.
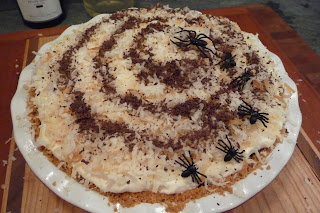
The pie begins with a graham cracker crust then has a layer of pumpkin pie filling, then a layer of rich, thick chocolate custard, followed by a layer of vanilla and oreo custard, then a layer of semi sweet chocolate chips, then a layer of fresh sweetened whipped cream and finally (are you still with me?) - a layer of toasted coconut. Obviously, you can leave out any layer that doesn't ring your bell and substitute with something else, or just use the entire recipe for the pumpkin filling (you'll have leftover that you can either make into a smaller trifle or pie. I would have cut the recipe in half but what's the point in saving a half a can of pumpkin?)
Serve this to someone you love...or despise.
Seventh Sin Pie
* You'll need a 10 inch deep dish pie dish for this. I use my Emile Henry which is a brand I highly recommend.
Makes 1 (10 inch) Pie.
* I hereby give you fair warning that this recipe is a time sucker so baker beware. The saving grace is that you can prepare the pie up to the vanilla custard layer then let set in the fridge overnight before finishing. That way all you have left is to sprinkle over the chocolate chips, spread the whipped cream over, and top with toasted coconut...
* The chocolate custard is Nigella's recipe, halved.
Graham Cracker Crust:
1 1/2 cups graham crackers, crushed
1/4 cup sugar
1/3 cup butter, melted
Preheat the oven to 375.
In a small bowl, combine the crumbs and sugar; add the butter and blend well with a fork. Spray your pie dish with nonstick spray, then carefully dole out the graham mixture evenly over the bottom. Ideally, using a soup ladle (I find this helps me not pack the crumbs too heavily as with my fingers so you don't end up with a baked graham cracker brick), evenly and gently press the crust into the bottom and up the sides of the plate. You'll think it'll never make it up those sides, but it will, just keep at it patiently but sternly like you would a stubborn child. If any crumbs break off, just carefully pick them up and press them back into the walls of the crust at the top. Once formed, bake for 8 to 10 minutes until the crust is lightly brown. Cool on a wire rack before filling. While the crust bakes, then cools, you can start the first layer of pumpkin on the stovetop, as follows.
Layer 1 - Pumpkin Pie:
* You'll only use half of the prepared recipe for your pumpkin layer - unless you decide to omit one of the other layers.
1 (.25 ounce) package unflavored gelatin
1 teaspoon ground cinnamon
1/2 teaspoon ground ginger
1/2 teaspoon ground nutmeg
1/2 teaspoon salt
1 (14 ounce) can sweetened condensed milk
2 eggs, beaten
1 (15 ounce) can pumpkin puree
In a heavy saucepan combine gelatin, cinnamon, ginger, nutmeg, and salt. Stir in condensed milk and beaten eggs, mixing well. Let stand one minute, then place on burner over low heat, stirring constantly for about 10 minutes, or until gelatin dissolves and mixture thickens. Remove from heat and stir in pumpkin, mixing thoroughly, and pour mixture into the prepared graham cracker crust. Place in the fridge to chill while you start your chocolate custard (you can cover lightly with a sheet of plastic wrap if desired.)
Layer 2 - Chocolate Custard:
2 ounces bittersweet chocolate, minimum 70 percent cocoa solids, chopped
2/3 cups plus 1/2 tablespoon milk
2/3 cups plus 1/2 tablespoon heavy cream
4 egg yolks
1/4 cup plus 1/2 tablespoon sugar
1/6 cup cocoa
Melt the chocolate on low to medium heat in the microwave, checking after 1 minute, though it will probably need a little more. Or you can place it in a bowl over a pan of simmering water. Once the chocolate is melted, set it aside while you start the custard.
In a saucepan warm the milk and cream over low heat, being careful to not let it form a skin (stirring prevents this.) Whisk the egg yolks, sugar, and cocoa in a large bowl. Pour the warm milk and cream into the bowl in three batches, swiftly whisking it into the yolks and sugar mixture to prevent the eggs from curdling. Stir in the melted chocolate, scraping the sides well with a rubber spatula to get all of it in, and pour the custard back into the rinsed saucepan. Cook over a medium heat until the custard thickens, stirring all the time. Make sure it doesn't boil, as it will split and curdle. Keep a sink full of cold water so that if you get scared you can plunge the bottom of the custard pan into the cold water and whisk like mad, which will avert possible crisis. Once thickened (your spoon should leave a wake in its path), set aside and let cool for 15 minutes (stirring a time or two) before carefully spreading it over the pumpkin layer. Return the pie to the fridge while you start the next pudding layer.
Layer 3/4 - Vanilla Custard with Crushed Oreos:
* Aha! You caught me. I cheated and used a boxed vanilla pudding mix. Of course you can make your own from scratch, but with all the other layers being made from scratch, I gave myself a tiny break here. And to be honest once you stir in the crush oreos, does it really matter? Finally the reason this layer is labeled 3/4 is that originally I kept the pudding and cookies separate, then decided they tasted better combined.
1 box vanilla pudding, such as Jello brand
2 cups whole milk
1 cup crushed Oreo cookies
In a thick bottomed, medium pan, stir the pudding powder into the milk. Bring to medium heat, stirring constantly until the mixture begins to boil. At this stage, DO NOT walk away and continue to stir until it thickens - about another 10 minutes. Remove from the heat and let cool for 5 minutes. Give a good stir and cool another 5 minutes before stirring in the Oreos. Let cool for 15 minutes before spreading over the chocolate layer. Cover with plastic wrap and return to the fridge to chill for at least 5 hours to let all the layers set before adding the chocolate chips.
Layer 5:
1 cup Semi Sweet Chocolate Chips, sprinkled evenly over the vanilla and oreo layer after it has set.
Layer 6:
1 cup of chilled heavy cream, whipped with 1 tablespoon sugar until stiff and spreadable, then spread out evenly over the cooled, set pie (or you can use cool whip)
Layer 7:
1 cup toasted sweetened shredded coconut (baked on 325 for 5 minutes), cooled and spread gently and evenly over the whipped cream layer.
Decoration (OPTIONAL): Freshly grated chocolate, sprinkled in any patter over the pie, or evenly over to finish. Plastic spiders to warn friends and family what they're in for!
Labels:
Alisa's All Stars,
Halloween,
movie themed,
pie,
sweets
Saturday, October 24, 2009
Halloween Recipe Pairing - Scooby Doo and Scooby Snacks
Scooby Doobie Doo...Where are you...
To this day I adore this show (aside from the Scrappy episodes - not a fan.) And when I have downtime during the fall, I love to put in a dvd of this 70's classic, particularly while I'm whipping up some Halloween recipes. And as far as Scooby snacks - something you can NOT get enough of - I volunteer these Ranch flavored oyster crackers. My old neighbor, Cassie, would make these growing up and I thought they were crack cocaine in edible form, even at the age of 13. Oddly enough, my husband doesn't find them as scrumptious as I do, and suggests they would work better as croutons. While I think this is a novel idea, what the hell is wrong with the man?
Scooby Snacks (Ranch style crackers)
Ingredients:
1 (10 oz pkg) oyster crackers
1 (1 oz pkg) Ranch dressing mix (the dry powder form)
1/2 teaspoon dried dill
1/4 teaspoon kosher salt
1/2 cup vegetable oil
Directions:
Preheat your oven to 275. Grease a large, rimmed baking sheet with nonstick spray and set aside. Place the dressing mix, dried dill, salt and oil in a large mixing bowl and mix thoroughly. Add the crackers and stir for several minutes (sounds ridiculous, but you'd be amazed at how long it takes those damn cracker to soak up that oil) until there is no longer excess dressing at the bottom of the bowl and the crackers have given into its power. Spread them out on the prepared baking sheet and bake for 15 minutes, or just until lightly golden. Cool on the sheet then serve or transfer to an air tight container and store for up to 1 week.
Monday, October 5, 2009
Halloween Recipe Pairing - Butternut Squash Salad with Basil and Pumpkin Seeds for It's the Great Pumpkin, Charlie Brown!

What would Halloween be without Charles Schulz's classic animated feature - It's the Great Pumpkin, Charlie Brown!
This little short has been a part of my life since I can remember. I'll never forget the thrill of waiting for it on TV when I was little, constantly hounding my mom about when it would be on until AT LAST - it arrived (thank goodness we had VHS so she could record it and to be fair I'm sure my first few memories of it were pre-recorded on this now defunct form of capturing cellouloid...)
I watched it diligently, all throughout childhood and the arrival of hormones (when I abandoned my first and true love - horses) then even through college and all the way up to right now. In fact - I'll never forget the time my brother came to visit me at UT and we had to wait until it came on before we headed out to the infamous 6th Street to commence with our October debauchery. It was that important, to both of us.
Poor little Linus and his feverish anticipation for the Great Pumpkin signified fall to me. And tradition. And...life - with all its buildups and occasional disappointments.
And even though I have it on DVD now, I'd still rather catch it on TV. It just feels more special. I think the magic of this little film is that it captures the feeling of fall. Fall, unlike the hedonistic abandon of summer whose seduction is obvious (an excuse to wear less and stay awake longer), is finicky. It is far more bewitching with its blustery winds, crimson colored leaves and whispers of apple pies and roasted turkeys. In essence - it's the redhead of seasons. Even if it's not your cup of tea - you still find yourself caught up in its web. And happy for it.
Well, if there's a recipe that captures the feeling of fall - it's my roasted butternut squash, basil, goat cheese, and pumpkin seed salad. Long list of ingredients, maybe, but SO easy you'd be a fool not to try it. That said - I'm a complete hypocrit as I like to purchase the already cut up butternut squash found in the veggie refrigerated section of my grocery store. Yes, it might be a little dried out compared to a freshly hacked up bit of squash, but you can always trim off any dried ends with your handy paring knife. And roasting forgives so many imperfections, much like a tanning bed;)
Few salads have the power to move me in this way - I get a bit emotional over this one and it's embarrassing. Something about the sweetness of the caramelized roasted squash against the sharp tang of the goat cheese and balsamic... It's a flood to the senses. Which is what fall is all about, right?
Butternut Squash Salad with Basil and Pumpkin Seeds
Ingredients:
1 small butternut squash, peeled and cut into 1 inch chunks (or a package of precut butternut squash - about a 1/2 pound)
2 teaspoons olive oil, plus 1/2 teaspoon
kosher or sea salt for seasoning
3 oz goat cheese, broken up with your fingers
pinch red pepper flakes
1/4 cup pumpkin seeds
1 large handful fresh basil leaves, rinsed and dried and torn if desired
1 teaspoon balsamic vinegar
sea salt or kosher salt, optional
Instructions:
Preheat oven to 400 (375 if your oven runs hot.)
Spray a large, rimmed baking sheet with nonstick spray and add your cut butternut squash to it (pan should be large enough so that each chunk has its own space to brown.) Drizzle over your 2 teaspoons of olive oil, a good pinch (1/2 teaspoon) of kosher or sea salt, and red pepper flakes (to taste) and mix all around with your hands making sure each piece gets anointed with the oil and seasonings (you might need a touch more oil - use your judgement.) Place in the oven for 20 minutes then remove and carefully flip each piece to the other side with a spatula. Return to the oven for another 15-20 minutes, until deep and dark on the other side (I even like them a little 'blackened' but you might not so check early and often.)
Remove from the oven and transfer to a large salad bowl. Add in the goat cheese, pumpkin seeds and basil then give a light toss. Drizzle over the balsamic vinegar and oil (and more salt if desired), toss again and serve.
Labels:
Halloween,
movie themed,
salad,
side dish,
vegetarian
Halloween Recipe Pairing - Spicy Adobo Turkey Burgers with The Curse of the Crying Woman

Curse of the Crying Woman, or La Llorona, is a classic Mexican horror film from 1963. If you like your horror with a bit of camp and oodles of atmosphere - you can't do much better than this. Not that I'm knocking it - believe me. For the genre many consider this film right up there with the likes of Bava. But for non film geeks - all you need to know is that the plot involves witchcraft, an old decaying mansion, and a beautiful heroine whose aunt wants to kill her. In short - all the ingredients of a great Gothic horror film!
These burgers are actually served in tortillas, and can be made even spicier if you like. Just add a little more minced chipotle in adobo, But remember - I warned you...
Spicy Adobo Turkey Burgers
Serves 5.
Ingredients:
1 (1.3 lb) package ground turkey, preferably 93% lean versus 97% or 99%
1/2 teaspoon kosher salt
2 1/2 teaspoons ground cumin
2 teaspoons minced chipotle chilis, from a can of chipotles in adobo sauce
4 tablespoons minced cilantro plus extra for topping
3 tablespoons minced green onions or chives
5 flour tortillas, wrapped in foil and warmed in a low oven
Shredded cheddar cheese for topping
2 ripe avocados, skin removed and cut into slivers for topping
Instructions:
Place the ground meat in a large bowl, breaking it up a little with your fingers so you can season it more evenly. Sprinkle over the salt and cumin then give a quick mix with your fingers to incorporate (don't go overboard - you don't want to overwork the meat.) Sprinkle over the minced chipotle, cilantro and green onions distributing evenly over the meat, then fold the ingredients in with your fingers just until evenly distributed.
Form into 5 patties and set aside.
Heat a large nonstick pan over medium heat and spray with nonstick cooking spray. Add the burgers, distributing evenly in the pan and cook for about 5 minutes before flipping. Cook another 4-5 minutes, then lower the heat to low to let cook all the way through for about another 3 minutes.
Serve the burgers in the warm tortillas, sprinkling with cheese and topping with the cool avocado slices and fresh cilantro, if desired.
Thursday, October 1, 2009
Happy October Everyone!

I wanted to let you know that in addition to the Slow Sunday Suppers that I'll be posting each Sunday in October, I'll also be featuring several Halloween themed recipes throughout the month along with a movie that inspired the recipe.
So get ready for some spooky October recipe ideas...if you dare!
Labels:
Halloween
Tuesday, November 4, 2008
Halloween Party Recap


Every year around September, I become possessed by the urge to have a Halloween party. The pattern of possession is always the same - weeks spent planning the invite, menu, and beverages, followed by the actual making of the recipes and the inevitable panic the night before as I frantically run around cleaning and decorating, thinking to myself 'why oh why God did I do this??? Party planning and hosting is for house wives - NOT for people who work 80 hours a week!!!'
But finally, ready or not, the party commences and I have the time of my life. Each year I'm dazzled by the creativity of my guests' costumes and their own willingness to regress back to childhood for the evening. Take a look at the pics - we had everyone from The Joker to 'Joan' from Madmen to Slash to a Stepford Wife to TGIFridays bartenders (who brought their own kamikazees which they poured for us all evening) to vice pres nominee Sarah Palin!
And by the end of the nigh - or morning as has been the case the last couple of years - I'm already dreaming of next year's party. (Much like child birth, I've already magically forgotten any pain I had endured. See - it really is possession!)
Anyway, I've included most of the food from this year's party and if you're surprised by how white trash/unsophisticated the recipes are - don't be. I promise you that's what people want when they're doing serious imbibing. The Tiki Snack Mix I made from the November issue of Bon Appetit was my most experimental dish and suffered, in my opinion, from the severe humidity brought on by torrential downpours we had that evening. (Notice how the skunk in one of the photos has a towel wrapped around his head - he arrived soaked to the bone as did several other devoted party goers.)
The cheese ball that I put into a brain mold and covered in black poppy seeds disappeared by midnight and as usual, the belles of the ball were my sausage cheese balls which I've included as well.
I wish you all a belated Happy Halloween!
Sausage Cheeseballs (for Halloween, I like to make them with spicy sausage and call them 'Devil's Balls' Hee Hee!)
Ingredients:
1 lb ground sausage
1 lb grated sharp cheddar cheese
1 and 1/2 cups Bisquick
2 shakes red pepper flakes
1 teaspoon Wousteshire sauce
¼ teaspoon ground Coriander
¼ teaspoon ground dried garlic
½ teaspoon hot English mustard (powder form such as Coleman’s brand)
pinch sea salt or kosher salt
Preheat oven to 350. Mix all ingredients in the food processor until well blended. Form into 1 inch balls and bake on a cookie sheet (only greased if you're making them from the freezer) at 350 for 15-20 minutes, until tops are just golden brown and bottoms are a rich, dark brown.
* These are so easy to do if you make and bake them a week or month ahead, then freeze them (after they've cooled) in Ziploc bags. Just pull them out of the freezer and bake them the same way as if they were fresh to heat through on a greased pan.)
Curried Ham Wraps
Ingredients:
4 oz cream cheese, softened
1/2 garlic clove, minced
1/4 teaspoon curry powder
1/4 teaspoon ground mustard
1 cup peeled, shredded tart apple
4 (6 inch) flour tortillas
8 thin slices Black Forest ham
In a mixing bowl, beat the cream cheese, garlic, curry powder and mustard. Stir in apple. Spread about 2 tablespoons over each tortilla. Layer with 2 slices of ham. Roll up tightly and wrap in plastic wrap. Refrigerate for at least 2 hours. Cut in half on the diagonal and serve stacked onto a plate with chives strewn around as garnish.
White Trash Cheese Ball (or 'The Brain' as it was for the party)
Ingredients:
2 (8 ounce) packages cream cheese, softened
3 1/2 cups shredded sharp Cheddar cheese (I used white Cheddar, to look more like a brain)
1/2 of 1 (1 ounce) package Ranch-style dressing mix
2 heaping tablespoons sour cream
Blend all in a food processor until smooth. Transfer to a cheese mold or using your hands shape into rounded ball and cover with plastic wrap. Refrigerate at least 4 hours (these are great to make the night before.) Cover with poppy seeds, chopped pecans or other nuts if desired before serving.
Subscribe to:
Posts (Atom)